CBT Bazar

Tips & Tricks, Tutorials, Hacking, Troubleshooting,

CCTV Installation and Repair Services in Vijayawada
Repairs/recondition/upgradation @ best quality & price.

All brands - Any problem like

1.    CCTV Installation and Services
2.    CCTV Camera Remote access problem
3.    CCTV Camera Video not clear
4.    CCTV DVR not recording
5.    CCTV Camera Network problem
6.    Cleaning of camera and DVR units
7.    Fixing Position Cameras
8.    Install any wired cameras and wifi cameras
9.    Upgrade Camera, DVR, Wifi Routers and others
10. DVR Repair and Service
11. Mobile view app installations

Contact:
GNB TECHNOLOGIES - A complete system solutions
#41-25-18, BAIREDDY STREET, KRISHNALANKA, VIJAYAWADA.
Please save these phone numbers in your contacts for your present/future needs.

Ph No: 8686465465, 8688465465, 7842949555, 9553670303


Happy Ugadi & Sri Ram Navami
Special Offer At Rs. 150/-


GNB TECHNOLOGIES
# 28-7-6, Shaik Mohiddin St., Arundalpet, Governorpet, VIjayawada


  • Laptop Repair Services
  • Laptop Chiplevel Repair
  • Laptop screens, keyboards, Batteries Replacement
  • Desktops & laptops Chiplevel Repairs
  • Data Recovery
  • Computers AMCs @ 1500/- (Home & Office Systems)
  • Computers & Laptops rentals
  • Buy & Sell Used systems
  • Hardware & Software Support
  • Networking
  • Home Based Service Available

In my previous tutorial, I showed you how to take control of your files and folder in Windows 8. This tutorial will follow the same path, but this time we will see on how to that with Windows 8 registry key. You will need to know how to perform this procedure, because one of our next tutorials will require from you to perform this change.

To get started follow the steps below.
Step 1: From your desktop press Win+R on your keyboard.
Step 2: Inside the Run window that opens up type regedit, and press Enter on your keyboard.

Step 3: When Windows Registry Editor window opens up, inside left pane go to the desired registry key, right mouse click on it and from context menu that appears choose Permissions.

Step 4: New dialog window will open. Click on Advanced button located in bottom right.

Step 5: Under Owner, click on Change button.

Step 6: Type in your username and click on Check Names button. It will automatically convert your username into the correct format.

Step 7: Click OK to save your changes.
Step 8: From Permissions and Display window, select your username and then check Allow checkbox under Full Control row.

Step 9: Again click OK to save your changes, and you will now have full permissions on chosen registry key.

If you are not able to take ownership of a file or folder inside Windows 8, this tutorial will show you how to do that manually. This procedure is the same in all Windows versions, so you shouldn’t have any problems performing it under Windows Vista or Windows 7.

To get started follow the steps below.
Step 1: Open Windows Explorer, and then go to a file or folder on which you want to take ownership.
Step 2: Right-click on that file or folder, and from the context menu choose Properties.

Step 3: When new window opens up, choose Security tab.

Step 4: From the given list, choose your username and you should see that it does not have full control.
Step 5: With username selected, click on Advanced button.


Step 6: Now, click on Change button located next to Owner.

Step 7: Under Enter the object name to select field, type in your username and click on Check Names button. Your username will automatically be converted to the correct format.

Step 8: Click OK to save your changes.
Step 9: Close last two opened windows and return to Properties window you opened in Step 2.
Step 10: Under Group or user names list select your newly added username.
Step 11: Under Permissions for Administrators, click on Allow row for Full control. Click OK to save your changes.

That’s it, you now have full permission on that folder or file.
Visit our Windows 8 Tutorial section for more tips and tricks.

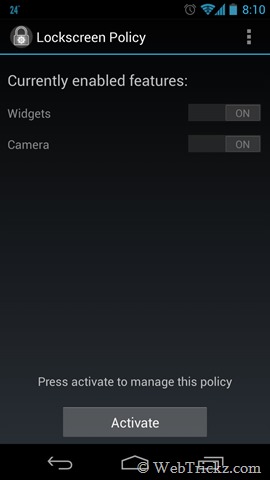
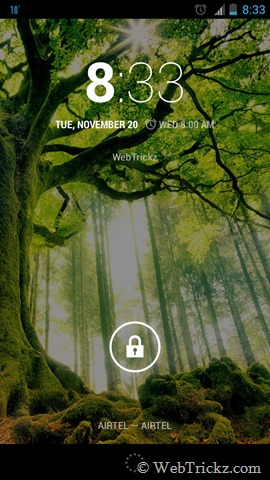
Android 4.2 Jelly Bean brings a variety of new features of which one is the new lock screen widgets. It’s the first time when has introduced widgets to lockscreen on Android,represented by a white rectangle that glows as you unlock the phone or swipe towards the edges while the lock screen is active. Apparently, there are many users who aren’t impressed with this change and prefer the good old lockscreen. The reason can be the annoying behaviour/ UI/ limitation of widgets or the accidentally opening of camera. Luckily, there is a nifty app available on the Play Store that allows users to easily turn off the new lock screen features in Android 4.2, i.e. the widgets and the camera.

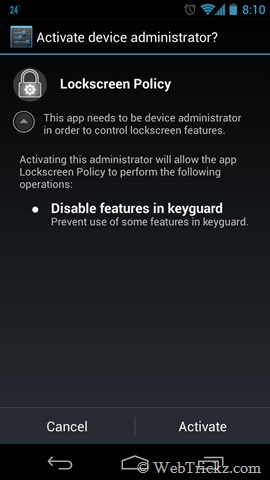
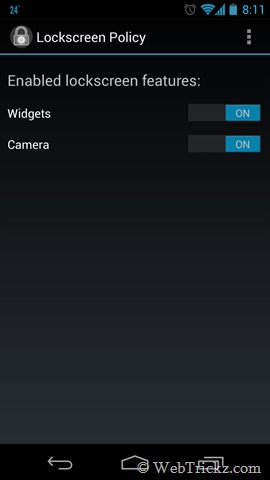
Lockscreen Policy is a free app that lets you disable widgets and/or camera access on the lockscreen under Android 4.2. One can simply toggle on/off the widgets and/or camera with this handy app that doesn’t requires root. However, one limitation is that you wont be able to access the camera anymore directly from the lock screen as was possible in earlier version of Jelly Bean. Right now the app makes the stock clock widget the only widget, which you cannot change. The app requires no permissions other than device administrator in order to control lockscreen features. Includes support for: Galaxy Nexus, Nexus 4, Nexus 7 and Nexus 10.
Screenshot_2012-11-19-20-10-50    Screenshot_2012-11-19-20-11-00
Screenshot_2012-11-19-20-11-27    Screenshot_2012-11-20-20-33-58
To uninstall, uncheck the application from the ‘Device Administrator’ list under ‘Security’ in your ‘Settings’ application on your device.

Download Lockscreen Policy [Google Play]

If you got bored with simple design of Google Chrome new tab, there is an easy way to make it more interesting with app called Awesome New Tab Page. With this app you can add much more functionality (or shortcut links to applications) to the new Google browser tab and in this tutorial I will show you how.


With Microsoft’s Metro looks like interface, Awesome new tab Page allows you to customize the new tab and even add widgets. Installation is as simple as adding the app from the Chrome app store. Once done, you will see that, when you click on the new tab option, space appears completely configurable.
To organize things, you need to unlock them by clicking on lock icon located at the left side of your screen. Then you can move, delete or edit anything you like.

To create a new icon, you must click on one of the empty boxes. Then enter the URL you want to target and add 128 x 128 pixels icon to customize the appearance of the link.

If we wish to add more useful features inside new tabs, you can download additional widgets from the Download Widgets section located at the left side of your screen.

The little effort you need to spend in customizing Google Chrome new tab is worth, because you will have a very comprehensive menu from which you can access all content you use frequently on your computer. Please share with us your impressions and opinions about this Google Chrome add-on and tell us what you think.

I’ve written a lot about Windows 8 and some of it’s advanced features, but I haven’t yet gone through a detailed explanation of the new Start Screen in Windows 8. It’s obviously a very different experience than the traditional Start Menu, but I’ve gotten the hang of it now.
In this article, I wanted to go through the Start Screen and show you how it can be customized and rearranged to suit your style. I’ll also explain some of the features of the Start Screen and how to access them in Windows 8.

Customizing Start Screen Background and Color

The first thing you can do is simply change the background and color of the Start Screen. If you open the Charms bar, click on Settings, click on Change PC Settings, then click on Start Screen from the Personalize category, you’ll see about 20 different background options and some color choices.
start screen color
These are the only options you get as of right now. For whatever reason, you cannot load your own background or choose a color other than the ones shown above. I personally find a lot of the backgrounds to be terrible because of the crazy floral patterns.

Adjust the Size of Tiles

The next thing you can do is adjust the size of the tiles on the Start Screen. You can right-click on a tile and then choose from either Smaller or Larger depending on the current size of the tile.
smaller larger tile
If you right-click on a tile and it doesn’t have the option for smaller or larger, then that just means the size of that tile cannot be changed. There are only two sizes for the tiles, one that is a square and one that is a rectangle. There is no way to change the tiles to a custom size.

Live Tiles

Live Tiles are a cool unique feature of Windows 8 that will show you real-time updates for an app in the tile on the Start Screen. For example, the finance app automatically updates with the latest Wall Street data and the weather app tile tells you the current weather for your location.
live tiles
Depending on what app you install, you may not care about the live tile. You can right-click on the tile and choose Turn live tile off. This will replace the live info with just an icon for that app.

Number of Rows

With a small registry hack, you can also adjust the number of rows that show on the Start Screen. By default, Windows 8 will choose the number of rows based on your resolution. However, that may not be what you want. You can check out my previous post on 10 Windows 8 registry hacks where I mention how to adjust this setting.
number of rows

App Groups on the Start Screen

By default, all apps are put into groups. You can tell which apps are in a group by the amount of spacing between the apps. The groups are spaced much farther apart than the apps inside of a group.
app groups
You can drag and drop apps from one group to the other by just clicking on an app, holding your mouse down and dragging it to another group.
Move apps between groups
As you can see above, the apps in the other group automatically move out of the way to accommodate the new app. If you don’t like the default grouping that you get when you install Windows 8, you can create your own groups. Instead of dragging the app to another group, drag it to the space between the groups or to the far right of all the groups. At this point, you will see a vertical bar appear, which would create a new group when you release the mouse.
New group

Move Groups Around on Start Screen

Once you have created your groups, how do you move the groups around? Well, you first have to zoom out. You can do this in a number of ways. The easiest way is to just click on the dash (-) at the very bottom right of the screen.
zoom out button
You can also press CTRL + - or press CTRL and then scroll the mouse wheel down to zoom out. This will make all of the apps smaller and now you can just drag and drop the groups in any order you want.
Reorder groups

Rename Groups

By default, no group will have a name. If you want to give your groups headings, you can go into the zoomed out mode that I just described above and then right-click on the group you want to name.
Rename groups
You’ll see a bar pop up at the bottom of the screen with an option called Name group. Click on that and give your group a name. So it’s easy to create groups for tools, news, websites, or whatever else you like. Hopefully that gives you a good overview of the different ways you can customize the Start Screen and organize apps in Windows 8. If you have any tips of your own, feel free to share them in the comments. Enjoy!