You can join a Computer or a Member server from the command line usinf the the “netdom” command. This I should say is simpler than the right-click my computer thing. Just one single command will do…
The following procedure should work in Windows Server-2008, Windows Server 2003, Windows Vista, Windows XP. Although, you need the Administrator pack/Support Tools to be installed to get the netdom utility in Windows Server 2003 and Windows XP.
To download the support tools for Windows XP SP2, click here
To download the Administrator pack for Windows Server 2003, click here
1. Click Start – Run (in Windows Server 2008/Vista, Start-Search and type “Run”)
2. From the command prompt type
C:\Users\administrator> netdom join client1 /domain:hq.wr.com /userd:administrator /passwordd:******
Syntax is
netdom join
Where:
ComputerName is the name of the server that is running the Server Core installation.
DomainName is the name of the domain to join.
UserName is a domain user account with permission to join the domain.
NOTE: Ensure you have the primary DNS server
set to your Domain Controller
3. When prompted to enter the password, type the password for the domain user account specified by UserName.
4. Restart the computer for the changes to take effect.
C:\Users\administrator> shutdown /r /t 0
Microsoft has released WGA Notifications application which effectively turned Microsoft Windows operating system into a ‘nagware’, with a “This copy of Windows is not genuine” warning. What the Windows Genuine Advantage Notifications application does what it will check your Microsoft Windows XP validity. If it found that the copy of Windows XP is not validated, not genuine, counterfeit, unlicensed, pirated, illegal, unauthorised or simply failed the Windows Genuine Advantage validation process, then the notification messages will appear at various places and time.
When you log on to a non-genuine copy of Windows XP, the following notification error message “This copy of Windows is not genuine” will pop-up on the logon process

Solution 1
Lauch Windows Task Manager.
End wgatray.exe process in Task Manager.
Restart Windows XP in Safe Mode.
Delete WgaTray.exe from c:\Windows\System32.
Delete WgaTray.exe from c:\Windows\System32\dllcache.
Lauch RegEdit.
Browse to the following location:
HKEY_LOCAL_MACHINE\SOFTWARE\Microsoft\
Windows NT\CurrentVersion\Winlogon\Notify
Delete the folder ‘WgaLogon’ and all its contents
Reboot Windows XP.
Note: With this method, you may be prompted to install WGA Notifications again which can still be unselected.
Solution 2
1-Launch Task manager
2-End process WGAtray.exe
3-Quickly restart in safe mode.
4-Click start, then Run. Type regedit and click ok.
5-Click HKEY_LOCAL_MACHINE
6-Click Software, microsoft, windowsNT, currentversion, winlogon, notify.
7-On the right hand side find folder WGAlogon and delete it and all of its components.
8-Restart in normal mode.
9-Go to c:\windows\system32 and delete WGAtray.exe file.
10-Next to it should be WGAlogon.dll, delete this too.
11-Delete from recycling bin and reboot.
This should have solved the problem but i advise switching your automatic updates to
“Notify me but dont automatically download or install them”. This should advise you if your computer tries to download WGA again.
Solution 3
For windows XP SP3 users try this method
1 Lauch RegEdit.
2 Browse to the following location:
HKEY_LOCAL_MACHINE\SOFTWARE\Microsoft\
Windows NT\CurrentVersion\Winlogon\Notify
3 Delete the folder ‘WgaLogon’ and all its contents
4 Reboot Windows XP.
Solution 4
Disabling and renaming the files ‘WgaLogon.dll’ and ‘WgaTray.exe’ in C:\WINDOWS\system32 folder by using the program Unlocker seems to get rid of all the nags/popups.
Solution 5
Another alternative suggest that three files are installed Windows XP System Folder for WGA:
\WINDOWS\system32\WgaLogon.dll
\WINDOWS\system32\WgaTray.exe
\WINDOWS\system32\LegitCheckControl.dll
The wgatray.exe process makes the check for genuine windows software. If WgaLogon.dll is denied execution right, that WinLogon is unable to call it to check on Windows validity and display notification package at boot, and since WgaLogon is also responsible for running and maintaining WgaTray.exe, no more tray popups either.
To change and disable the execute bit of WgaLogon.dll:
Turn off Simple File Sharing in Tools -> Folder Options -> View tab.
Right click WgaLogon.dll in Windows Explorer and open the Security Tab.
Click Advanced button.
Uncheck the Inherit box at the bottom.
Click the Copy button.
Click OK.
Go through each listed user/group and remove the “Read & Execute” permission for WgaLogon.dll, leaving the “Read” permission as-is.
Click OK to apply the permission changes.
Close the file properties dialog.
Restart the computer.
Turn “Use simple file sharing” on (optional).
The system automatically creates hidden “administrative shares” for its logical drives C:, D:, and so forth which it names C$, D$ and so forth. It also creates the admin$ hidden share for to the \winnt or windows folder. These shares are designed for remote access support by domain administrators. By default, if you delete these admin shares, they will be recreated when you reboot. To disable permanently so they will not be recreated on the next reboot, use the following procedure.
Note:- Before doing this procedure please take a complete registry backup
For Workstations (Vista/XP/2000)
Click Start—>Run type regedit click ok
For vista users Enter your UAC credentials to continue.
Open the HKEY_LOCAL_MACHINE branch.
Open the SYSTEM branch.
Open the CurrentControlSet branch.
Open the Services branch.
Open the LanmanServer branch.
Select the Parameters branch.
Select Edit, New, DWORD (32-bit) Value. Vista adds a new value to the Parameters key (If you have the key just check for correct value).
Type AutoShareWks and press Enter. (You can leave this setting with its default value of 0.)
Restart Windows to put the new setting into effect.
Solution 2
In Windows 2000 and Windows XP, you disable the shares via
Start —>Settings —>Control Panel
Systems Tools panel
Shared Folders
Double-click the Shared Folders branch to expand it
Click Shares
In the Shared Folder column, right-click the share you want to disable
Click Stop sharing
Cick OK.
For Servers (2003/2000)
Click Start—>Run type regedit click ok
Open the HKEY_LOCAL_MACHINE branch.
Open the SYSTEM branch.
Open the CurrentControlSet branch.
Open the Services branch.
Open the LanmanServer branch.
Select the Parameters branch.
Select Edit, New, DWORD (32-bit) Value. Vista adds a new value to the Parameters key (If you have the key just check for correct value).
Type AutoShareServer and press Enter. (You can leave this setting with its default value of 0.)
Restart Windows to put the new setting into effect.
There are all kinds of software programs out there, both free and not free, that allow you to encrypt your files. However, Windows XP has native support for compressing and decompressing files and for opening these compressed files without need of extra software.
You can also password protect those files directly in Windows XP. The .zip files are treated as normal folders, allowing you to add files by dragging and dropping or to copy files from the .zip file.
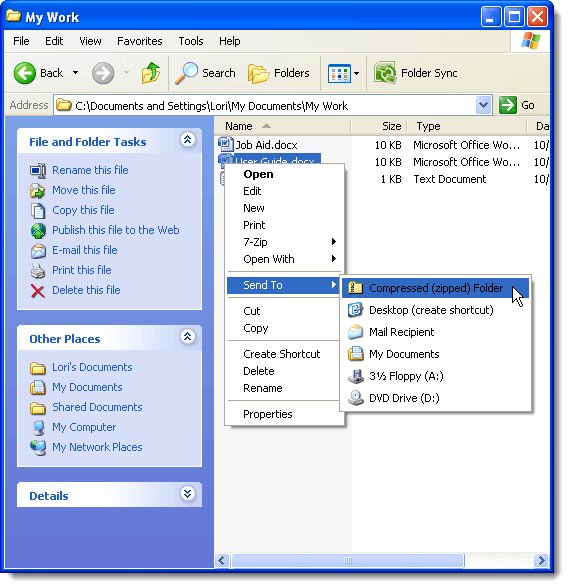
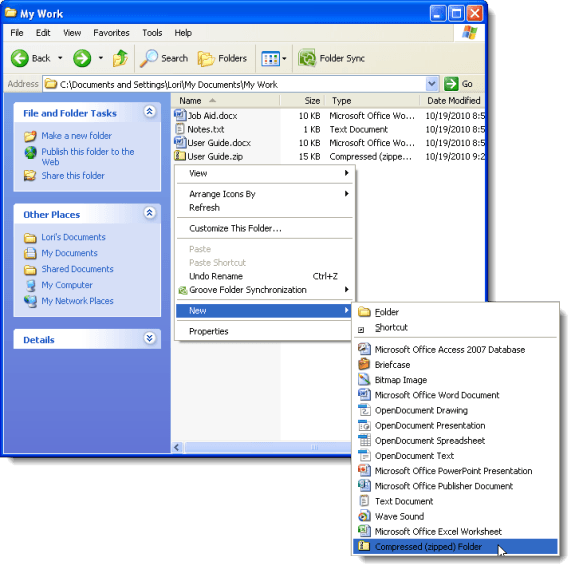
To create a compressed, protected folder, find a file you want to add to a compressed folder. Right-click on the file and select Send To | Compressed (zipped) Folder from the popup menu.
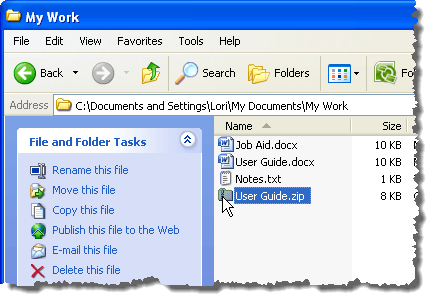
A compressed folder is created with the same name as the selected file. You can change the name of the .zip file, if desired.
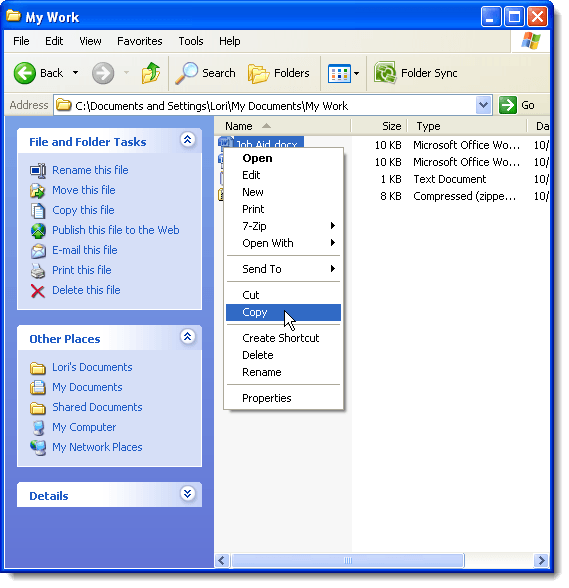
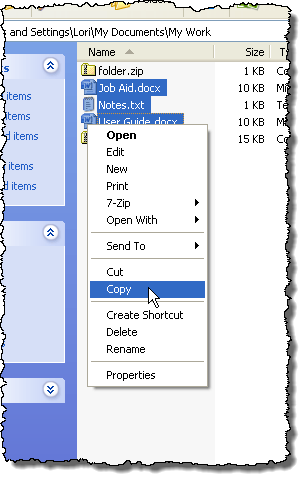
To add a file to the compressed folder, right-click on the desired file and select Copy from the popup menu.
NOTE: If you want to add more than one file to the compressed folder, you can select multiple files and then right-click on the selected files and select Copy.
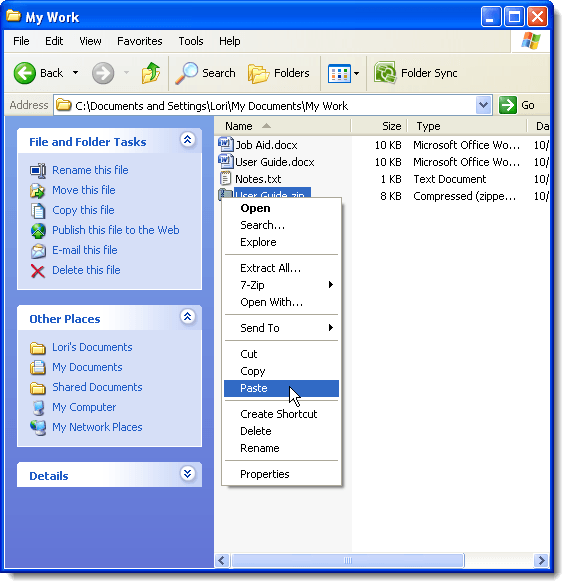
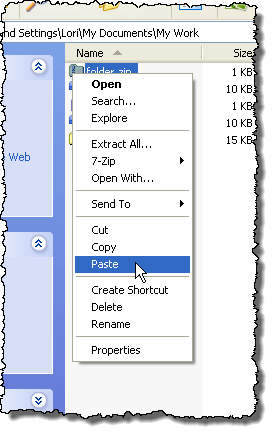
To add the copied file to the compressed folder, right-click on the compressed .zip file and select Paste from the popup menu.
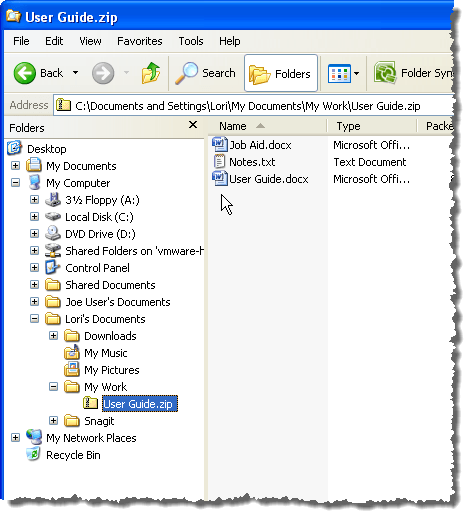
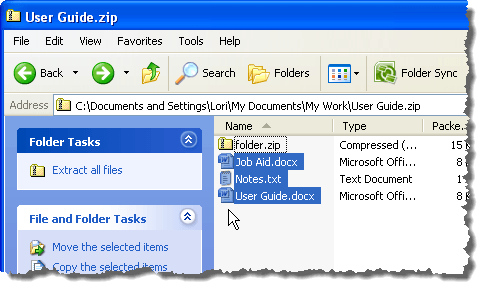
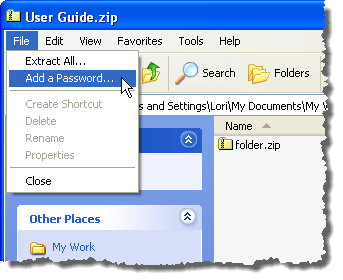
To apply a password to the compressed folder, you must first open it. To do this, right-click on the .zip file and select Explore from the popup menu.
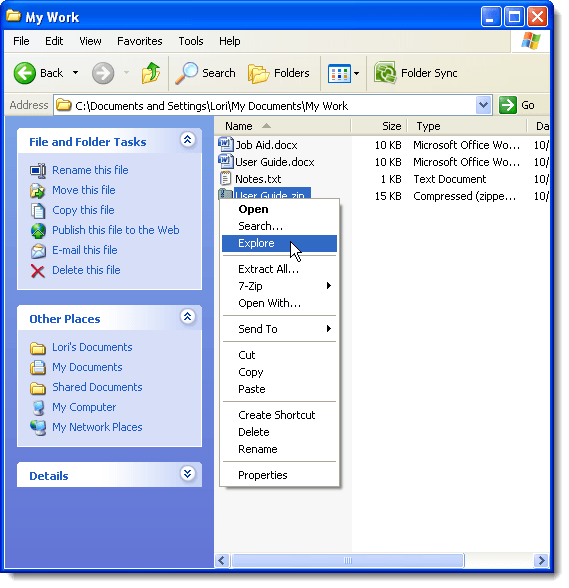
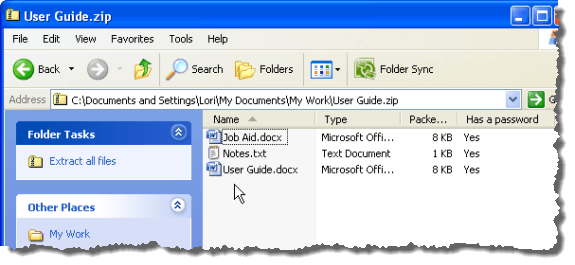
An Explorer windows opens showing you the contents of the .zip file.
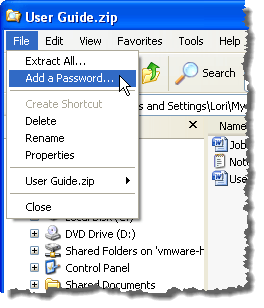
To apply a password to the compressed folder, select Add a Password from the File menu.
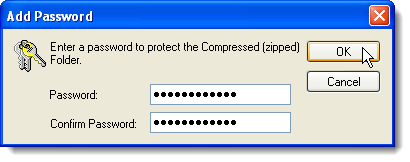
On the Add Password dialog box, enter the desired password in the Password edit box and again in the Confirm Password edit box. Click OK.

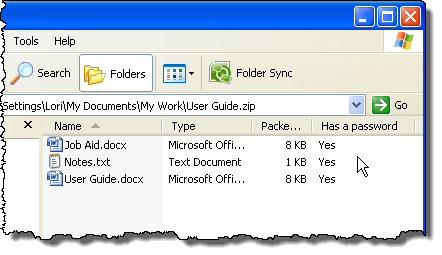
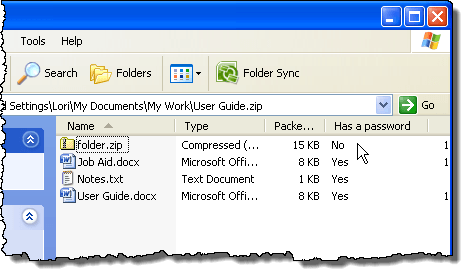
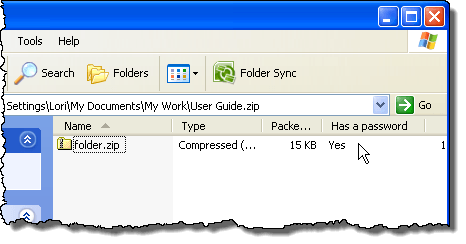
Notice that all the files in the compressed folder read Yes in the Has a password column.
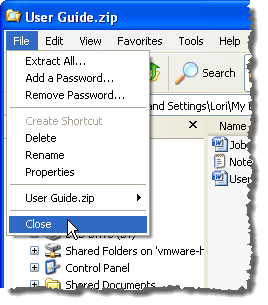
To close the Explorer window, select Close from the File menu.
You probably noticed that the filenames in your password-protected, compressed folder are visible even though the files themselves cannot be opened without entering the password.
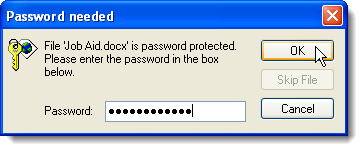
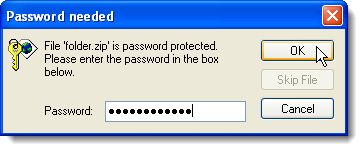
The following dialog box displays when you try to open a file in the password-protected, compressed folder. Enter your password and click OK to open the file.
To hide the filenames, you need to create another secondary, compressed folder containing the files you want to protect. It is not necessary to password-protect this secondary, compressed folder. To do this, navigate to the folder containing the primary, password-protected, compressed folder. Right-click in this folder and select New | Compressed (zipped) Folder from the popup menu.
Select the files you want to put in the secondary, compressed folder. Right-click on the selected files and select Copy from the popup menu.
To copy the selected files into the secondary, compressed folder, right-click on the secondary, compressed folder and select Paste from the popup menu.
NOTE: Any subsequent files added to the compressed, protected folder will not be password-protected. To password protect subsequent files, the password needs to be removed and added again.
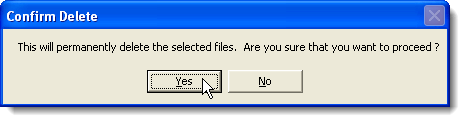
In this example, there is a way to avoid removing the password before adding a password so the secondary, compressed folder is protected. Select the files in the primary, compressed folder (but not the secondary, compressed folder) and delete them. You can either send them to the recycle bin or permanently delete them.
The following is the confirmation dialog box you see if you permanently delete the files. Click Yes.
Now, to apply a password to the secondary, compressed folder, select Add a Password from the File menu.
On the Add Password dialog box, enter the desired password in both edit boxes and click OK.
Now, the secondary, compressed folder is password-protected and it cannot be opened without entering the password. This hides your filenames from view.
When you double-click on the secondary, compressed folder, the Password needed dialog box displays asking for your password. Enter it and click OK to open the .zip file and access your files.
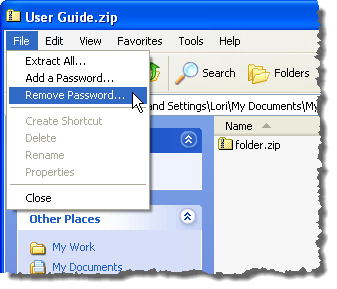
If you want to remove the password from your primary, compressed folder, open the .zip file as described earlier in this post. Select Remove Password from the File menu.
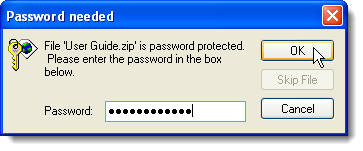
Enter your password in the edit box on the Password needed dialog box and click OK.
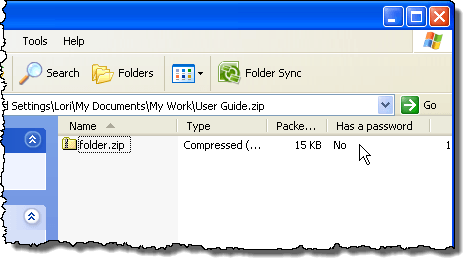
The Has a password column displays No for the secondary, compressed folder, indicating the password has been removed. Now, you can open the secondary, compressed folder without entering a password.
One drawback we found with creating an secondary, compressed folder containing your files to hide the filenames, is that we couldn’t find a way to copy other files into the secondary, compressed folder after it was created.
We had to create another compressed folder containing the original files and the new file(s) and copy that into the primary, compressed, protected folder. Then, you can delete the previous secondary, compressed folder, whether or not it is password-protected.
Did you use the menu bar in Explorer a lot in Windows XP? By default the menu bar in Explorer in Windows 7 and Windows Vista is not visible. You can access it by pressing Alt, but as soon as you choose a menu option, the menu bar goes away again. However, there is a way to make it permanently display.
To do this, open the Start menu and click the Control Panel button.
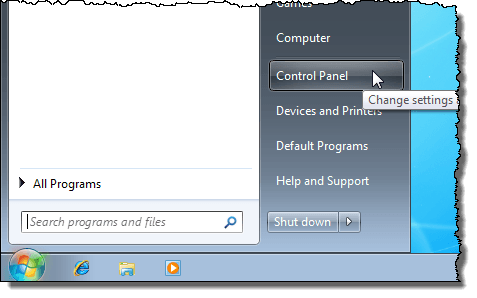
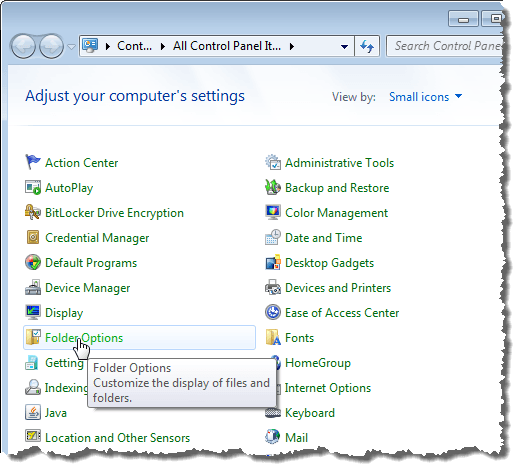
If you are not already viewing the Control Panel options using small icons, as shown in the image below, select Small icons from the View by drop-down list. Then, click the Folder Options link.
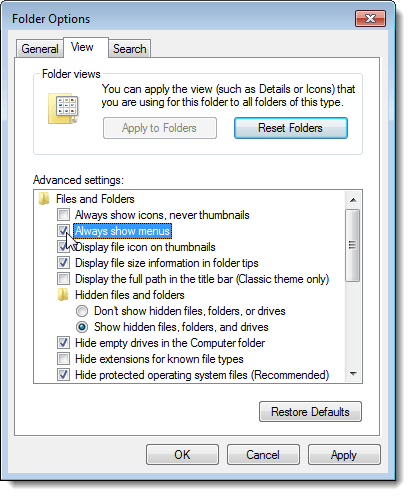
On the Folder Options dialog box, click the View tab. Select the Always show menus check box so there is a check mark in the box.
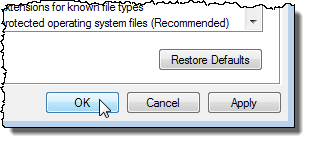
Click OK to close the Folder Options dialog box.
Notice that once you choose to always display menus, the menu bar immediately displays in the Control Panel. To close the Control Panel, click the X button in the upper, right corner of the window.

Open Windows Explorer. Notice that the menu bar automatically displays now without having to press Alt.
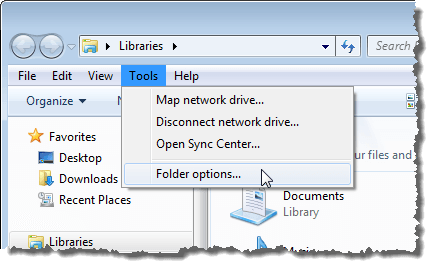
NOTE: You can also access the Folder Options dialog box from the Tools menu on the menu bar in Explorer. If you want to hide the menu bar again, you can do so from the Control Panel or from the Tools menu on the menu bar itself.
The procedure to permanently display the Explorer menu bar is the same in Windows Vista.
The Windows 7 Taskbar can be a very handy launch bar where you can pin programs you use often. You can also pin often-used files, folders, and web pages to it (see our post, Pin Files and Folders to the Windows 7 Taskbar for more information).
Once you have set up your Taskbar the way you want it, you may want to back it up so you can restore it if there is a problem with your computer. You may also want to copy your pinned Taskbar items to another user profile.
Backup your Pinned Taskbar Items
To backup the items pinned to your Taskbar, open Windows Explorer, enter the following path in the address bar and press Enter.
%AppData%\Microsoft\Internet Explorer\Quick Launch\User Pinned\TaskBar
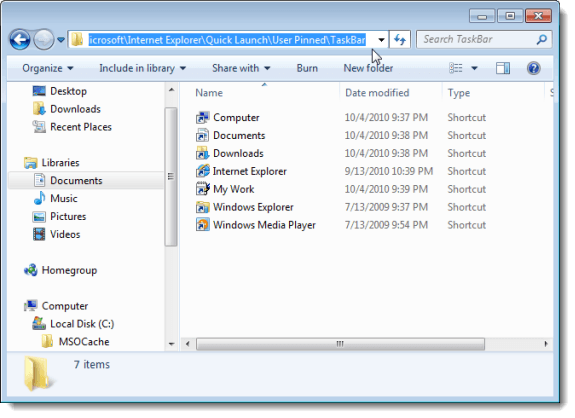
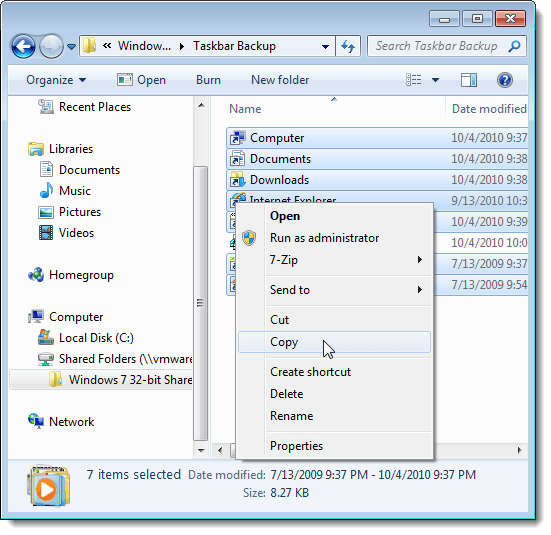
Select all the shortcut files in the TaskBar folder. Right-click on the files and select Copy from the popup menu.
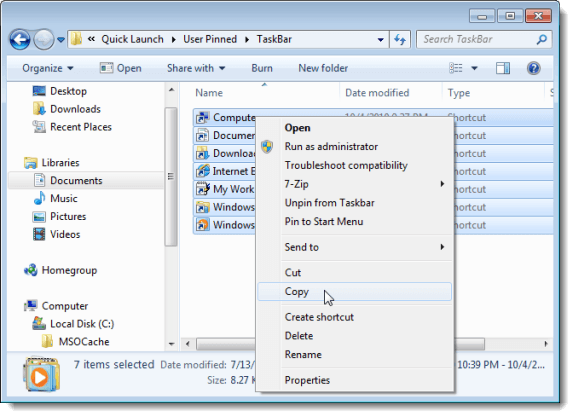
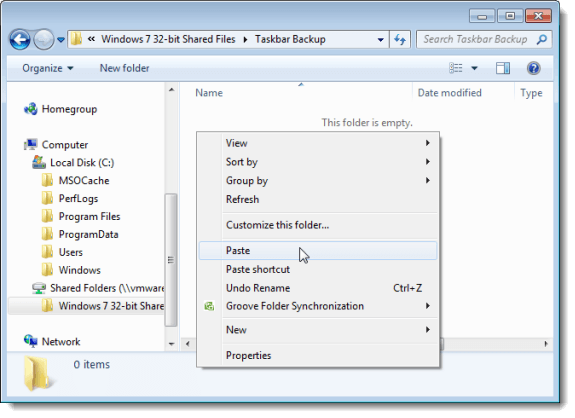
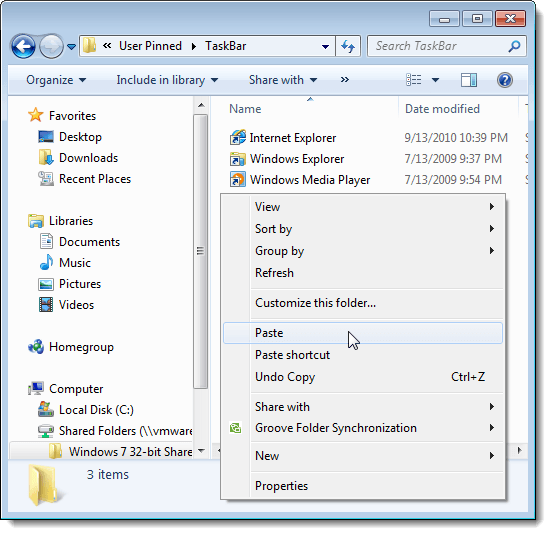
Navigate to the folder you are using to store the Taskbar backup files. Right-click in the folder and select Paste from the popup menu.
There is a key in the registry that stores data about the Taskbar that you should also backup. To do this, open the Start menu and enter “regedit” (without the quotes) in the Search programs and files box. When regedit.exe displays in the list of results, click the link.
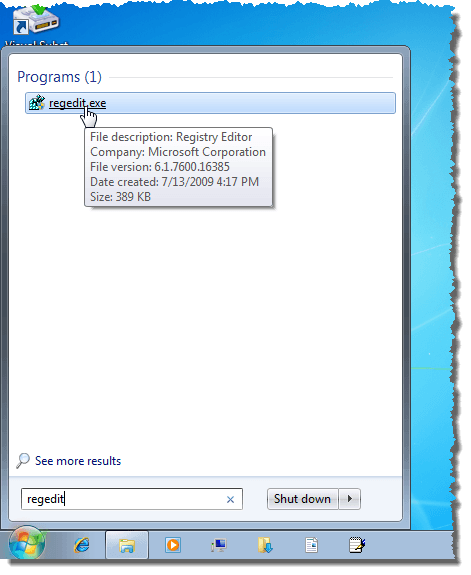
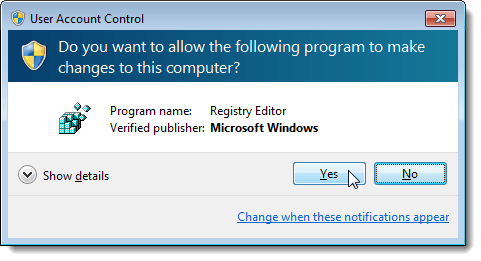
Again, click Yes on the User Account Control dialog box.
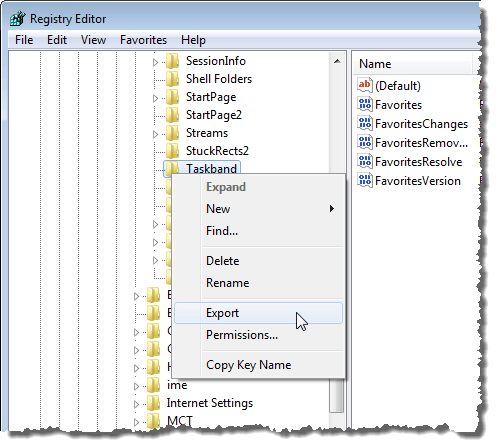
Navigate to the following key:
HKEY_CURRENT_USER \ Software \ Microsoft \ Windows \ CurrentVersion \ Explorer \ Taskband
Right-click on the Taskband key and select Export from the popup menu.
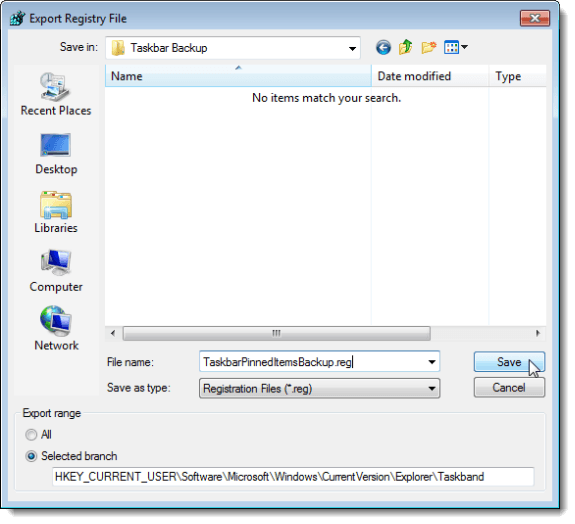
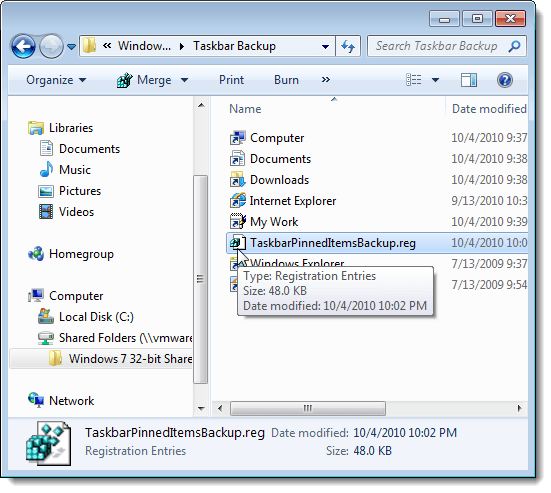
At the bottom of the Export Registry File dialog box, notice Selected branch is selected and the value matches the registry key you selected. Navigate to the folder where you are storing your Taskbar backup files. Enter a name for your registry key backup file, putting a .reg extension on the filename. Click Save.
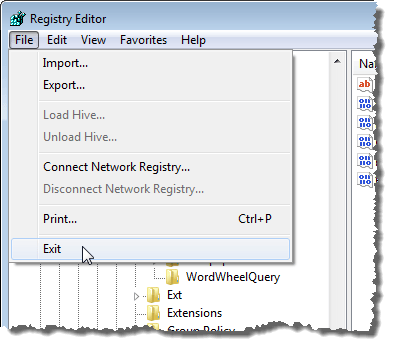
Close the Registry Editor by selecting Exit from the File menu.
You should see your .reg file in your backup folder.
Restore your Pinned Taskbar Items
To restore your pinned Taskbar items, open Windows Explorer and navigate to the directory where you stored the Taskbar shortcut files and the .reg file. Select the shortcut files (not the .reg file, yet), right-click on the files, and select Copy from the popup menu.
Navigate to the following folder again:
%AppData%\Microsoft\Internet Explorer\Quick Launch\User Pinned\TaskBar
Right-click inside the folder and select Paste from the popup menu.
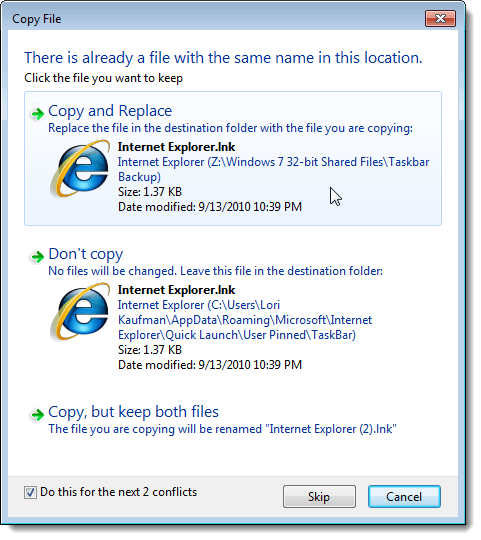
When the Copy File dialog box displays, select the Do this for the next X conflicts check box (X may vary, depending on how many shortcuts will be replaced). Then, click the Copy and Replace button.
Now, you need to add the backed up Taskband registry key back into the registry. To do this, copy the .reg file you created to the Desktop.
NOTE: We found that .reg files do not always run from external drives or network drives, so we copied the TaskbarPinnedItemsBackup.reg file to our desktop before adding the key back into the registry.
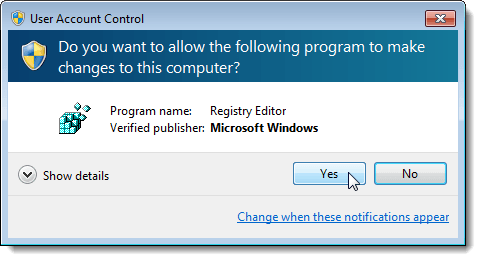
Double-click the .reg file on the Desktop and click Yes on the User Account Control dialog box that displays.
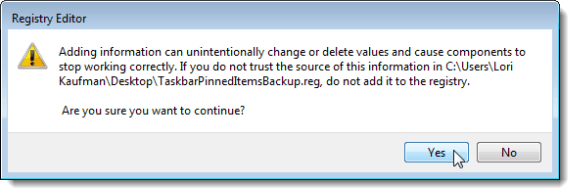
A confirmation dialog box displays to make sure you really want to add the information in the .reg file to the registry. Click Yes.
A dialog box then displays saying the information has been successfully added to the registry. Click OK.

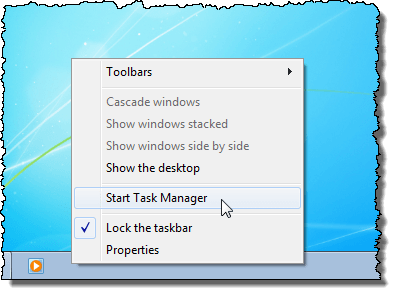
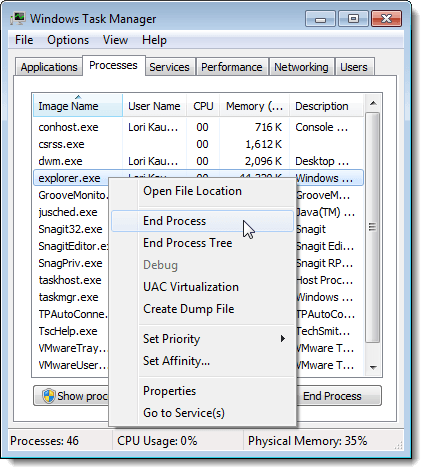
Notice that your pinned items do not immediately display on the Taskbar. You need to end the Explorer process and restart it for the items to show up. To do this, right-click on the Taskbar and select Start Task Manager from the popup menu.
On the Windows Task Manager dialog box, click the Processes tab. Right-click on the explorer.exe task in the list and select End Process from the popup menu.
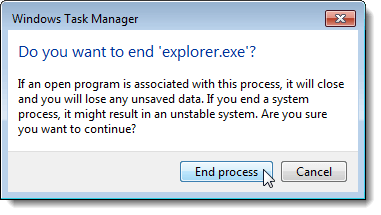
A dialog box displays to make sure you really want to end the Explorer process. Click End process.
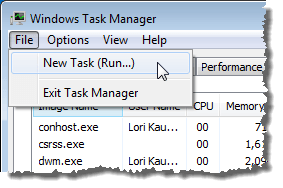
To restart the Explorer process, select New Task (Run…) from the File menu.
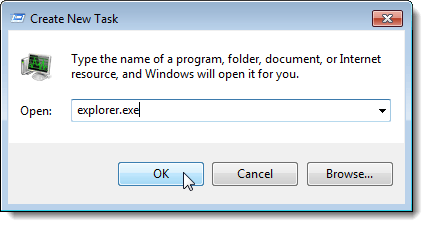
On the Create New Task dialog box, enter “explorer.exe” (without the quotes) in the Open edit box and click OK.
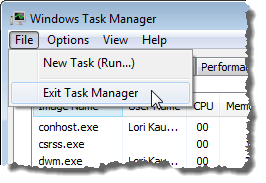
To close the Windows Task Manager dialog box, select Exit Task Manager from the File menu.
Once you have restarted Explorer, you should see your restored pinned items on the Taskbar again.
