The ‘dd’ program is one of the oldest applications in the Linux world. Originally part of UNIX, it’s generally considered to be lost to history exactly what ‘dd’ stands for. Disk Destroyer? Data Deleter? Disk Duplicator? The last option would appear to be a good bet, as either of the first two seem rather likely to scare away would-be users. Regardless, ‘dd’ is a powerful tool, and is a good go-to tool for three common use cases.
1. Backup a hard drive to a different partition or external drive.
2. Create an .iso file from a CD or DVD.
3. Make a bootable USB flash drive from a disk image.
All three of these procedures involve duplicating data from “over here” and copying it “over there,” but the different media involved (internal hard drive, external hard drive, CD and USB flash drive), would appear at first glance to require different applications. However, the ‘dd’ command can be used in all three cases.
Working With the ‘dd’ Command
There are two things to know about ‘dd’ before we start. First is that it can be incredibly dangerous to use. What ‘dd’ does is copy your data from a certain place and write it to a different place. You tell ‘dd’ where to get the data from, and where to place it.
Mix up those two places, and you’ve effectively told ‘dd’ to take data from your would-be destination drive and place it on top of the data you want to back up! Not good.
Those two parameters are ‘if‘ and ‘of‘ which stand for ‘input file’ and ‘output file.’ The ‘if’ command is generally formatted this way:
![]()
Or, if a partition is the source directory, like this:
![]()
Once we’ve told ‘dd’ where to take the data from, we need to tell it where to put the data, using the ‘of‘ option. The ‘of‘ option can be an .iso image, like this:
![]()
It could also be a disk image, like this:
![]()
There are other parameters available as well, the ‘bs’ parameter being the most widely used. This parameter represents the block size of both the input and output file, and should be a multiple of 512 (512, 1024, and 2048 are common block sizes). There are actually dozens more options, but for basic use cases, the ones already mentioned are basically all that are necessary.
Backup a Hard Drive to a Different Partition or External Drive
Let’s say you have a hard drive or partition you want to backup to an external drive, or to a different partition. This is the classic example of using the ‘dd’ command. Assuming the hard drive you want to copy data from is “/dev/sda1″ and the partition on the external hard drive you want to backup the data to is “/dev/sdc1″ the command would be as follows:
![]()
There are two parameters at the end of the basic command. We have told dd to use a block size of 4096 (larger block sizes should lead to fewer read/write cycles and generally will produce a faster backup), as well as telling it to use noerror, which will force dd to continue running, even if it encounters an error.
If you want to save the data instead to a single disk image, you would only need to modify the last part of the command:
![]()
Create an .iso File From a CD-ROM
This is a very similar command to the one just used, in that our output file is an image and not a collection of files and folders. The only big difference is that in this case, our input file is a CD-ROM or DVD-ROM disk, and not a hard drive.
In the following command, a file named cdbackup.iso will be written to our Desktop (substitute your username for “ericcflem” and you can name the .iso file whatever you want, of course):
![]()
In the above command, “conv=sync” tells ‘dd’ to use synchronized input and output, which ensures the entire block is read to protect against data loss. Depending on the speed of your drive, the process will take a few minutes, and when you’re finished, you’ll have a new .iso file that can be burned to blank media and exactly duplicate the original CD or DVD.
Make a Bootable USB Flash Drive from a Disk Image
Finally, with USB flash drives so cheap, it’s common to create a bootable flash drive for running Linux, instead of burning an actual CD. So let’s say you’ve downloaded the newest Ubuntu Live CD and want to create a bootable thumb drive. Insert the flash drive, then once it’s loaded, type the following into a Terminal window:
![]()
You’ll likely be asked for your password. Once you’ve provided it, fdisk will scan for all mounted disks. What we’re interested in is finding out the devicenode for your flash drive. Here’s example output from the above command:
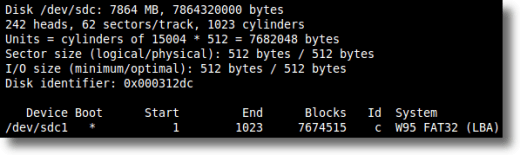
As we can see, the device is /dev/sdc and the single partition is /dev/sdc1, but before we do anything, we need to unmount the partition:
![]()
Now, simply type the following command, which will copy our Ubuntu image to the entire flash drive (this command will wipe out everything on the flash drive in the process of writing the disk image):
![]()
Note also that in the above command we wrote, not to a particular partition, but to the entire drive.
And that’s it. Three different use cases, three very similar commands, one program. Using ‘dd’ isn’t as user-friendly as something like Brasero or Nero, but it is incredibly powerful. Just be careful not to mix up your input and output files, and you’ll be well on your way to making fast, accurate backups.

No comments:
Post a Comment