Although the Start Menu contains everything you need to control Windows, it is much more convenient to have the programs you use the most just one click away. In previous version of Windows, most notably Windows XP, many users got used to adding their most-used programs to the Quick Launch Toolbar.
Unfortunately, Microsoft removed the Quick Launch Toolbar from Windows 7 leaving only the alternative to pin programs to the Taskbar and Start Menu. However, with just a few easy steps, you can create your own Quick Launch Toolbar and add shortcuts to it just like in Windows XP.
Create a Quick Launch Toolbar in Windows 7
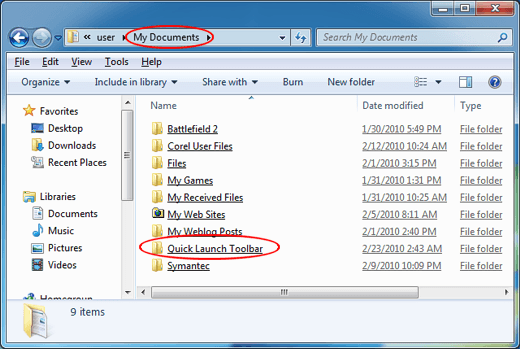
To create a Quick Launch Toolbar in Windows 7, begin by navigating to your My Documents folder. For most users, this folder is located in:
c:\users\
\My Documents
where
Create a new folder in My Document titled Quick Launch Toolbar. Truthfully, the name of the folder and its location can be anything and anywhere you want. However, the My Documents folder is a convenient place to store the folder and naming it Quick Launch Toolbar will make it easy to find in later steps.
Now you need to add shortcuts to the folder. Open up the Quick Launch Toolbar folder you just created and right-click drag a program to the folder. For now, one shortcut is enough. Later you can drag as many shortcuts to the folder that you want.

Now, right click on the Windows 7 Taskbar and choose Toolbars and then New Toolbar.
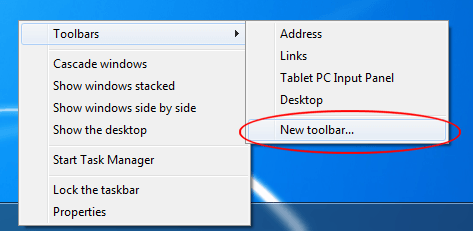
Locate the Quick Launch Toolbar folder in your my Documents folder and click Select Folder. Notice that Windows 7 has placed your new Quick Launch Toolbar on the very right of the Taskbar. Just like in Windows XP, you can drag the toolbar around on the Taskbar to any location you want.
To make your new Quick Launch Toolbar easier to use, consider removing the title of the toolbar and the text associated with each shortcut. Do this by right-clicking on the anchor of the toolbar and de-selecting Show Text and Show Title.

After you have added all of the shortcuts you want to the folder you created in My Documents, your new Quick Launch Toolbar will function just as it did in Windows XP.

With each new version of Windows, Microsoft seems to remove some of the most commonly-used features leaving users of the operating system to either get used to a new way of doing something or finding a workaround.
With just a few simple steps, you can recreate the Quick Launch Toolbar in Windows 7 made popular in Windows XP. Using the steps above, you can create any number of toolbars turning them on and off whenever you want. This is one method of making Windows 7 customized to your current task.

No comments:
Post a Comment