One of the many gripes people have had about Microsoft products, at least in the past, has been the lack of customization regarding menus, which led to claims that Microsoft was out to tell us all what to do and how to do it all the time, rather than let us do what we want with the products we buy.
Well, Microsoft has been listening, and now, for the first time, they have made the menu system in Office 2010 completely customizable. Here we describe how to customize the main menu (ribbon) in Word.
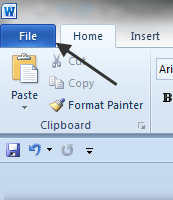
First, click on the File tab in the main ribbon to get to the Backstage area:
Then, click on the Options menu choice:
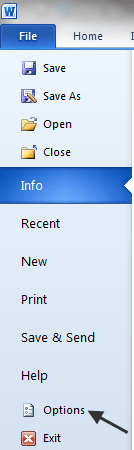
Next, move down and click on the Customize Ribbon option:
The screen should look like this:
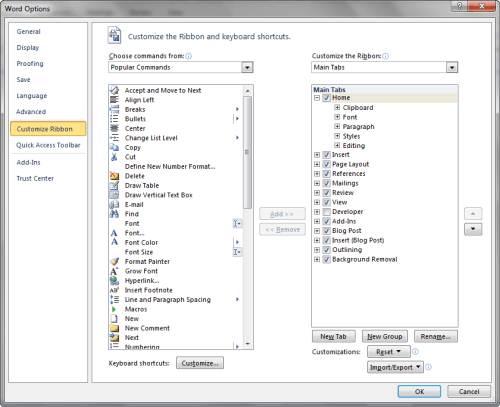
This screen is divided into two sides; on the left are possible things you can add to your ribbon, while on the right are the things that are already there. To add something to the current ribbon, highlight it with your mouse, then click the Add button that sits in the middle between the two sides (or if you prefer, simply drag it from the screen on the left and drop it where you want it in the screen on the right).
In similar fashion, you can remove things from the ribbon by highlighting it in the window on the right and then clicking the Remove button under the Add button.
Before you can add any buttons however, you first have to add a new Group to your ribbon, because Word won’t allow you to add or remove commands from the existing groups.
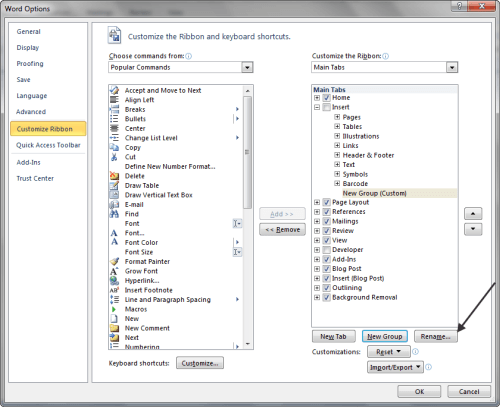
To add a group, first choose which ribbon you want to add the group to, by highlighting it on the right side of the menu. Then click the New Group button at the bottom of the screen:
Here we’ve added a new group under the Insert tab.

Because New Group isn’t exactly a great name, it’s best to rename the group once it’s been created by highlighting the group name and then clicking the Rename button:
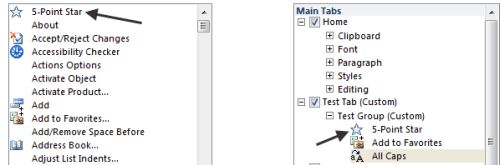
Once you have the new group created and renamed, the next step is to add commands to it. To do that, click once on any of the commands on the left side of the screen, drag it over to the right side of the screen and drop it on the new group you created.

While adding or removing commands from your ribbon might be just what you need, the best approach is generally to add a new tab to your main ribbon and populate it with the stuff you most commonly use.
To add a new tab to the main ribbon, click on the New Tab button at the bottom of the right side of the screen:
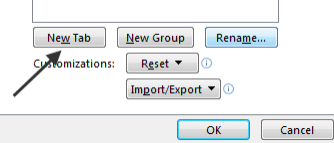
You should get the following screen:
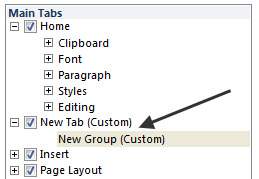
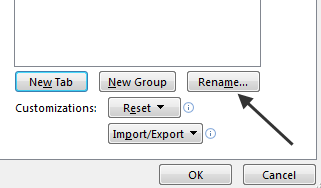
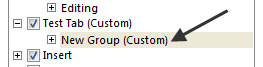
Note how the new tab was created and displayed in the center of the right hand screen. And then, because the name New Tab isn’t all that helpful, highlight the new tab by clicking on it, then move down and click the Rename button.
Type in the new name for your tab, then press the Ok button. The new tab should now reflect the new name.
Next, notice that when you added a new tab, Word also created a group name underneath it…
…and because the words New Group aren’t very helpful either, highlight it and then move down and click the Rename button again, and give your group name something meaningful.
![]()
Now you’re ready to start adding stuff to your new tab. To do so, click one of the commands on the right hand side window, and then drag it over and drop it onto the tab you just created.
Note: If an option on the command side of the screen has a “+” next to it, click on it to see the commands under it.
Once you’ve added the commands you want, click the Ok button at the bottom right hand side of the screen, and just like that, you now have a new tab on your ribbon with all of your most used and favorite commands on it.
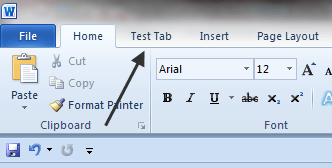
…and when you click on it, you’ll see your new commands added to it:

The ability to customize the ribbon in Word allows you to make your ribbon look the way you want it, which should help make you more efficient when using Word.
Note: If you regret your customizations, click the Reset button at the bottom of the screen.

No comments:
Post a Comment