In Ubuntu, when your computer has been idle for long enough so that the screensaver kicks in, you’ll see upon jiggling the mouse that a password screen pops up. You’ll be unable to access your desktop until correctly verifying your password.
This is a handy security feature for those of us in job environments with unsecured workspaces. It’s not so handy, however, for those times at home when other things distracted you from your computer and you returned only to have to log in again.
Thankfully, this is a feature that can be turned off quite easily. In fact, there are three ways to turn off this feature: the first from the Configuration Editor, the second using the Terminal, and the third from the Screensaver preference pane itself.
Using the Screensaver Preference Pane
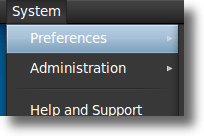
This is the simplest, and most user-friendly way of turning off the screensaver lock. To access the screensaver preference pane, click the System menu (assuming you are still using the Ubuntu-default Menu Bar. Once you have clicked the System menu, choose Preferences, as shown below.
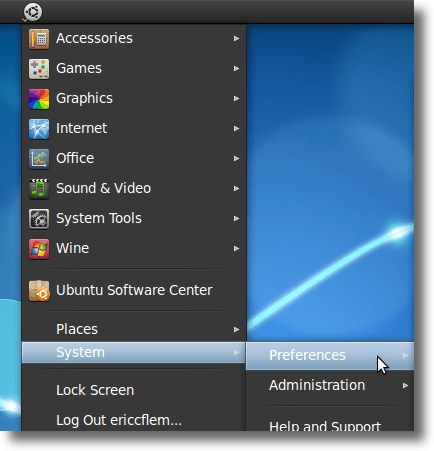
If you are using the optional Main Menu, which combines the Menu Bar into a single menu, then you’ll find the screensaver preference pane by clicking the icon, moving down to System, and choosing Preferences, as in this screenshot.
Regardless of how you get to the Preferences area, you’ll want to then choose Screensaver.

Clicking this will bring up the screensaver preferences window, from which you can change screensavers, set the standard idle time that has to pass before the screensaver kicks in, turn off the screensaver altogether or, and this is why we’re here, turn off the option to lock the screen when the screensaver activates.

Now that we’re here, the only thing to do is un-tick the checkbox beside the last option, as illustrated below:
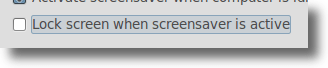
And that’s all for this method. Once the checkbox is un-ticked, the screensaver will continue to work as per your settings, but you won’t have to log into your account every time you return to your computer and find the screensaver running.
Using the Configuration Editor
The configuration editor is – at least by default in Ubuntu – a hidden application that gives the user access to hundreds of configuration options, including the screensaver lock option we’re looking to change. To access the configuration editor, open the Run Dialog by hitting Alt-F2. A small window should appear.
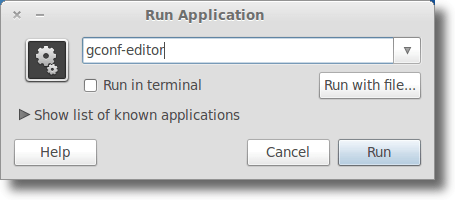
To start the configuration editor, simply type the following (as shown above):
gconf-editor
When the configuration editor appears, double click apps in the left sidebar (#1 in the image below), then scroll down to gnome-screensaver and click it (#2 in the image below). In the content area on the right, a series of options should appear. The one we’re looking for is lock_enabled (#3 in the image below).
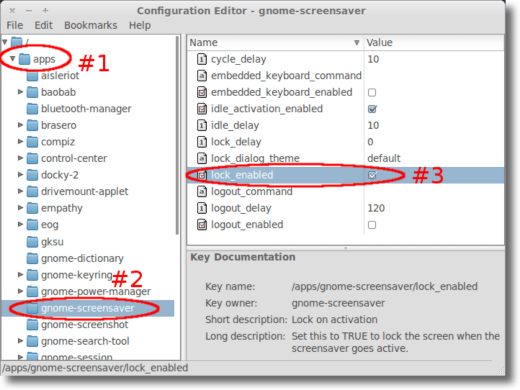
In order to turn off the screensaver lock, all we need to do is un-tick the checkbox, so that it looks like this:

Just as when we used the Screensaver preference pane, once we have un-ticked the checkbox, the screensaver will no longer ask us for our password.
Using the Terminal
The Terminal method is probably the most complex method, in that knowledge of the gconf syntax is required, while at the same time being the quickest, with only two steps.
The first step is to open the Terminal. The Terminal can be found in the Applications menu in the Accessories section.
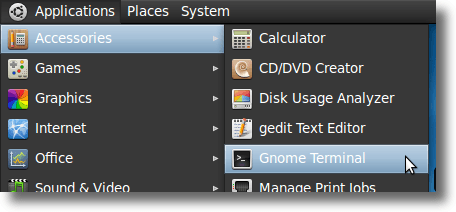
Note: in the example image above, the terminal is called Gnome Terminal. In most setups, it is likely identified as simply Terminal.
Once you have opened the Terminal, simply type or paste in the following (for clarification, the final part of the following command is a zero, and not a letter):
gconftool-2 –type bool –set /apps/gnome-screensaver/lock_enabled 0
Hit enter, and you should be all set. As you can see from the screenshot below, there will be no confirmation that the command has actually worked.
![]()
So you understand exactly what you typed, here is what the sections of the command actually do. The first part: “gconftool-2” calls up the command line gconf editor (called gconftool-2 or sometimes simply gconftool). Next is “–type bool” which tells gconftool-2 that the following command will have a Boolean response (either on or off, 1 for “on” and 0 for “off”).
The final part, “–set /apps/gnome-screensaver/lock_enabled 0” is telling gconfeditor-2 where to find the command: in the apps folder, then the gnome-screensaver settings, and finally the lock_enabled option, which we are setting to off, with the “0” at the end of the command.
You may notice the path (apps -> gnome-screensaver -> lock_enabled) is identical to the path we took in the GUI Configuration Editor. This has the advantage of being a single command, if a bit geeky and definitely not something most people will remember off the top of their heads.
For confirmation that this command worked, double-check by opening either the Screensaver preferences or the Configuration Editor as shown earlier and if everything was done correctly, the checkbox should be un-ticked, just the way we wanted. So that’s it. Three ways, each one effective. One very geeky, one slightly geeky, and one for parents and grandparents everywhere!

No comments:
Post a Comment