In a nutshell, version 2.8 of the Gimp changed the method used to save files, slightly. More specifically, the “text” of the menu items has changed. The following guide will explain the ‘new terminology’ – so you can save images in different formats. Though the screenshots used in this tutorial are from the OS X version of the Gimp, the steps are identical and the screens are extremely similar.
- Once you’ve made whatever changes you want to the image file (of whatever format) – select File -> Export to.
- From here, you can determine the file format (.jpg, .png, .gif etc) you want to save the file as. Simply name the file, and add the extension of the format you want to use. In the example screenshot below, you can see that I’ve named my file file_name and since I added .png to the end of the name, that’s the type of file that will be saved. Click the Export button.
- If you elected to Export (ie. Save) the file as a .PNG, you’ll be presented with the usual PNG options.
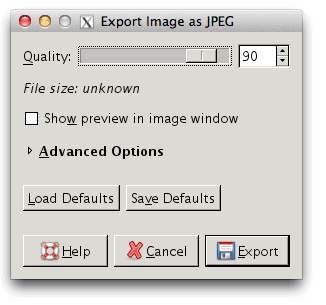
- If you opted to Export (again, Save) the file as a .JPG, you’ll be presented with the usual JPG options.
- If you continue to make changes to your image file, and want to save them again, this time select File -> Export to file_name.png.
- If you continue to make changes to your image file, and you want to save them as a new file, select File -> Export….
- Give the file a new name, and click the Export button.
- That’s it! As you have probably figured out, Gimp basically changed the “Save” and “Save As” features to only work with the .xcf format. Now you use Export to, Export to filename.png/jpg and Export… instead.


click to enlarge


click to enlarge

No comments:
Post a Comment