Tips & Tricks, Tutorials, Hacking, Troubleshooting,

Showing posts with label Google. Show all posts


Email Following the steps outlined below, you’ll be able to save any of the attachments included with your Gmail messages straight to Dropbox.
  1. To get started, head over to https://www.insynchq.com/gmail and click the Sign in with your Gmail account button at the bottom of the page.

  2. You’ll be redirected to your Google accounts page where you’ll need to grant access to Insynchq.com – make sure that Remember this approval is checked, and then click the Allow button.

  3. On your insync page you’ll need to add an account – so click the Dropbox button.

  4. This time you’ll be redirected to your Dropbox page, where you’ll need to grant access for Insync on your Dropbox account. Click the Allow button.

  5. Finally, set a label to use in Gmail. The default label of @Dropbox is perfect – but you can use anything you’d like. Click the Set label button when you’re done.

  6. At this point there should be a “Connected service” on your Insync page (see the image below – yours won’t be identical but it will be close).

  7. Now open up your Gmail. Locate an email that has an attachment you’d like to save to Dropbox. You can either “move” the email to your @Dropbox label, as illustrated in the image below…

  8. or you can simply apply the @Dropbox label to the email (which means it will remain in your Inbox, but also be included in your @Dropbox “folder”, and thus downloaded to Dropbox).

  9. Once you’ve applied the @Dropbox label to an email with an attachment, your Dropbox folder will automatically create a sub-folder titled Attachments.

  10. click to enlarge

  11. Inside of that folder you’ll find additional folders. Each will be named using the email addresses of people who have sent you messages, that have attachments, that you applied the @Dropbox label to.

  12. click to enlarge

  13. Open one of those folders, and you’ll find the attachment happily waiting for you :)

  14. click to enlarge

  15. Going forward, all you need to do is apply that @Dropbox label to any messages with attachments, and those attachments will be automatically sent to Dropbox. That’s it!

To protect your Google account (Gmail, Calendar, Google+, Documents, etc.) against keyloggers and people who try to steal your password, you can enable validation in two steps. In addition to your regular password, a single-use code sent by SMS to your phone or generated by the Google Authenticator will be required. Without this code you or anyone else wont be able to access your account. With validation in two steps, you have several methods for securing your Google Account. In this complete tutorial I will show you how to setup this service in order to protect your Google account.


There are three possible ways to get this code:
  • Get the code by SMS to your mobile phone. So you must have network coverage to receive your code.
  • Generate code with the Google Authenticator to your mobile phone or tablet running Android, BlackBerry or IOS. This code is generated locally and an Internet connection or telephone is not required on your phone.
  • Print a list of codes for single use. Handy if you need to go abroad or you do not have your cell phone with you.
In order to get started follow steps below

Enable Validation In Two Steps

You can enable validation in two steps in the settings in your Google account.
Step 1: Go to any Google service you use, such as Gmail and login.
Step 2: Click your email address or your name at the top right of the page and from drop down menu click Account.

Step 3: In the Security section, click Edit next to the option 2-step verification

Step 4: Click Start Setup

Step 5: Select your country and make sure your mobile phone number is correct. Mark it if it is not already.
Step 6: Select and click Text message (SMS).

Step 7: You will receive a SMS with a verification code on your phone.
Step 8: Enter the code you received on the configuration page of validation in two steps and click Verify.

Step 9: The service then asks if you want to store your computer, that is to say, mark it as safe for 30 days. If you do, you will not have to do validation in two steps if you log into your Google account from this computer. However, if you connect from another computer, the validation in two stages will be much effective. Click Next.

Step 10: Finally, click on Confirm to finish setup

Enable Google Authenticator

By default, you receive a SMS with your unique code and temporary when you want to log into your Google account. To avoid not being able to receive code if you do not have network coverage or you are abroad, you can install Google Authenticator on your phone or tablet running Android, BlackBerry or IOS.
Step 1: Log into your Google account.
Step 2: Click your email address or your name at the top right of the page and click Account.

Step 3: In the Security section, click Edit next to the option 2-step verification.
Step 4: In How to receive codes, click the type of mobile device you own, an Android phone for example.

Step 5: Then go on the market of mobile phone and download the Google Authenticator.
Step 6: Once you download and install it, open it.
Step 7: If your phone has a camera, tap a barcode scanner.
Step 8: Install the barcode reader on your phone if you have not already and come back in Google Authenticator.
Step 9: Point bar code on the page.
Step 10: The application gives you a code.
Step 11: Copy it into the page and click OK.
Step 12: Finally, click Save.

Print Rescue Codes

To connect to a Google Account, you will now need your mobile phone to generate a code with Google Authenticator or to receive an SMS if you have uninstalled the software. To avoid not being able to connect without your phone, you can print a list of emergency codes used only once. This is useful if you need to go abroad for example.
Step 1: Log into your Google account.
Step 2: Click your email address or your name at the top right of the page and click Account.
Step 3: In the Security section, click Edit next to the option 2-step verification.
Step 4: Click Show backup codes.

Step 5: Print or save a text file. The important thing is to put them in a safe place.
Step 6: Each code can be used only once. If you run out of codes, click Generate new codes. Please note that the last set of codes supersedes the previous one.

Set Passwords For Applications That Use Your Google Account

Some applications that access your account from your Google phone (Android Market for example), your desktop computer (email software) or other device (such as Gmail for mobile, desktop Picasa or AdWords Editor) are not compatible with the validation codes. To use these applications, you need to enter a password that is specific in the field normally reserved for the password for your account.
Step 1: Log into your Google account.
Step 2: Click your email address or your name at the top right of the page and click Account
Step 3: In the Security section, click Edit next to the option 2-step verification
Step 4: Click Manage application-specific passwords
Step 5: Enter your password and confirm.
Step 6: In the Name field, enter the name of the application for which you want to generate a unique password, for example Android for your Google account on your phone so you can access your mail, calendar and the Market. Click Generate password.

Step 7: A password will be displayed on the screen
Step 8: Enter it in place of your usual password in the application that can access your Google account. Note that spaces do not need to be copied.
Step 9: Confirm. The application has access to your new Google Account.

Connect To Google

You set up the 2-step verification: here’s how your identification with a Google service will now take place.
Step 1: Visit the Google page that you want to open Gmail for example. Enter your username and your usual password. Click Login.
Step 2: Google will ask you a validation code. Launch Google Authenticator to your mobile phone and write down the code you receive

Step 3: Enter it on the login page to Google. If the computer on which you are not safe (it’s not yours for example), uncheck the Remember this computer for 30 days. Click Verify.
Step 4: If you do not have Google Authenticator or phone on hand, click Don’t have your phone?
Step 5: Choose whether you want to receive the code via SMS or use an emergency code that you previously noted. Confirm with OK and enter the code you received or noted.
Step 6: You have access to your Google.
You have successfully enabled Google Authenticator in your account. If you want to share any opinions about this way of protection that Google offers for your account or you have any problems leave your reply in comment section below.

Google Chrome was updated yesterday and includes faster browsing speeds and a new Settings interface. Here we take a look at what’s new and how to navigate the new Options interface.

1. To access the Settings Options click on the gear icon on the upper right corner of the browser then click on Options.

sshot-2011-03-08-[21-34-33]

2. Notice the Options page now opens in a separate tab instead of a new dialog window.

sshot-2011-03-08-[21-35-45]

3. Each category in the Options is easily accessible by clicking on Basics, Personal Stuff, or Under the Hood.

sshot-2011-03-08-[21-36-26]

4. One of the cooler features is that you can search through the options to easily find what you’re looking for…no matter where you are in Options. For example I searched for home and everywhere in Options where the word Home appears, it’s highlighted and you can find the settings that correspond with it.

sshot-2011-03-08-[21-38-46]

5. If you’re looking for a specific tool just search the keyword for it and the tool will come up. Like in these two examples for Importing Bookmarks and setting up Sync.

sshot-2011-03-08-[22-12-48]

sshot-2011-03-08-[22-15-43]

6. You can also copy and paste specific sections of the Settings as well. For instance if you’re in the Under the Hood Section and want to manage content, just copy the URL.

sshot-2011-03-08-[22-20-25]

7. Then you can share that link with someone else and they can paste it into their Chrome browser and pull it up without having to search for it themselves.

sshot-2011-03-08-[22-21-05]

sshot-2011-03-08-[22-21-33]

This is a cool new feature added to the latest version of Chrome (which should automatically update the next time you launch it). The current stable version is 10.0.648.127.

sshot-2011-03-08-[22-25-47]

If you have more than one Google account setup, it can be very annoying having to sign out then back in each time you want to access a specific account. Here take a look at setting up to 3 of your Google accounts that you can use in one browser.

1. To manage multiple Google accounts without having to log in and out each time, navigate to http://google.com/accounts.

sshot-2011-02-24-[22-11-42]

2. Then sign in to one of your Gmail Accounts if you’re not already – it might be best to use your Primary account for this.

sshot-2011-02-24-[22-12-45]

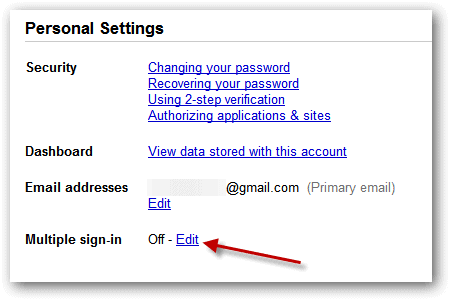
3. Under Personal Settings next to Multiple sign-in click on Edit.

sshot-2011-02-24-[22-17-44]

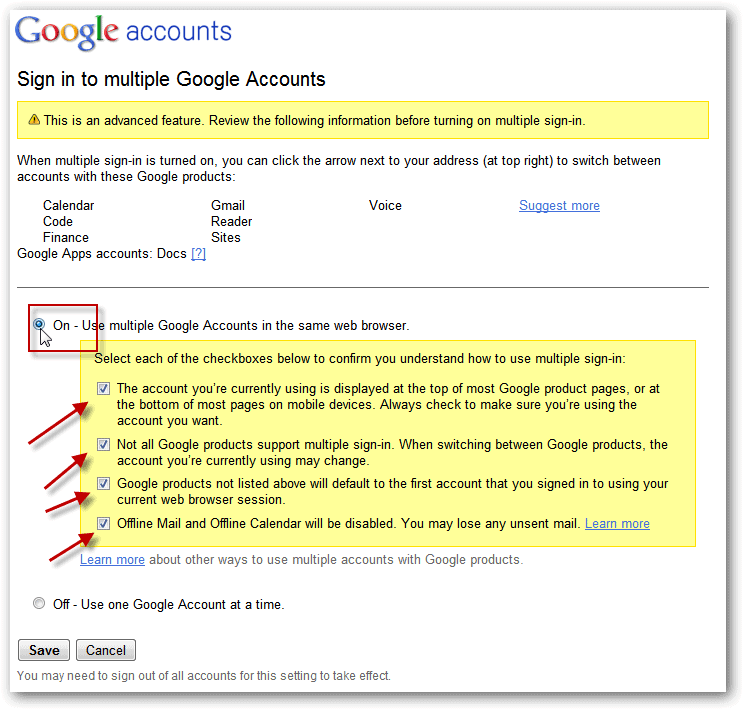
4. To enable the feature, click the radio button next to On – Use multiple Google Accounts in the same web browser. You’ll also need to check each box to confirm you understand how to use multiple sign-in…then click Save.

Note: When enabling this feature, you’ll need to verify that not all Google products support multiple sign-in, Offline Mail and Offline Calendar is disabled and more. If you want to learn more about ways to use multiple accounts click the Learn More link.

sshot-2011-02-24-[22-19-24]

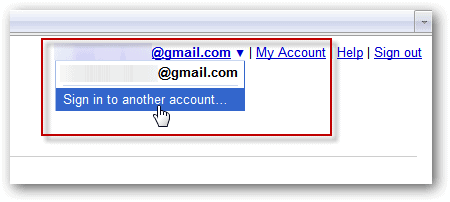
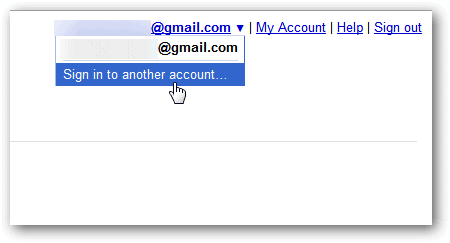
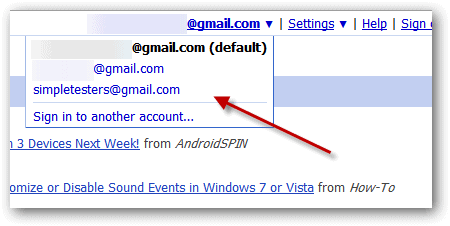
5. After you turn on the multiple accounts feature and save it…you can go back to the Accounts page and click the dropdown menu where you’re primary email account appears. Then click Sign in to another account.

sshot-2011-02-24-[22-26-24]

6. Now sign into another Google account using your Gmail address

sshot-2011-02-24-[22-29-11]

7. Then just repeat the steps for each account you want to use. Here we have 3 already…and you just need to select the one you want without having to log out then back in again. Very convenient!

sshot-2011-02-24-[22-30-57]

8. Keep in mind with free Google Accounts you can only use 3 sign-ins. If you try to add more you’ll see the following error message.

sshot-2011-02-24-[22-31-54]

9. If you want to start over with different accounts, or just want to turn the feature off, go into the Google Accounts page again, click Off – Use one Google Account at a time…then click Save.

sshot-2011-02-24-[22-43-15]

10. Then you can start over again using different accounts by repeating the steps above.

sshot-2011-02-24-[22-44-57]

If you have multiple Google Accounts using this feature is easy to setup, and you can switch between them by simply selecting the account you want from the dropdown menu. This feature is indeed a great time saver.

Google Docs becomes more useful with every subsequent update from Google, and a lot of people have practically replaced Microsoft Office with it. There are, however, a lot of things that Google Docs still cannot do, so you still have to rely on the desktop office suites for more complex documents.

Creating or editing documents in Microsoft Office and moving them back and forth between Google Docs and your PC can be time consuming, and can also be confusing if you have several versions of one document.

OffiSync is a plug-in for Microsoft Office that allows you to save documents you are working on in Word, Excel, or PowerPoint directly to Google Docs, and open existing Google Docs with Microsoft Word, eliminating the need to go to the site in a web browser. The plug-in is still in its infancy, but the beta features and planned features are all very useful.

Once you download and install the OffiSync plug-in, click on the OffiSync tab in Word, Excel, or PowerPoint. Click on the Settings button and choose Accounts from the menu. Click the Add button on the Accounts window.

Add a new Google Docs account.

When you are prompted to log into Google (which is the only available service right now), enter your User/Email (your Gmail address) and Password, and then click OK.

Enter your Google credentials.

Once you are logged in, close the Account window, and click the Open button on the OffiSync tab. The Open Document window will open, and you can navigate the full tree of your Google Docs right from the Office applications. You can search for files, or you can browse and open a specific file.

Open Document from Google Docs

When you open files, they open just like any other Microsoft Word document. If you start a new document, you can also choose to save it to Google Docs using the Save or Save As buttons on the OffiSync tab.

Once you save documents to Google Docs, you will be able to access them online. Please note that if you use fonts that are not available in Google Docs, the font will be substituted, so your documents may not look exactly the same.

OffiSync allows you to share documents with other users and manage the permissions on a document. There is also a Premium version of OffiSync for $12 a year, or a one-time fee of $30, which will allow you to do everything that the free version does, plus:

  • Save files in native office format
  • Real time co-authoring
  • Google Sites Integration
  • Receive support from OffiSync and their partners

OffiSync is still in its early phases, but it shows a lot of promise, and it will save you time by allowing you to save Office documents directly to Google Docs and retrieve them from Google Docs for editing. If you have a small business, the Premium version may be an excellent complement to the new Google Docs features.

Welcome to the second part of this two-part series about using Google Chrome Backup to backup, restore, and manage your Google Chrome profiles.

In Part I, we covered installing and starting Google Chrome Backup, protecting the backup file with a password, and backing up a profile.

In this post, we are going to discuss setting up Google Chrome Backup so it starts when Windows starts, creating a new profile, creating a desktop profile to open Google Chrome using a specific profile, and restoring a profile.

Make sure you have downloaded and installed Google Chrome Backup prior to following the steps in this post. Also, we recommend you go through the steps in Part I before proceeding with the post.

Download Google Chrome Backup from

http://www.parhelia-tools.com/products/gcb/googlechrome.aspx.

Start Google Chrome Backup When Windows Starts

If you want Google Chrome Backup to automatically start when Windows starts so it is always available, click the wrench icon and select Start program at Windows Startup so there is a check mark to the left of the option, as pictured below.

Selecting Start program at Windows Startup option

Create a New Profile

You can also use Google Chrome Backup to manage your profiles. For example, you can create a new profile, delete a profile, and clear your personal data from a profile. To create a new profile, click the Profile button and select New Profile from the drop-down menu.

Selecting New Profile

The Create new profile dialog box displays. If you have Chromium installed in addition to Google Chrome, you can choose to backup either version in the Select version of Chrome box.

To select where to put the profile, click the Browse button to the right of the Put profile to box.

Create new profile dialog box

The Browse For Folder dialog box displays. Navigate to the folder in which you want to save the profile. The default location for profiles is generally C:\Documents and Settings\[username]\Local Settings\Application Data\Google\Chrome\User Data. Replace [username] with your own username. You can choose a different location for the new profile, using the Make New Folder button if you want to create a separate folder for it. Once you have selected your location, click OK.

Browse For Folder dialog box

Google Chrome has various switches that can be used when running the program to perform various tasks. To add switches to be run when the new profile is used, click the Advanced options check box. Additional options become available at the bottom of the dialog box. To choose a switch to add, select one from the Add switches to shortcut drop-down list and click Add.

For more information about switches available for Google Chrome, see the following web page:

http://www.waltercedric.com/component/content/article/1713.html

Selecting Advanced options

Once you have chosen the settings for your new profile and added switches, if desired, click OK.

Clicking OK

If you have selected the Advanced options check box, but have not selected any switches, the following dialog box displays. Click OK to create your new profile anyway, with no switches.

Switch list is empty dialog box

An icon for your new profile is added to the List of profiles.

New profile created

Create a Desktop Shortcut for a Profile

If you open Google Chrome using different profiles often, you can create a shortcut on your desktop for each Google Chrome profile, making it easier to access your profiles. To do this, right-click on the profile icon for which you want to create a shortcut and select Create shortcut to Desktop from the popup menu.

Creating shortcut to profile on Desktop

A shortcut is created for the selected profile and is named Google Chrome [profile name], where [profile name] is the name of the profile as listed in the List of profiles in Google Chrome Backup.

Chrome profile shortcut on desktop

Restore a Profile

To restore a profile, you can use the wizard (click the Run Wizard button) and select Restore instead of Backup on the first screen. You can also right-click on the profile you want to restore and select Restore this Profile from the popup menu.

Selecting Restore this Profile

If you use the popup menu to restore a profile, the Select backup file dialog box displays. Navigate to the location where you saved your backup file, select the file, and click Open.

Selecting a backup file

If you chose to protect your backup file with a password, as described earlier in this post, the Password dialog box displays. Enter the password and click OK.

Entering the password for the backup file

A dialog box displays warning you that your current profile will be overwritten. To proceed with the restore process anyway, click Yes.

Overwrite current profile warning dialog box

When the restore process is done, a status message displays at the bottom of the Google Chrome Backup main window.

Restore status

Close Google Chrome Backup

To close Google Chrome Backup, click the X button in the upper, right corner of the dialog box.

Closing Google Chrome Backup

Wrap Up

In this post, we covered setting up Google Chrome Backup so it starts when Windows starts, creating a new profile, creating a desktop profile to open Google Chrome using a specific profile, and restoring a profile.
In Part I of this series, we covered installing and starting Google Chrome Backup, protecting the backup file with a password, and backing up a profile.

You can also backup your profiles by copying the separate profile directories in the User Data directory to another location. However, we hope this series has shown you that Google Chrome Backup can be a handy tool for easily managing your profiles, including backing up and restoring profiles and creating new profiles.