Tips & Tricks, Tutorials, Hacking, Troubleshooting,

Showing posts with label Internet Explorer. Show all posts

There are many of our readers who reported that us that some times the google chrome browser flash plugin crashes when they were watching youtube video, it has happened with many google chrome users irrespective the browser version they are using. Symptoms were quite different as it happened with some users while youtube video, dailymotion video or any other flash videos are playing. On the other hand there are times when this happened with users were actually not playing a video but it happened due to some other flash object on some website which they are trying to load.
Shock Wave Plugin Crash In Google Chrome
In most of the cases this issue happened with google chrome users, but not limited to google chrome only as it happened with those who are using other browsers like Firefox and Internet Explorer as well.  The first and foremost reason this could happen could be due to conflict in between the flash player in google chrome and there are different reasons for different browsers.

For Google Chrome – Disable One Version Of Flash Player

This firstly happens in google chrome when there are multiple version of flash shockwave plugin installed and google chrome get confused and try to use both of these plugins installed of the same program and fails to do so and results in crashing of all flash videos across the browser.

Quick Fix To Google Chrome Flash Crash Issue

The quickest way to get rid of this problem is to close google chrome, restart it and reload all the youtube or any other flash videos again and they should play fine, if you want to get rid of this problem permanently then follow the fix below.
In this case you will need to go to google chrome browser plugin settings and fix the issues, follow the step by step solution for the same.
1. Open google chrome and type about:plugins or chrome://plugins
chrome_Plugins
2. Now locate Flash – if it says 2 files with different versions as you can see in the image above, you will need to disable one of them to stop the flash plugin to crash while videos are playing. For this you will need to click Details with plus sign which is shown on the top right corner with in the browser.
Plugins_Details_Google_Chrome
3. Once you click details you will see the details for both the flash plugin and you need to here disable the internal google chrome flash version which is second entry and is in the app data folder.

Disable_Flash_Plugin_In_Google_Chrome
Once you have disabled one of the flash plugin here, you just need to restart google chrome and the problem of shockwave plugin will not happen again.

For Firefox – Reinstall Flash Plugin To Fix Crashing

There are times when shockwave plugin may crash in firefox and at such times you will need to re install the flash shockwave plugin, for this uninstall the flash plugin and then go to Adobe’s test page – then when you see a yellow notification bar will appear above the webpage. Click Install Missing Plugins
Install Flash In Firefox

For Internet Explorer – Uninstall Flash From Add Remove Programs

For this you will need to go to Control Panel >> Add Remove Programs or Programs and Features and then locate the Adobe Flash Player and then double click to remove or uninstall it.
remove_flash_player_in_ie
Once flash player is removed, restart computer and then go to Adobe Flash Player Download page in internet explorer again.

If you’re running Windows 8 with Internet Explorer 10, you probably have realized by now that there are two different versions of IE: one that is a full-screen Metro app and one that is just a desktop version that we’ve always had for years and years.
Normally, if you go to the Start screen, you’ll see the Internet Explorer 10 tile, which will load the Metro full-screen version of IE:
ie metro app
Now let’s say you install Google Chrome and you set Chrome as your default browser:
chrome default browser
If you go back to the Start Screen after doing this, you’ll notice that the Internet Explorer tile has a slightly different version of the logo on it! That’s because it’s now the desktop version of IE instead of the metro version.
ie desktop version
Now whenever you click on the IE 10 tile on the start screen, it just keeps opening the desktop version! Grrrr. I thought it was a bug or something and it took me forever to figure out what the actual problem was. Since I had made Google Chrome the default browser, Windows 8 decided to replace the tile with the desktop version. I have no idea why it would do this or how it makes any sense, but that is what Windows 8 does.
If you want to get back the immersive IE 10 full-screen metro app, you will have to set IE 10 as the default web browser on your Windows 8 machine. You can do that by going to the Start Screen and typing Default Programs. This will automatically bring up the search charm for you.
default programs
Then click on Set your default programs.
set your default programs
Scroll down to Internet Explorer and then click on the Set this program as default at the bottom of the right-hand pane.
set ie as default
That’s it! Now when you do this, if you go back to the Start Screen, you will see that the IE 10 logo has changed back to the Metro full-screen version. If you click on it, you will get the full-screen version of IE.
full screen ie
As of right now, I can’t figure out a way to make Chrome my default browser and still get IE to load in the full-screen version. If you have found a solution to this, please let us know in the comments!
This is definitely not very intuitive and will confuse people even more once they start using Windows 8 and Internet Explorer 10. Two versions is already confusing enough, but disabling the Metro version just because you set another browser as default really makes no sense. Feel free to vent in the comments! Enjoy!

So there’s one really annoying thing about the way Internet Explorer works and that’s when you try to save a web page. If you click on Save As, by default IE will choose the Webpage, complete (*.htm, *.html) format when saving.
save webpage ie
I don’t like this format when saving web pages because it creates one HTML file for the source code and then saves all the other assets like JS files, images, CSS, etc in a separate folder.
ie save webpage
Instead, I always change it to Web Archive, single file (*.mht). This is a lot more convenient for me if I am just looking for a quick way to save a few web pages and don’t care about all the source files.
web archive mht
So is there any way to default IE so that it saves every webpage in the MHT format instead of HTML? Well, not exactly. You can’t reconfigure the File – Save As or pressing CTRL + S on your keyboard. That will still bring up the Save Webpage dialog with Webpage, complete as default.
However, you can create a new button on the Favorites toolbar that, when clicked, will bring up the save Save Webpage dialog, but with MHT as the default. It’s the best solution and really the only one out there. It works nicely because it doesn’t require any additional clicks to use either.
Also, if you know how to use a program like AutoHotKey, you can create a keyboard shortcut so that you can press just one key to run the script and have the Save Webpage dialog pop up! In this article, I’ll show you how to do this.
First, you need to created a VBS script with the following code. In order to do this, open Notepad and paste in the following code:
WScript.Timeout=10
Set wShell=CreateObject("WScript.Shell")
wShell.SendKeys "^s"
Do While Not wShell.AppActivate("Save Webpage")
WScript.Sleep 100
Loop
wShell.SendKeys "%t{home}tww%n"
It should look exactly like this:
save webpage
Next, click on File – Save and then change the Save as type to All Files. Give the file a name like SaveAsMHT.vbs. The important thing is the .VBS at the end of the file name.
save as type
Save the file somewhere on your computer, doesn’t really matter where. Next, right-click in the same folder and choose NewShortcut.
new shortcut
Go ahead and click Browse and then select the VBS script. Give your shortcut a useful understandable name like Save As or Save As MHT, etc.
new shortcut vbs
shortcut name
Now for the last step. Open Internet Explorer, right-click anywhere in the top title bar and select Favorites bar.
favorites bar
Now all you have to do is drag and drop the shortcut to the Favorites bar. You may have to minimize IE so it’s not taking up the whole screen in order to do this.
shortcut favorites bar
That’s it! Now just click on that button, which will run the script and open the Save Webpage dialog set to the MHT format automatically.
mht save as
Sweet! So for those of you who save a lot of webpages, hopefully this will make your life easier by creating a shortcut to saving web pages in MHT format. Enjoy!

If you use Internet Explorer and you have trouble downloading more than 2 files from one website, this registry edit might solve your problem.
To do this, open the Registry Editor by entering “regedit” (without the quotes) in the Search box on the Start menu. When regedit.exe displays in the results, click on it or press Enter when it’s highlighted.
01_opening_regedit
If the User Account Control dialog box displays, click Yes to continue.
NOTE: You may not see this dialog box, depending on your User Account Control settings. See our post, Windows 7 – How to configure UAC (User Account Control), for more information.
02_uac_dialog_for_regedit
Navigate to the following key in the tree on the left.
HKEY_CURRENT_USER\Software\Microsoft\Windows\CurrentVersion\Internet Settings
Right-click on the Internet Settings key and select New | DWORD (32-bit) Value from the popup menu.
03_creating_new_dword_value
Name the new value MaxConnectionsPerServer and then double-click on it.
NOTE: This key sets the limit for HTTP 1.1 servers, which is normally supposed to be 2.
04_maxconnectionsperserver_value
On the Edit DWORD (32-bit) Value dialog box, enter 4 in the Value data edit box, select Decimal as the Base and click OK.
05_changing_maxconnectionsperserver_value
Create another new DWORD (32-bit) Value under the Internet Settings key and name it MaxConnectionsPer1_0Server. Double-click on the new key and change its value to 8.
NOTE: This key sets the limit for HTTP 1.0 servers, which is normally supposed to be 4.
06_values_changed
Close the Registry Editor by selecting Exit from the File menu.
07_closing_regedit
You can set these two keys to higher numbers if you want, but if you set the numbers too high, you may find that your browsing becomes much slower than usual, and you might even get blocked from some servers for using too many connections. It’s usually safe to double the default values.
To revert to the default values, simply delete the two keys you added to the registry.

Internet Explorer 9 recently was having some strange issues on my Windows 7 machine and instead of spending hours trying to figure out what was causing the problem, I decided I would just reinstall the whole thing! Well, it fixed my problem and that’s why I’m writing about it.

Method 1 – Windows Features

Depending on your version of Windows 7, you have either IE 8 or IE 9 installed by default. You can uninstall and reinstall IE now by simply going to the control panel. In the Control Panel, just click on Programs and Features.
programs and features
Next, click on the Turn Windows Features On and Off link located in the left-hand pane.
turn off features
In the dialog, simply uncheck Internet Explorer 8 or Internet Explorer 9.
uninstall ie 9
You’ll get a message stating that doing so could affect other programs, blah, blah. Don’t worry about it, it won’t do anything. Just click Yes.
uninstall ie
Now go ahead and reboot your computer and then come back into the same dialog and re-check Internet Explorer. It will reinstall it and hopefully any issues you were having will be gone.

Method 2 – Installed Updates

There’s also a second way to reinstall Internet Explorer in Windows 7. Instead of clicking on Turn Windows Features On and Off in the Control Panel screenshot above, click on View Installed Updates.
view installed updates
Now scroll down the list to the Microsoft Windows section and there you will find Internet Explorer:
windows ie 9
Click on that and then click the Uninstall button that shows up at the top. Then to reinstall IE 9, you can go to the IE 9 homepage and download it:
http://windows.microsoft.com/en-US/internet-explorer/downloads/ie-9/worldwide-languages
I’m not 100% sure about the difference in using one method over the other, but you can try both if you find one method does not fix your problem. If you have any questions, feel free to post a comment. Enjoy!

Although you can search the web from the Firefox address bar, there is a much better way to use the address bar and harness the power of Google at the same time.

CyberSearch is an add-on for Firefox that lets add advanced Google search capabilities to Firefox. With it, you can get results from Google more quickly and find what you are looking for faster.

Firefox and Google Searches

Many people use Google as the default search engine in Firefox. When searching from the address bar, you simply type in your search term and press the Enter key. Firefox then directs you to Google’s website where your search results are displayed on the search engine results page (SERP). About the only thing this process saves you is the trouble of having to go to Google’s website first.

CyberSearch, an add-on for Firefox, brings some features of the SERP to your address bar by allowing you to see the top results for your searches without having to go to Google’s site at all.

When you type a search term in Firefox’s address bar, the results of your search automatically appear allowing you to choose from among the most popular search results. CyberSearch is particularly useful when your searches include popular and high-volume search terms.

Installing and Using CyberSearch

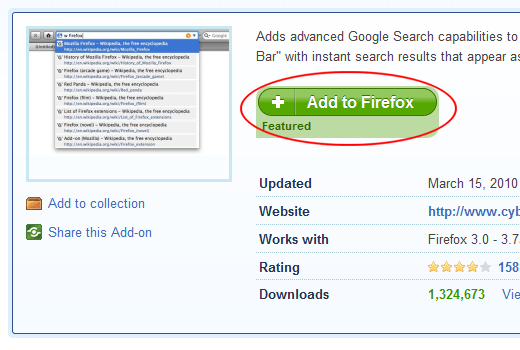
Open Firefox and visit the official CyberSearch page at Mozilla.org. Click on the Add to Firefox button and follow the instructions for installation. Note that after installation, you are prompted to restart Firefox. The add-on won’t work until you do.

Install CyberSearch Firefox Add-on

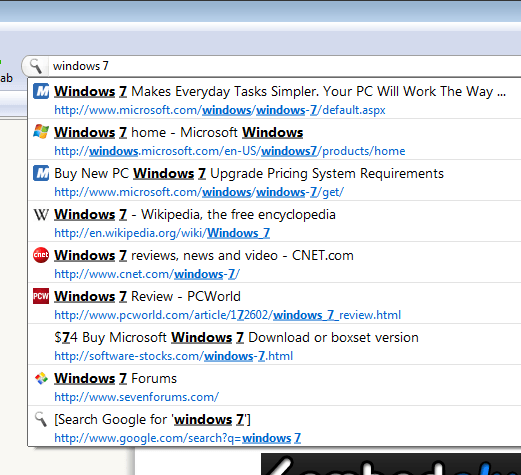
Once the add-on is installed and you’ve restarted Firefox, CyberSearch is ready to use. Let’s say that you want to search for the term Windows 7 from the Firefox address bar. Type in the search term and notice that CyberSearch automatically shows you the most popular results.

Search Results with CyberSearch

These are the same results you would get on the SERP had you searched for Windows 7 on Google. Note that the results include pages from Microsoft, Wikipedia, CNET, PCWorld, and others.

These are not watered down or filtered results; they are the same you would get at Google.com because they are from Google.com. CyberSearch just conveniently displays them from your Firefox address bar.

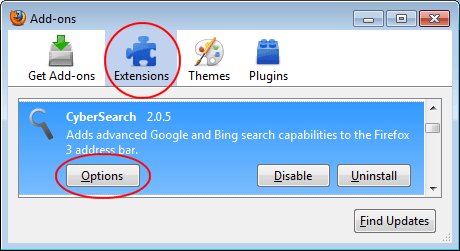
CyberSearch also comes with a variety of options so you can customize how the add-on works and behaves. Click on Tools>Add-ons, click on the Extensions tab, and locate the CyberSearch add-on from the list. Click on the Options button to open the options window.

CyberSearch Options for Firefox

Using the options window, you can set how many results appear during a search, which search service to use, whether the Enter key pulls up the search page, and a number of other options to make using the add-on more convenient. On the Reset tab, you can even restore CyberSearch’s default settings in case you forget which options you’ve changed and which you’ve left alone.

CybserSearch is a convenient add-on that lets you add advanced search capabilities to Firefox. Once installed, you can view Google search results right from the address bar without having to go to the Google website first. CyberSearch is especially useful if you often find yourself searching Google and want to save some time by not having to go to the search engine’s website first.

In the days before broadband Internet connections, surfers would have to wait a long time on dial-up for images and pictures to load on a web page. By disabling images, surfers were able to save money on bandwidth charges and save time by picking and choosing which images to download and which to ignore.

Even in a world of almost universal broadband connections, the benefits of disabling images in IE8 still have merit no matter how fast your connection. This is especially true since some Internet service providers are beginning to experiment with eliminating unlimited Internet connections and charging customers a rate based on bandwidth usage.

Disabling images in IE8 is a simple procedure. First, click on Tools>Internet Options and then click on the Advanced tab in the Internet Options window. In the Settings pane, locate the section labeled Multimedia. Here you need to change two options. Uncheck the Show pictures option and check the Show image download placeholder option. Click the OK button for these options to take effect.

1 - Show Pictures in IE8

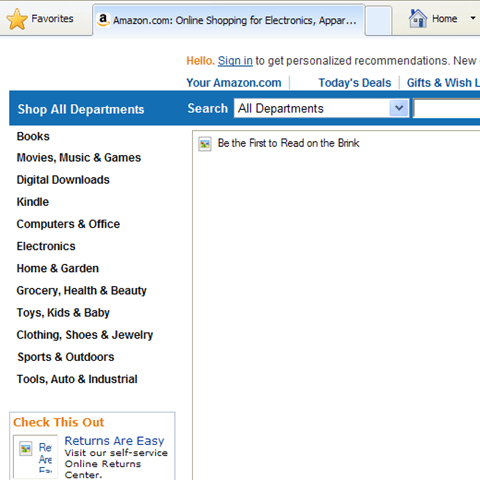
You will notice that whenever you surf to a web page, the images do not automatically load. In their place, you will see what’s called a placeholder where the image would have loaded if you allowed IE8 to display images.

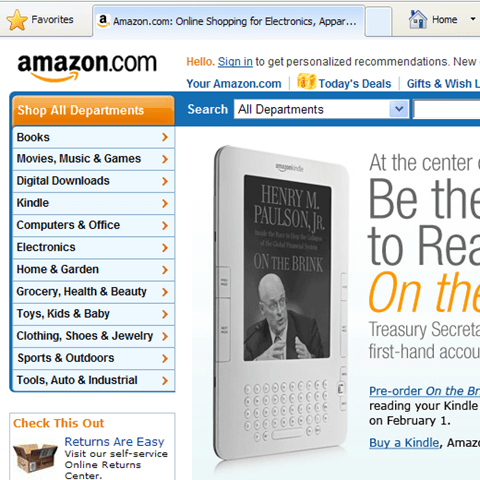
For example, in the screenshot below, notice that this part of Amazon.com’s frontpage displays normally when you have images enabled in IE8.

2 - Before Images Disabled=

In the next screenshot, you see what Amazon.com looks like when you disable images in IE8 and the placeholders show up instead of the pictures.

3 - After Images Disabled=

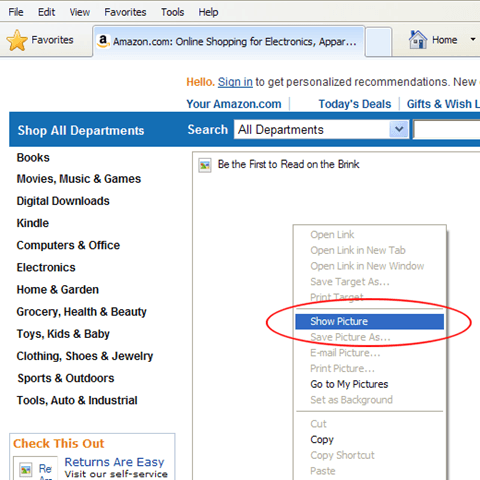
Fortunately, IE8 does not force you to either have the images load or not have the images load. You can override your decision to suppress images from downloading and displaying by right clicking on any placeholder and selected Show Picture from the pop-up menu.

4 - Show Picture in IE8

This style of web surfing carries with it several advantages. First, if Time Warner and other ISPs begin to charge customers per bandwidth usage, this trick can significantly reduce the amount of information you download on the Internet resulting in a lower bill.

Second, if you are doing research on the Internet, you may find that disabling images in IE8 allows you to focus on your task and avoid the distraction of looking at extraneous images. You may also find that your children will spend more time on task when using the Internet for school assignments. Without those pesky images to distract them, your kids can get down to work and not use homework time for entertainment time.

Finally, some Internet users actually prefer this minimalist style of surfing the web. What is stoic to some is a break from the advertisements, “click here” teasers, and other distractions displayed in web images to others. Give it a try and tell us what you think about disabling images in IE8 and surfing the web free from distraction.

Internet Explorer 9 Beta is the new version of the browser available from Microsoft. To get a better browsing experience with it, you might want to make it always start in Full-Screen Mode, and here’s how to do it.

1. If you haven’t done so already, you’ll want to download and install Internet Explorer 9 Beta. For more about getting started, check out Our Beginner Guide to Set Up & Use IE 9.

sshot-2010-12-26-23-32-54

2. To manually toggle between Normal and Full-Screen Mode, simply hit the “F11” key. This allows you to use all of your monitor’s real estate making browsing your favorite websites a more fluid experience…especially if you have a large monitor.

sshot-2011-02-06-[19-21-22]

3. To make it always launch in Full Screen Mode you’ll need to tweak the Registry. Make sure you’re closed out of IE 9, then click on Start and type regedit into the search box and hit Enter.

sshot-2011-02-06-[19-32-24]

4. When the Registry Editor opens navigate to the following:

HKEY_CURRENT_USER\Software\Microsoft\Internet Explorer\Main

Then in the right panel scroll down to FullScreen and double-click on it.

sshot-2011-02-06-[19-49-42]

5. The Edit String window will come up and in the Value data field it will be set to no.

sshot-2011-02-06-[19-50-06]

6. Change the Value data field to Yes, then click OK.

sshot-2011-02-06-[19-50-21]

7. Now you can simply close out of Registry Editor.

sshot-2011-02-06-[20-03-55]

8. When you go back and launch Internet Explorer 9 Beta, it will start in Full-Screen Mode.

sshot-2011-02-06-[19-52-52]

sshot-2011-02-06-[19-56-22]

9. To keep this setting you’ll need to hover the mouse in the upper right corner of IE 9 and Minimize or Close out of it. If you use “F11” on the keyboard or click the Restore button, it will revert the value data you set in the Registry back to “No”. Then you’ll need to reset the Registry setting again or continue to toggle between Normal and Full-Screen mode by hitting the “F11” key.

sshot-2011-02-06-[20-11-07]

If you’re a fan of IE 9 and always want it to launch in Full-Screen Mode, this quick tip will do it for you.

Also be sure to check out our other IE 9 Beta tips: