Tips & Tricks, Tutorials, Hacking, Troubleshooting,

Showing posts with label Windows Vista. Show all posts

This brief guide will show you how to have ‘drive icons’ (shortcuts) automatically appear on your desktop when you plug in a USB drive, SD Card, insert a CD or DVD etc.


  1. To get started, head over to the Desktop Media download page and download their free app, Desktop Media. Once the file has finished downloading (it’s very small) – open the .zip and run the installation program. The procedure is very straight forward – just click Next a bunch of times.

  2. Once the installation has completed, Desktop Media will launch. Now try plugging in a USB drive, an SD Card or CD/DVD. A shortcut to that drive will automatically appear on your Desktop.

  3. You can customize Desktop Media by right-clicking on its icon in the System Tray and then select Options…

  4. One item of note is the option to display Fixed drives. A “fixed” drive is one that’s “built in” to your PC (for example, your C: drive). Place a check in the Fixed box to have shortcuts created to them on your Desktop.

  5. Now you’ll be able to quickly access your fixed drives as well.

  6. For your external drives (USB, SD, CD/DVD) – you can also right-click on the shortcut and select Eject to safely remove them from your PC – a very handy option!

If you like using a mouse to get work done on your Mac or Windows laptop, then you might find it useful to disable the trackpad or touchpad on your system. This is really useful if you type a lot and the trackpad is located in a spot on your laptop that causes it to always pick up slight movements from your hand while typing.
It can be really annoying if you are typing something and all of a sudden the cursor jumps to another part of the document! In this article, I’ll show you the different ways to disable the touchpad on OS X, Windows 7 and Windows 8.

Disable Trackpad OS X Mountain Lion

If you’re running the latest version of OS X and you have a bluetooth or USB mouse connected, you can have OS X ignore the trackpad by going to System Preferences and then clicking on Accessibility.
disable trackpad mac
Then scroll down to Mouse and Trackpad and check the Ignore built-in trackpad when mouse or wireless trackpad is present box.
mouse and trackpad

Disable Trackpad on Windows

In Windows 7 and Windows 8, there are a couple of different ways you can disable the trackpad depending on how your system is configured. The first way you want to check is to see if there is a special button on the keyboard or switch on your laptop to disable the trackpad. For example, this is the key on a Dell laptop. You have to press the Function key and the trackpad button to enable/disable it.
disable trackpad keyboard
If you don’t have the button or the switch, the next way to disable the touchpad is to go to Mouse properties from Control Panel and check if there is a Device Settings or Touchpad tab.
device settings
Click on the Disable button and you’re good to go. If you don’t see the Device Settings tab in Mouse Properties, that means you don’t have the proper drivers installed or the full software for the trackpad. Go to the manufacturers website and download the full driver package.
Lastly, you can open up Device Manager from Control Panel, expand Mouse and other pointing devices and then disable the touchpad if it is listed there.
uninstall touchpad
Everything is the same when disabling the trackpad in Windows 8 also. Of course in Windows 8, your trackpad may not even work unless you have the latest drivers! Synaptics still hasn’t released a Windows 8 generic Touchpad driver yet, so keep an eye out for that if you have a Synaptics touchpad on your laptop. Enjoy!

I am not sure this is already posted, only yesterday I came to know about this, so thought will share with you all.

Follow these steps:

1) Open Notepad and copy the contents of the code below.


cls
@ECHO OFF
title Folder MyPrivateLocker
if EXIST "Control Panel.{21EC2020-3AEA-1069-A2DD-08002B30309D}" goto UNLOCK
if NOT EXIST MyPrivateLocker goto MDLOCKER
:CONFIRM
echo Are you sure u want to Lock the folder(Y/N)
set/p "cho=>"
if %cho%==Y goto LOCK
if %cho%==y goto LOCK
if %cho%==n goto END
if %cho%==N goto END
echo Invalid choice.
goto CONFIRM
:LOCK
ren MyPrivateLocker "Control Panel.{21EC2020-3AEA-1069-A2DD-08002B30309D}"
attrib +h +s "Control Panel.{21EC2020-3AEA-1069-A2DD-08002B30309D}"
echo MyPrivateLocker locked
goto End
:UNLOCK
echo Enter password to Unlock folder
set/p "pass=>"
if NOT %pass%==change to your desired password goto FAIL
attrib -h -s "Control Panel.{21EC2020-3AEA-1069-A2DD-08002B30309D}"
ren "Control Panel.{21EC2020-3AEA-1069-A2DD-08002B30309D}" MyPrivateLocker
echo MyPrivateLocker Unlocked successfully
goto End
:FAIL
echo Invalid password
goto end
:MDLOCKER
md MyPrivateLocker
echo MyPrivateLocker created successfully
goto End
:End
2) Change the password by replacing change to your desired password in the code above with your desired password.

3) Save it as FL.bat and close. (Note: Try to be innovative and save it in such a way that it sounds like a system file so that nobody will try to bother clicking it)


4) Double click run FL.bat.

5) It will create a new folder called ‘MyPrivateLocker’ automatically. (If you want the file name to be different, replace MyPrivateLocker in the code above with the name of your choice). This new locker folder will be created in the same folder/drive as the .bat file).


6) Copy/place the files to be locked and hidden inside the MyPrivateLocker


and double click run FL.bat, it will ask whether you want to lock. Say ‘Y’ and now your folder will get locked and hidden.


7) To unlock and unhide the folder, double click run FL.bat again and enter your password you have changed in the code (step 2).


Tested for invalid password : Gave error

There are some Windows errors that are masterpieces, meaning they have been around since the beginning of time and never fail to go away. One that pops into my mind is “Windows has recovered from a serious error”. If you search Google for that, you’ll find thousands of entries! Another one like that is “Windows Explorer has stopped working”.
explorer stopped working
And sure enough, I got one of these error message on my Windows 7 PC last week. The problem with these errors and the reason why they are so popular is because they have all sort of causes. It’s not just one issue that causes the error, otherwise it would be easy to fix. In this article, I’ll try to go through all the different methods you can use to fix the error.

Method 1 – Perform a Clean Boot

The hunt it on! This problem is normally caused by something on your computer other than the OS. Windows itself rarely crashes on it’s own with this error. So the first thing to do is try and isolate what service, program or startup item is causing the issue, if it’s one of those.
You can do this by performing what is called a clean boot. It’s described here in detail on the Microsoft website:
http://support.microsoft.com//kb/929135
Basically, we use MSCONFIG to disable all third-party services and startup items and see if the problem goes away. If it does, then you know it’s one of those services or startup items and you have to start a cycle of enabling half the items, then rebooting, checking, etc. It’s a little time consuming, but worth it to have your computer running properly.
clean boot

Method 2 – Disable Shell Extensions

If you perform a clean boot and the issue is still occurring, then you can try to disable all non-Microsoft shell extensions. You can do this by downloading a free program from Nirsoft called ShellExView.
shellexview
You want to run the program and then sort all the items by Manufacturer. Anything that is not from Microsoft should be disabled. Again, if the issue goes away, then you know it’s one of those shell extensions and you can enable them one by one. To disable, just select the item and then click on the red circle button.

Method 3 – Update Video Driver

Oddly enough, an old or corrupted video driver can cause this issue. Go to the manufacturer’s website and download the latest version for your version of Windows, making sure to get 32 or 64-bit depending on your system.

Method 4 – Always Show Icons

Another strange fix is to go to Explorer, Tools, Folder Options and then the View tab for Windows XP. For Windows Vista and 7, you want to click on the Organize button, then Folder and Search Options, then View tab.
tools folder options
organize explorer
On the View tab, check the box that says Always show icons, never thumbnails.
always show icons
What does this do? Well, basically instead of trying to show a small thumbnail preview of a picture or video, it will just show an icon. That may not be ideal, but if it gets rid of the problem of explorer not responding, then it might be worth it.

Method 5 – System Restore

If you installed something like an update or a new driver and now all of a sudden you are having the explorer problem, it might be a good idea to restore your computer to a previous state. You can use System Restore to go back to a time before the update or installation that you believe is causing the problem. Click Start and type System Restore.
system restore

Method 6 – Run System File Checker

If this problem happens to be caused by a corrupted file in Windows, which is pretty rare, you can fix it using a few different tools. The first one is running the system file checker command at the command prompt. You can do this by opening an elevated command prompt (Click Start, type command and then right-click and choose Run as Administrator).
run as admin
At the command prompt, simply type in the following command:
sfc /scannow
sfc scannow
This will check all system and protected files and replace them if any of them are found to be corrupted. If this does not work, you can try a repair install.

Method 7 – Repair Install Windows

startup repair
You can get to startup repair from the System Recovery Options dialog shown above when the computer first loads. Basically, you need to press and hold F8 while your computer is booting. Then you’ll get the list of Advanced Boot Options, where you will choose Repair your computer.
repair your computer
Click Startup Repair and let it do it’s thing. Also, while you are in the System Recovery Options, you’ll see an option for Command Prompt. From there, you can try running the following command:
chkdsk c: /r

Method 8 – Virus or Malware Removal

If absolutely nothing else is working for you, then you may be a victim of a virus or malware. If you think you may have a virus, you should try to install some anti-virus and anti-spyware software to see if you can find any problems. If you have a really bad virus infection or lots of malware, your only choice may be to do a fresh install of the OS.
If you’re still having this problem, post your specs here, anything you had done recently on your computer and we’ll try to help! Enjoy!

System Restore is a useful tool that you can use to reset your computer’s settings to an earlier time. It can be very helpful in times of crisis, when your computer fails to work as it should. However, you can only restore your computer’s settings if you have a valid restore point to set it back to.

Although your computer usually automatically creates a restore point every time you install new software, drivers or updates, there’s no guarantee that it will. It’s wise to create a manual restore point before you major changes to your computer’s settings, install software or manually edit the registry.

If turn System Protection off on a disk, all your restore points for that disk will be deleted. If System Restore fails to automatically create a restore point when you turn it back on, you should create a manual restore point. To use System Restore in Windows Vista, you must have about 300 MB of free space on your hard drive.

Your drive must be larger than 1 GB and must be formatted using the NTFS file system, as System Restore cannot protect FAT32 or FAT file systems. System restore restores important files and settings such as system files, installed programs and registry settings. It doesn’t change your personal user files, such as documents, email messages or pictures, stored on your computer.

Creating a System Restore Point on a Disk

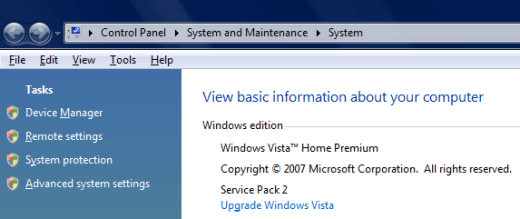
Click the Start button, then right click Computer and select Properties. In the left pane, click System Protection.

System Properties

Under Automatic restore points select the drive for which you’d like to create a restore point. Beside You can create a restore point right now for the disks selected above, click Create.

Type a description of the restore point in the field provided. You can use today’s date, or you can type a description of the changes you’re about to make to your computer. For example, describe the software you’re about to install or the edits you’re going to make to the registry. If it works, you will receive a message that the Restore point has been created successfully.

System Protection

Restoring Your Manual Restore Point

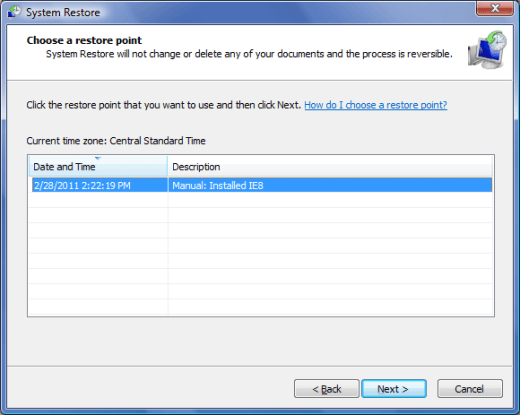
Save your work and close all open programs. Click the Start Search box, type System Restore and press Enter. Click Next, then look in the window for your restore point. Your most recent restore point will appear.

Select it and click Next. Review the information under Confirm your restore point and click Finish. System Restore will now restart your computer to return it to the earlier state you chose.

Choose a Restore Point

For more information, read How to enable or disable System Restore in Vista.

If your children will be using your Windows Vista computer, you can protect them by using Parental Controls. Windows Vista Parental Controls can control which websites your children can access, what games they can play, when they can use the computer and which programs they can run.

To effectively set up Parental Controls for a child’s account in Windows Vista, you must first protect your administrator accounts with a password. Click the Start button and Control Panel. Under User Accounts and Family Safety, click Add or remove user accounts.

Click the icon for each administrator account on your Windows Vista computer. Select Create a password. Type a strong password of with at least 8 characters which consists of both letters and numbers. Then type a hint that will help you remember your password if you forget it. Click Create password.

Create a Strong Password

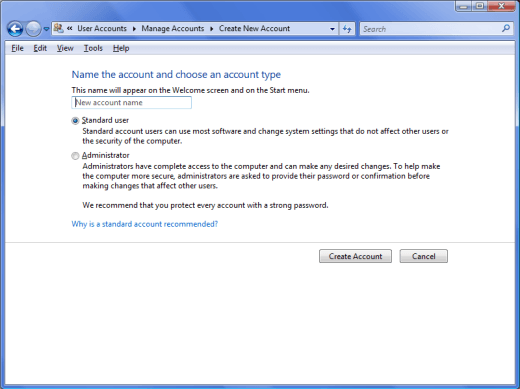
Click User Accounts and Family Safety in the address bar. If your child doesn’t already have an account on your Windows Vista computer, select Add or remove user accounts, then click Create a new account. Type a name for the child’s account. Select Standard account as the account type and click Create account.

Create a Child's Account

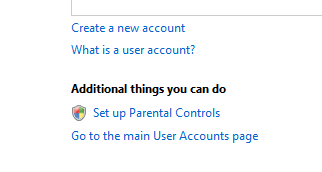
Click Manage Accounts in the address bar and select Set up Parental Controls. Select your child’s account from the list.

Set Parental Controls

Under Parental Controls, click On, enforce current settings. Under Activity Reporting, ensure that On, collect information about computer usage is checked.

Set Parental Controls Options

Click Windows Vista Web Restrictions. In this screen, you can choose to block certain websites and content or to allow all websites and content. You may also click the Edit the allow and block list link to allow or block specific websites.

If you’re setting up the computer for a younger child or if your child has a tendency to visit inappropriate websites, check the box beside Only allow websites that are on the allow list. Otherwise, choose a web restriction level for the Parental Controls under Block web content automatically.

The High web restriction level will block all websites except those which are specifically approved for children. The Medium web restriction level blocks unrateable web content and other content that is inappropriate for children, such as mature content. You may also choose to block web downloads by checking the next box. Click OK.

Web Restrictions

Click Time Limits, then click and drag your mouse over the hours when your child should not use the Windows Vista computer. The blocks in the graph should turn blue. Make sure to block all hours before 8 or 9 am and all hours after 8 or 9 pm.

If you prefer, you can choose to block your child’s access to the Windows Vista computer at other times, such as during breakfast, lunch or dinner or during times when you or another adult will need the computer.

If the child is on the computer when a blocked hour begins, he or she will be automatically logged off of the computer. When you’re satisfied with the Time Restrictions, click OK.

parentalcontrols6

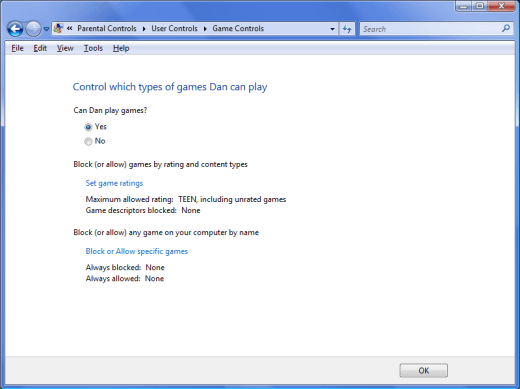
Click Games to set game restrictions. Game ratings only controls games which are installed on the computer, and cannot block or allow online games. Select Yes if you would like to allow the child to play games on your computer. If not, choose No.

If you’ve chosen Yes, click Set game ratings to choose which games the child can play. Choose whether you’d like to block or allow unrated games. Select Early Childhood for younger children. Select Everyone for children under 10 years of age. Choose Everyone 10+ for children between the ages of 10 and 13.

If you don’t mind your child being exposed to some strong language or violence, you may choose Teen for teenagers between the ages of 13 and 17. However, if these things concern you, you may select Everyone 10+ for your teenaged children instead. Click OK to enable your game ratings choice. Click Block or Allow for specific games.

If you’ve chosen to block unrated games, you may allow certain unrated games in this section. Also, if you’ve chosen Everyone 10+ or Teen as your game rating selection, you may block specific games which have violence, language and suggestive themes which you don’t want your child to observe.

The specific games which are currently installed on your computer will appear in this window. Go over each game individually, view its rating and select whether you want to block it, allow it or use the user rating setting you set in the Game Ratings parental controls.

If you’re uncertain whether a specific game is appropriate for children, consider playing it for a few minutes to determine whether you should block it or allow it. When you’re satisfied with your selections, click OK.

Allow or Block Games

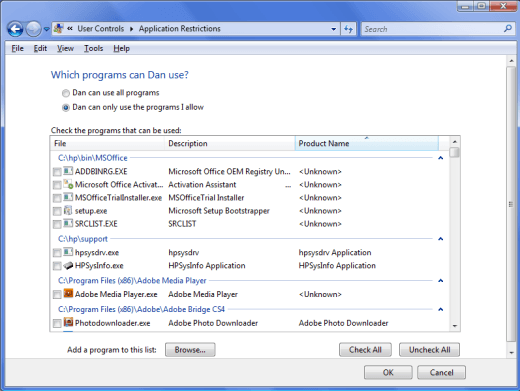
Click Allow and Block Specific Programs. If you want to allow your child to use all programs, select User can use all programs. If you want to block programs from running, select User can only use the programs I allow.

Wait for the computer to scan the Program Files folder, then select the allowed programs from the list. If a program is missing, click the Browse button to add it. When you’re finished, click OK.

Allow or Block Programs

You can get more information on this topic at How to block Internet web sites with free parental control software.

It can be extremely annoying when you’re looking away from your screen, typing away, then look to realize it’s all in CAPS. You accidentally hit the Caps Lock Key…here is how to make it beep when you hit it so you have a warning.


In Vista & Windows 7

1. To make the Caps Lock key beep and alert you if it’s accidentally hit in Vista or Windows 7, click on Start >> Control Panel.

caps

2. In Control Panel set the view to show Large Icons, then click Ease of Access Center.

sshot-2011-02-19-[17-47-56]

3. When the Make your computer easier to use screen comes up, you might be surprised when the computer starts talking to you. If you want to turn that off, uncheck Always read this section aloud.

Then under the Explore all settings list click Make the keyboard easier to use.

sshot-2011-02-19-[17-49-56]

4. Then in the next screen scroll down and check Turn on Toggle Keys – hear a tone when you press CAPS LOCK, NUM LOCK, or SCROLL LOCK. Then click OK and close out of Control Panel.

sshot-2011-02-19-[17-53-19]

In Windows XP

1. The process is essentially the same in XP but things are named and laid out differently. Click on Start >> Control Panel.

sshot-2011-02-18-[18-39-28]

2. When Control Panel opens make sure you’re in Classic View and click on Accessibility Options.

sshot-2011-02-18-[18-40-57]

3. In the Accessibility Options window, make sure you’re under the Keyboard tab, then check Use ToggleKeys. Click OK then close out of Control Panel.

sshot-2011-02-18-[18-42-02]

That’s it! Now any time you hit the Caps Lock key you will hear it beep. This trick can be very helpful when you’re busy and accidentally hit Caps Lock.

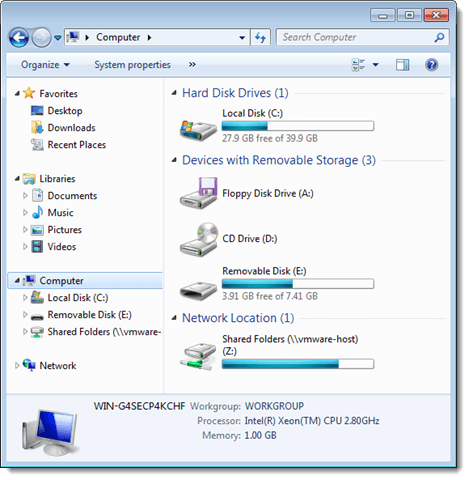
You may have drives showing in My Computer or Windows Explorer that you don’t use a lot, such as a USB flash drive or a network drive only used for backups, or a floppy drive. You can hide these drives in Windows 7 and Windows XP with a fairly simple change to the registry.

Drives showing in My Computer

NOTE: We recommend that you backup the registry before making changes to it. Refer to the following posts for help in backing up the registry.

Hiding drives using this method only hides the drive from view. Applications and the command prompt will still be able to access it and you can manually access it by typing a path to a folder on the drive in My Computer or Windows Explorer.

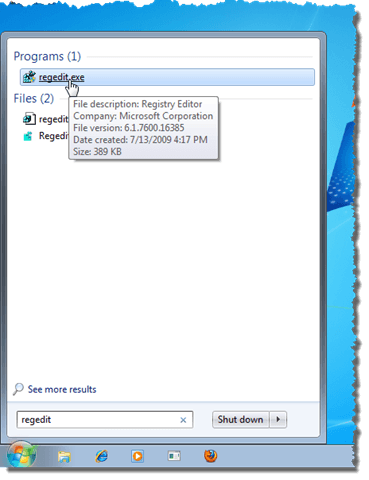
To hide one or more drives, open the Start menu and enter “regedit” (without the quotes) in the Search programs and files box. Press Enter when regedit.exe is listed in the results to open the Registry Editor. You may also click on the regedit.exe link.

Searching for regedit

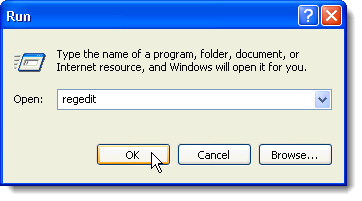
NOTE: If you are using Windows XP, select Run from the Start menu to open the Run dialog box. Enter “regedit” (again, without the quotes) in the Open edit box and click OK.

Entering regedit in the Run dialog box in Windows XP

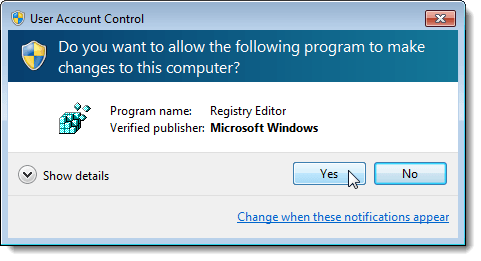
If the User Account Control dialog box displays, click Yes to continue.

NOTE: You may not see this dialog box, depending on your User Account Control settings. See our post, Windows 7 – How to configure UAC (User Account Control), for more information.

User Account Control dialog box

The Registry Editor displays. Navigate to the following key in the tree in the left pane.

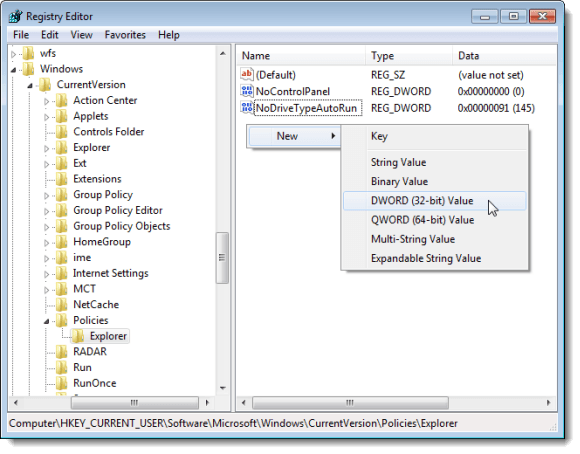
HKEY_CURRENT_USER \ Software \ Microsoft \ Windows \ CurrentVersion \ Policies \ Explorer

You need to create a new value, called NoDrives, under the Explorer key that most likely does not exist. To do this, select the Explorer key and right-click in the right pane. Select New | DWORD (32-bit) Value from the popup menu. Name the new value NoDrives.

Creating a new DWORD value

Before assigning a value to the new DWORD value you created, you have to calculate what that value will be. The NoDrives value is a 32-bit number, with the bits arranged in reverse order for the letters that represent drives, a value of 1 for a letter hiding that drive. For example, we decided to hide the floppy drive, which is drive A: and a USB flash drive, that is drive E:. The bits for hiding these two drives would be arranged like the following table.

Z Y X W V U T S R Q P O N M L K J I H G F E D C B A
0 0 0 0 0 0 0 0 0 0 0 0 0 0 0 0 0 0 0 0 0 1 0 0 0 1

You would then convert the binary number 10001 (the bits between A and E in the table) to a decimal number. You can use the Calculator in Windows 7 or Windows XP to do this.

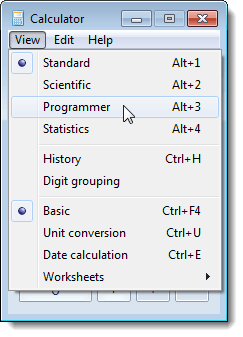
If you are using Windows 7, open the Calculator and select Programmer from the View menu.

Changing to the Programmer view in the calculator in Windows 7

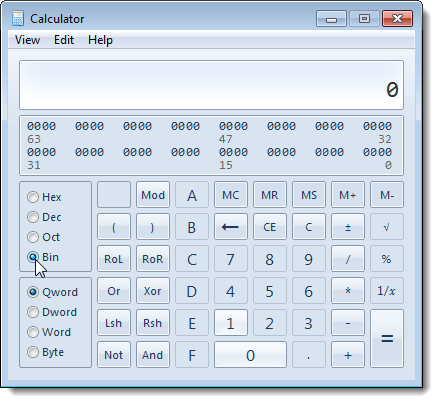
On the right side of the Calculator, select the Bin radio button to turn on Binary mode.

Selecting Binary mode on the calculator in Windows 7

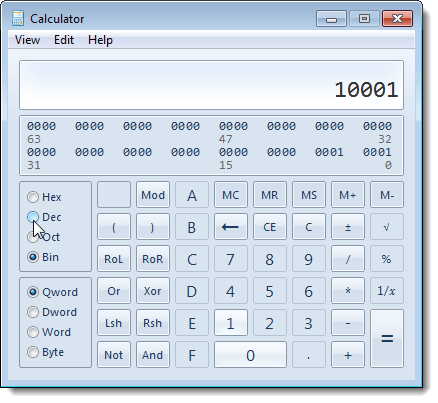
Enter “10001” (without the quotes) and then select the Dec radio button.

Entering a binary number in the calculator in Windows 7

The decimal value of 17 displays as the result. This is the value you will enter for the NoDrives value.

Decimal number calculated in Windows 7

Before we get back to defining the NoDrives value in the registry, we will show you how to convert the binary value “10001” to a decimal value in the Calculator in Windows XP. It’s a little different.

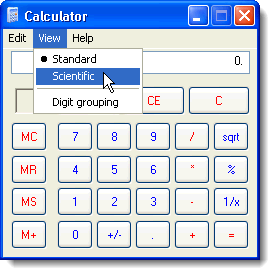
Open the Calculator and select Scientific from the View menu.

Changing to the Scientific view in the calculator in Windows XP

At top, left of the Calculator, under the entry box, select the Bin radio button to turn on Binary mode.

Selecting Binary mode on the calculator in Windows XP

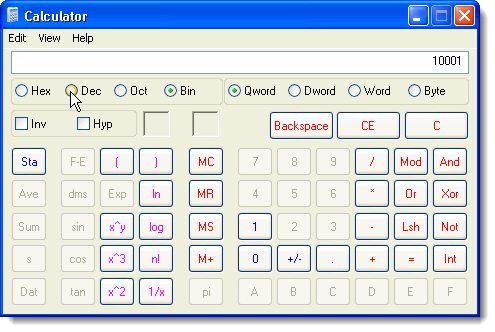
Enter “10001” (without the quotes) and then select the Dec radio button.

Entering a binary number in the calculator in Windows XP

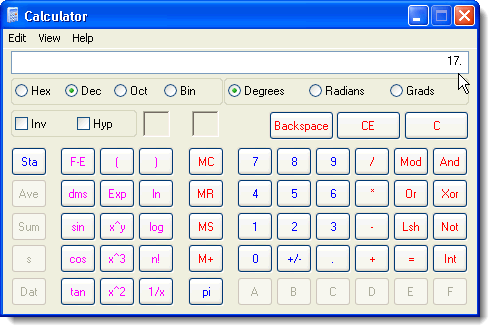
The decimal value of 17 displays as the result. Again, this is the value you will enter for the NoDrives value.

Decimal number calculated in Windows XP

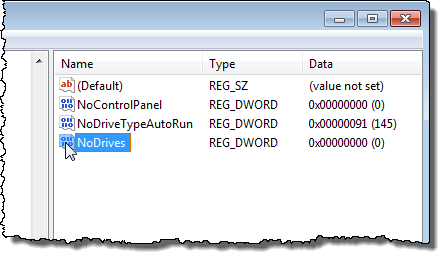
To enter the value for NoDrives, double-click on the NoDrives value in the right pane in the Registry Editor.

Double-clicking the NoDrives value

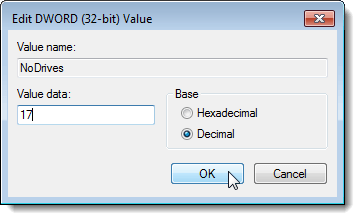
The Edit DWORD (32-bit) Value dialog box displays. First, select the Decimal radio button in the Base box. Then, enter “17” in the Value data edit box. Click OK.

NOTE: If you are hiding different drives and have calculated a different value for NoDrives, enter that value in the Value data edit box.

Entering the decimal Value data

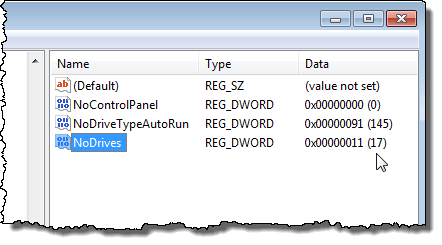
The value you entered displays in the Data column, along with the hexadecimal value, which, in our case, is 0×11.

Data value set

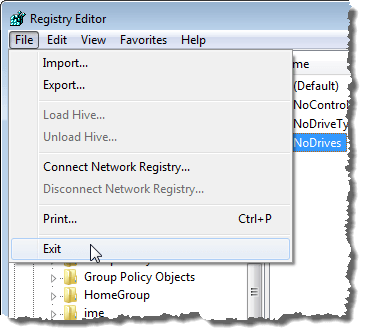
To close the Registry Editor, select Exit from the File menu.

Closing the Registry Editor

To put these changes into effect, you need to restart explorer.exe. We have previously written about the safe way to do this in Windows 7, Vista, and XP. See our post, Restart the Explorer.exe Process Correctly in Windows.

A and E drives hidden

If you want to hide one drive, the following chart is a quick reference, showing you the Decimal and Hexadecimal values for commonly used drive letters.

Drive Letter Decimal Hex
A 1 1
B 2 2
C 4 4
D 8 8
E 16 10
F 32 20
G 64 40
H 128 80

To hide multiple drives, use the table of all the drive letters shown earlier in this post to figure out the correct binary code, and then convert that to decimal or hexadecimal using the calculator methods also discussed earlier.

To show the drives again, simply open the Registry Editor again and delete the NoDrives value you added.