Tips & Tricks, Tutorials, Hacking, Troubleshooting,

Showing posts with label Mozilla Firefox. Show all posts

If you’re using Firefox, you might have recently stumbled upon a strange problem where you can’t log into Facebook. Instead of being able to login, you end up with some strange error messages:
/check6only.facebook.comajax/v6.php?v=check6only&pingonly=false
This happens when you try to login to your Facebook account and it instead redirects to some odd page. I ran into this issue on my test Firefox install on a virtual machine, but quickly realized a lot of people have had this error.
In this article, I’ll mention a couple of ways I tried to fix the problem and hopefully it’ll work for you and allow you to properly log into Facebook. Note that this is not a virus or malware issue as far as I can tell, so you don’t have to worry about scanning your system for viruses, etc.

Method 1 – Restart Firefox (no-addons)

The first thing I tried and which worked in my case was restarting Firefox without any add-ons. You can do this by clicking on Firefox, then Help and then Restart with Add-ons Disabled.
restart firefox
If this works for you and you are able to log into Facebook, then you will have to re-enable each add-on individually to see which one is causing the issue. Some people have reported that there is an extension called Babylon causing the issue with Facebook. If you have that installed, go ahead and disable it and see if that helps.

Method 2 – Reset Firefox

The second thing you can try is to reset Firefox. Resetting Firefox will save your bookmarks, browsing history, passwords, cookies, and auto-fill information, but nuke everything else. The old profile will be put on your desktop and called Old Firefox Data. You can reset Firefox by clicking on the Firefox button, then Help and then Troubleshooting Information.
reset firefox
A new tab will appear and here you can click on the Reset Firefox button.
check6only facebook
Once Firefox starts back up, go ahead and try to log into Facebook and see if you get the error message anymore. Hopefully not! There are a couple of other solutions I read about, but these two seem to be the easiest and best fixes.
If you’re still getting the error after trying the two methods above, post a comment here and I’ll try to help. If you have found another possible solution, let us know in the comments. Enjoy!

There are many of our readers who reported that us that some times the google chrome browser flash plugin crashes when they were watching youtube video, it has happened with many google chrome users irrespective the browser version they are using. Symptoms were quite different as it happened with some users while youtube video, dailymotion video or any other flash videos are playing. On the other hand there are times when this happened with users were actually not playing a video but it happened due to some other flash object on some website which they are trying to load.
Shock Wave Plugin Crash In Google Chrome
In most of the cases this issue happened with google chrome users, but not limited to google chrome only as it happened with those who are using other browsers like Firefox and Internet Explorer as well.  The first and foremost reason this could happen could be due to conflict in between the flash player in google chrome and there are different reasons for different browsers.

For Google Chrome – Disable One Version Of Flash Player

This firstly happens in google chrome when there are multiple version of flash shockwave plugin installed and google chrome get confused and try to use both of these plugins installed of the same program and fails to do so and results in crashing of all flash videos across the browser.

Quick Fix To Google Chrome Flash Crash Issue

The quickest way to get rid of this problem is to close google chrome, restart it and reload all the youtube or any other flash videos again and they should play fine, if you want to get rid of this problem permanently then follow the fix below.
In this case you will need to go to google chrome browser plugin settings and fix the issues, follow the step by step solution for the same.
1. Open google chrome and type about:plugins or chrome://plugins
chrome_Plugins
2. Now locate Flash – if it says 2 files with different versions as you can see in the image above, you will need to disable one of them to stop the flash plugin to crash while videos are playing. For this you will need to click Details with plus sign which is shown on the top right corner with in the browser.
Plugins_Details_Google_Chrome
3. Once you click details you will see the details for both the flash plugin and you need to here disable the internal google chrome flash version which is second entry and is in the app data folder.

Disable_Flash_Plugin_In_Google_Chrome
Once you have disabled one of the flash plugin here, you just need to restart google chrome and the problem of shockwave plugin will not happen again.

For Firefox – Reinstall Flash Plugin To Fix Crashing

There are times when shockwave plugin may crash in firefox and at such times you will need to re install the flash shockwave plugin, for this uninstall the flash plugin and then go to Adobe’s test page – then when you see a yellow notification bar will appear above the webpage. Click Install Missing Plugins
Install Flash In Firefox

For Internet Explorer – Uninstall Flash From Add Remove Programs

For this you will need to go to Control Panel >> Add Remove Programs or Programs and Features and then locate the Adobe Flash Player and then double click to remove or uninstall it.
remove_flash_player_in_ie
Once flash player is removed, restart computer and then go to Adobe Flash Player Download page in internet explorer again.

When you enter a keyword in the Mozilla Firefox address bar, it offers a drop-down list of sites you’ve surfed. You can make the background of this list slightly transparent, as is the case in Google Chrome, simply by changing the browser settings and in this tutorial I will show you how to do that.


To get started follow steps below
Step 1: If you Mozilla Firefox window is open, close it
Step 2: Click Start menu button, inside search field type %appdata%\Mozilla\Firefox\Profiles\ and press Enter on your keyboard
Step 3: In the Windows Explorer that opens, double click the folder that is present xxxxxxxx.default.

Step 4: Now open chrome folder

Step 5: Double click on the file userChrome.css. If by any chance this file is missing, double click the file userChrome-example.css.
Step 6: The file is opened in Windows Notepad or your web editor if you have one installed. At the end of the file content, add the following code:
#PopupAutoCompleteRichResult[type="autocomplete-richlistbox"]
{
opacity: 0.9 !important;
}

Step 7: Click the File menu and select Save As
Step 8: Pull down the Type list and select All Files.
Step 9: Then name the file userChrome.css and click Save. Confirm your save if necessary and close Notepad.
Step 10: Restart your Mozilla Firefox browser and the Smart Address Bar is now transparent!

With Firefox, you saved usernames and passwords you use for quick access to online services you use regularly. Now you want to delete this list because other people use your computer and you do not want them accessing your service. In this tutorial I will show you how to delete all your remember usernames and passwords in Firefox.


To get started follow steps below
Step 1: Start the Mozilla Firefox.
Step 2: Click orange Firefox button located at top left and from menu choose Options -> Options

Step 3: Open the Security tab.
Step 4: Click Saved Passwords.

Step 5: Then select the sites for which you want to delete the passwords stored in Firefox and click Remove. To remove all stored usernames and passwords simply click Remove All. Finally, click Close.

Step 6: If you no longer wish for Firefox to ask you to keep your passwords, go back to Options window and uncheck the options Remember passwords for sites. Save changes by clicking OK button.

All your usernames and passwords are now gone from Mozilla Firefox. If you have any problems or suggestions regarding this topic leave your reply in comment section below. I also strongly advise you to read this tutorial if you are looking for more secure way to manage your passwords.

Your bookmarks include hundreds of links to sites, documents and articles. But since the day you added these documents to your bookmarks, they may have disappeared from the web site. To easily detect deas links within your bookmarks and remove them you can use a free tool called AM-DeadLink and in this tutorial I will show you how to do that under Windows 7.


To get started follow steps below
Step 1: Download AM-DeadLink from this link.
Step 2: After downloading the program, install it.
Step 4: AM Deadlink detects all Internet Explorer favorites by defaut.
Step 5: Scroll down the list and instead of Internet Explorer choose Firefox.

Step 6: If requested provide the path to the file where your Firefox bookmarks are located. By default, they are in the file C: \ Documents and Settings \ [Your Username] \ Application Data \ Mozilla \ Firefox \ Profiles \ [string]. Default \ bookmarks.html. Click the Open button.
Step 7: Then pull down the Bookmarks menu and then click Check bookmarks.

Step 8: The program then tests all links.
Step 9: Once verification is complete, open the Bookmarks menu and click on the command Set bookmarks with errors to the top of list.

Step 10: Then select the bookmarks that point to a 404, that is to say that the pointed documents no longer exist, then press the Delete button.

Step 11: Confirm the deletion by clicking Yes. The bookmarks with errors are deleted.
Step 12: You can then close AM Deadlink.
Repeat this process for any other web browser you have, it will work just the same way as for Mozilla Firefox.

Firefox has a feature that allows it to find the pages you were visiting in case of browser or system crash. Sometimes, however, that restoration is not very accurate, the backup sessions state taking place only every 15 or 10 seconds. You can reduce this interval to 5 seconds and in this tutorial I will show you how to do that.


To get started follow steps below
Step 1: Launch Mozilla Firefox
Step 2: Enter about:config in the address bar and press Enter on your keyboard
Step 3: Click I’ll be careful, I promise!.

Step 4: In the Filter field, type the command browser.sessionstore.interval.

Step 5: Double click on the option browser.sessionstore.interval from the results
Step 6: Change the value in ms, 15000 (15 seconds) by 5000 (5 seconds) then click the OK button to save changes

Step 7: Now restart your Firefox for changes take effect.

If you have already tried the Opera browser, you probably enjoyed its Speed Dial feature that appears on a new page, which include thumbnails of your favorite sites and you can access them with one click. With the Speed Dial extension, you can have the same functionality with Firefox and in this tutorial I will show you how to do that.


To get started follow steps below
Step 1: Launch Firefox.
Step 2: Press Alt on your keyboard and click on the Tools menu and choose Add-ons.
Step 3: Now choose Get Add-ons tab from the left side
Step 4: In the search field, enter speed dial and press Enter.
Step 5: Select Speed Dial addon and then click on Install
Step 6: Wait untill addon is downloaded and install
Step 7: Then restart your Firefox web browser
Step 8: Next time when you lunch web browser a dialog box appears allowing you to configure the extension. Check Set Speed Dial as the home page and click OK.

Step 9: Restart your Firefox again and you now have nine locations where to put your favorite sites.
Step 10: To add a shortcut to the list of thumbnails, open the new page in Firefox and click the empty empty slot in the list that appears.
Step 11: Under Location drop down menu select a web site which you want to appear in that slot

Step 12: Now repeat above steps for all the shortcuts which you want to be displayed in your new home page.

Mozilla Firefox personal bar allows you to add your bookmarks so they can be easily accessible to you no matter on which web site you are. In one of my previous tutorial I showed you how to make some additional space on your monitor by moving your bookmarks in Firefox to left or right side of your screen. This tutorial is a bit different and I will show you how to display your bookmarks only when you hover the mouse over and hide the rest of the time.


To get started follow steps below
Step 1: Open Windows Explorer and go to this location C:\ Users\ [ your username ]\ AppData\ Roaming\ Mozilla\ Firefox\ Profiles\ 94svhx6b.default\ chrome\

Step 2: If the file userChrome.css is not present, rename the file userChrome-example.css into userChrome.css.
Step 3: Then open this file with Notepad by clicking the right mouse button and choosing Open with -> Notepad.

Step 4: Then add the following lines at the end of the file:
# PersonalToolbar {display: none;}
# navigator-toolbox: hover> # PersonalToolbar {display:-moz-box;}
Step 5: Then save the changes and close the Notepad
Step 6: Now restart your Firefox so changes can take effect. When you mouse over in the address bar, personal bar is displayed. It disappears when you remove the mouse pointer.

After getting a lot of complaints about Firefox not working properly, Mozilla has come up with a simple solution. Mozilla has developed a new feature into the Firefox called ‘Reset Firefox’. It gives you the ability to reset the browser settings retaining your personal data. The new feature is available in Firefox beta for Windows, Mac and the Linux platforms.

Reset Firefox, Image Credit : YouTube
The ‘reset’ button works in a simple way. It saves your bookmarks, passwords, cookies, saved forms, browsing history and deletes everything else. After that, Firefox creates a fresh new profile and populates it with the saved data. The new profile looks just like when the browser was first opened after installation.
Michael Verdi, who works on Firefox support team, mentioned that the engineering team has wanted this feature “forever” because it cuts out the majority of the sometimes-complicated troubleshooting steps down to one.
Verdi wrote in a blog post, “I have to say, this thing is like magic. You basically get a brand new Firefox installation without the penalty of losing all your data. This is especially useful as a quick fix for the thousands of posts we see on social media where people often express vague complaints about Firefox. ‘Firefox is slow.’ ‘Firefox crashes too much.’ ‘Firefox sucks.’”
The Reset featured can be accessed from Firefox’s Menu> Help> Troubleshooting Information section. If you want to try it then download Firefox beta.
Place of Reset Button, Image Credit : Screen Shot
Clicking Reset Firefox, Image Credit : Screen Shot
Important Notes :
* The Reset feature may be broken in Nightly or Aurora. Only try this in Beta.
* It only saves bookmarks, passwords, cookies and form data. You will lose your add-ons, Sync settings, open tabs and tab groups.
* It only works with the default profile. If you’ve opened Firefox via the command line or shortcut with a profile that isn’t the default, you won’t see the Reset Firefox button.
However, Mozilla plans to make it easier for people to find in the future when the browser crashes. Firefox 13 is scheduled for public release in June 5, 2012.
Read more about Reset Firefox on the support site and then download Firefox Beta and try it out.
Source : Michael Verdi

Since Firefox 3.6, the Properties command has disappeared from the menu that appears when you click a on the link or picture from a Web page. This command allowed you to display more information on a particular object. In this tutorial I will show you how to return this option in newer Firefox versions with a simple Firefox plugin.


To get started follow steps below
Step 1: In Firefox, press the Alt key on your keyboard to display the menu bar. Click on the Tools menu and click Add-ons.

Step 2: In the search field located at top right, type element properties and click the magnifying glass to start the search
Step 3: Select the extension Element Properties 6 and click the Install.
Step 4: Wait until it’s downloaded and installed in your web browser

Step 5: Then restart Firefox to complete installation of the extension.
Step 6: The Properties command has returned from the context menu that appears when you click right mouse on an object on a Web page.
Step 7: Click to view information about that item.

Firefox has a feature that allows it to find the pages you were visiting in case of browser or system crash. Sometimes, however, that restoration is not very accurate, the backup sessions state taking place only every 15 or 10 seconds. You can reduce this interval to 5 seconds and in this tutorial I will show you how to do that.


To get started follow steps below
Step 1: Launch Mozilla Firefox
Step 2: Enter about:config in the address bar and press Enter on your keyboard
Step 3: Click I’ll be careful, I promise!.

Step 4: In the Filter field, type the command browser.sessionstore.interval.

Step 5: Double click on the option browser.sessionstore.interval from the results
Step 6: Change the value in ms, 15000 (15 seconds) by 5000 (5 seconds) then click the OK button to save changes

Step 7: Now restart your Firefox for changes take effect.

Your bookmarks include hundreds of links to sites, documents and articles. But since the day you added these documents to your bookmarks, they may have disappeared from the web site. To easily detect deas links within your bookmarks and remove them you can use a free tool called AM-DeadLink and in this tutorial I will show you how to do that under Windows 7.


To get started follow steps below
Step 1: Download AM-DeadLink from this link.
Step 2: After downloading the program, install it.
Step 4: AM Deadlink detects all Internet Explorer favorites by defaut.
Step 5: Scroll down the list and instead of Internet Explorer choose Firefox.

Step 6: If requested provide the path to the file where your Firefox bookmarks are located. By default, they are in the file C: \ Documents and Settings \ [Your Username] \ Application Data \ Mozilla \ Firefox \ Profiles \ [string]. Default \ bookmarks.html. Click the Open button.
Step 7: Then pull down the Bookmarks menu and then click Check bookmarks.

Step 8: The program then tests all links.
Step 9: Once verification is complete, open the Bookmarks menu and click on the command Set bookmarks with errors to the top of list.

Step 10: Then select the bookmarks that point to a 404, that is to say that the pointed documents no longer exist, then press the Delete button.

Step 11: Confirm the deletion by clicking Yes. The bookmarks with errors are deleted.
Step 12: You can then close AM Deadlink.
Repeat this process for any other web browser you have, it will work just the same way as for Mozilla Firefox.

Although you can search the web from the Firefox address bar, there is a much better way to use the address bar and harness the power of Google at the same time.

CyberSearch is an add-on for Firefox that lets add advanced Google search capabilities to Firefox. With it, you can get results from Google more quickly and find what you are looking for faster.

Firefox and Google Searches

Many people use Google as the default search engine in Firefox. When searching from the address bar, you simply type in your search term and press the Enter key. Firefox then directs you to Google’s website where your search results are displayed on the search engine results page (SERP). About the only thing this process saves you is the trouble of having to go to Google’s website first.

CyberSearch, an add-on for Firefox, brings some features of the SERP to your address bar by allowing you to see the top results for your searches without having to go to Google’s site at all.

When you type a search term in Firefox’s address bar, the results of your search automatically appear allowing you to choose from among the most popular search results. CyberSearch is particularly useful when your searches include popular and high-volume search terms.

Installing and Using CyberSearch

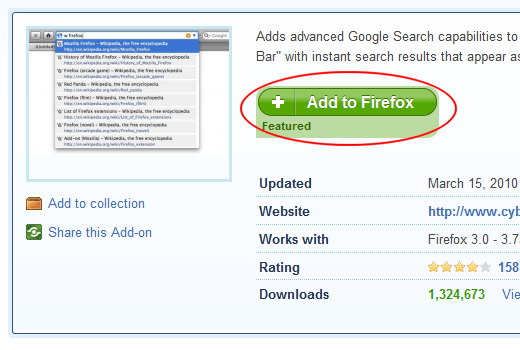
Open Firefox and visit the official CyberSearch page at Mozilla.org. Click on the Add to Firefox button and follow the instructions for installation. Note that after installation, you are prompted to restart Firefox. The add-on won’t work until you do.

Install CyberSearch Firefox Add-on

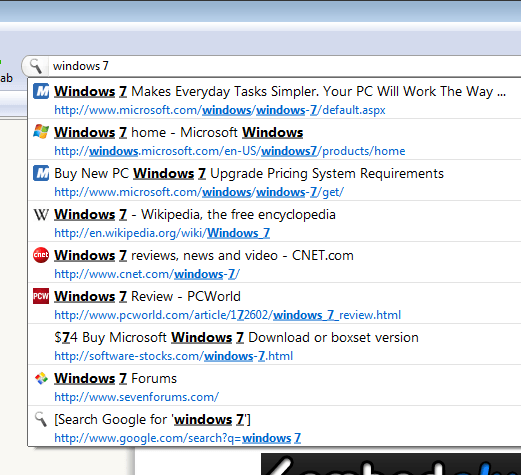
Once the add-on is installed and you’ve restarted Firefox, CyberSearch is ready to use. Let’s say that you want to search for the term Windows 7 from the Firefox address bar. Type in the search term and notice that CyberSearch automatically shows you the most popular results.

Search Results with CyberSearch

These are the same results you would get on the SERP had you searched for Windows 7 on Google. Note that the results include pages from Microsoft, Wikipedia, CNET, PCWorld, and others.

These are not watered down or filtered results; they are the same you would get at Google.com because they are from Google.com. CyberSearch just conveniently displays them from your Firefox address bar.

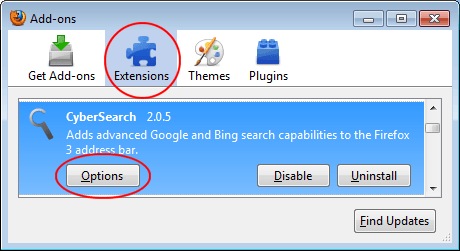
CyberSearch also comes with a variety of options so you can customize how the add-on works and behaves. Click on Tools>Add-ons, click on the Extensions tab, and locate the CyberSearch add-on from the list. Click on the Options button to open the options window.

CyberSearch Options for Firefox

Using the options window, you can set how many results appear during a search, which search service to use, whether the Enter key pulls up the search page, and a number of other options to make using the add-on more convenient. On the Reset tab, you can even restore CyberSearch’s default settings in case you forget which options you’ve changed and which you’ve left alone.

CybserSearch is a convenient add-on that lets you add advanced search capabilities to Firefox. Once installed, you can view Google search results right from the address bar without having to go to the Google website first. CyberSearch is especially useful if you often find yourself searching Google and want to save some time by not having to go to the search engine’s website first.