Tips & Tricks, Tutorials, Hacking, Troubleshooting,

Showing posts with label Google Chrome. Show all posts

If you got bored with simple design of Google Chrome new tab, there is an easy way to make it more interesting with app called Awesome New Tab Page. With this app you can add much more functionality (or shortcut links to applications) to the new Google browser tab and in this tutorial I will show you how.


With Microsoft’s Metro looks like interface, Awesome new tab Page allows you to customize the new tab and even add widgets. Installation is as simple as adding the app from the Chrome app store. Once done, you will see that, when you click on the new tab option, space appears completely configurable.
To organize things, you need to unlock them by clicking on lock icon located at the left side of your screen. Then you can move, delete or edit anything you like.

To create a new icon, you must click on one of the empty boxes. Then enter the URL you want to target and add 128 x 128 pixels icon to customize the appearance of the link.

If we wish to add more useful features inside new tabs, you can download additional widgets from the Download Widgets section located at the left side of your screen.

The little effort you need to spend in customizing Google Chrome new tab is worth, because you will have a very comprehensive menu from which you can access all content you use frequently on your computer. Please share with us your impressions and opinions about this Google Chrome add-on and tell us what you think.

There are many of our readers who reported that us that some times the google chrome browser flash plugin crashes when they were watching youtube video, it has happened with many google chrome users irrespective the browser version they are using. Symptoms were quite different as it happened with some users while youtube video, dailymotion video or any other flash videos are playing. On the other hand there are times when this happened with users were actually not playing a video but it happened due to some other flash object on some website which they are trying to load.
Shock Wave Plugin Crash In Google Chrome
In most of the cases this issue happened with google chrome users, but not limited to google chrome only as it happened with those who are using other browsers like Firefox and Internet Explorer as well.  The first and foremost reason this could happen could be due to conflict in between the flash player in google chrome and there are different reasons for different browsers.

For Google Chrome – Disable One Version Of Flash Player

This firstly happens in google chrome when there are multiple version of flash shockwave plugin installed and google chrome get confused and try to use both of these plugins installed of the same program and fails to do so and results in crashing of all flash videos across the browser.

Quick Fix To Google Chrome Flash Crash Issue

The quickest way to get rid of this problem is to close google chrome, restart it and reload all the youtube or any other flash videos again and they should play fine, if you want to get rid of this problem permanently then follow the fix below.
In this case you will need to go to google chrome browser plugin settings and fix the issues, follow the step by step solution for the same.
1. Open google chrome and type about:plugins or chrome://plugins
chrome_Plugins
2. Now locate Flash – if it says 2 files with different versions as you can see in the image above, you will need to disable one of them to stop the flash plugin to crash while videos are playing. For this you will need to click Details with plus sign which is shown on the top right corner with in the browser.
Plugins_Details_Google_Chrome
3. Once you click details you will see the details for both the flash plugin and you need to here disable the internal google chrome flash version which is second entry and is in the app data folder.

Disable_Flash_Plugin_In_Google_Chrome
Once you have disabled one of the flash plugin here, you just need to restart google chrome and the problem of shockwave plugin will not happen again.

For Firefox – Reinstall Flash Plugin To Fix Crashing

There are times when shockwave plugin may crash in firefox and at such times you will need to re install the flash shockwave plugin, for this uninstall the flash plugin and then go to Adobe’s test page – then when you see a yellow notification bar will appear above the webpage. Click Install Missing Plugins
Install Flash In Firefox

For Internet Explorer – Uninstall Flash From Add Remove Programs

For this you will need to go to Control Panel >> Add Remove Programs or Programs and Features and then locate the Adobe Flash Player and then double click to remove or uninstall it.
remove_flash_player_in_ie
Once flash player is removed, restart computer and then go to Adobe Flash Player Download page in internet explorer again.

Google Chrome has a nice feature where you can sync all your open tabs across all your devices. Anywhere you can install Chrome, you can set it up so that you can see all the other open tabs on all your other Chrome installs.
It’s a very slick feature and works really well. I’ve been using it on my Windows 7 PC, MacBook Pro, iPhone and iPad and it’s been great. It’s so useful when I’m browsing at home and then have to leave to go somewhere and I can just pull up the tabs on my iPhone.
The process is pretty easy and to get started, you need to open Chrome and click on the Wrench icon. Click on Settings.
image
Here, you want to sign into Chrome using your Google account. Once you have done so, you can click on the Advanced sync settings button.
image
Here is where you choose what you want to sync.
image
You can choose to Sync everything, which includes open tabs or you can click on Choose what you want to sync and check the boxes manually.
That’s about it. now all you have to do is install Chrome on your other devices, go to Settings and sign into Chrome. Make sure that you have syncing turned on for the other devices as well.
When you open a new tab in Chrome, you’ll see an option called Other devices. Click on that and you’ll see all the open tabs on your other devices!
image
The only issue I have seen is that sometimes it takes a while for the tabs to sync. Unfortunately, as of now, there is no way to manually refresh the list of open tabs on other devices. Hopefully, that’ll be something you can do in the future. Enjoy!

Here’s a quick post for those looking to change the location of the downloads folder in Google Chrome. You may want to do this for many different reasons, but for most people, it’s probably because you are running out of space on your local hard drive. I moved my downloads folder to my NAS (Network Attached Storage) device. Since it’s on the network and always connected, I don’t have to worry about it suddenly getting disconnected.
I’ll talk about what happens if you do change the location to an external hard drive that can occasionally become disconnected. First let me show you how to actually change the download location in Chrome. First, click on the wrench icon at the top right and click on Settings.
chrome settings
Then scroll down to the bottom and click on Show advanced settings.
advanced settings
Now scroll down more until you get to the Downloads section.
chrome downloads
Go ahead and click on the Change button and choose a new location. Like I mentioned before, you can choose an external drive, a shared folder, a network drive, etc to save the downloads too. There really is no restriction. Now if the download target suddenly disappears, i.e. you unplug the external hard drive, etc, then what happens?
Well, I was hoping that it would default back to the default location when you first install Chrome, but it doesn’t. Instead, the Save As dialog pops up and you have to choose a new location for the file.
chrome save as
And that’s pretty much it! If you have any other questions about Chrome, feel free to post a comment. Enjoy!

Google Chrome was updated yesterday and includes faster browsing speeds and a new Settings interface. Here we take a look at what’s new and how to navigate the new Options interface.

1. To access the Settings Options click on the gear icon on the upper right corner of the browser then click on Options.

sshot-2011-03-08-[21-34-33]

2. Notice the Options page now opens in a separate tab instead of a new dialog window.

sshot-2011-03-08-[21-35-45]

3. Each category in the Options is easily accessible by clicking on Basics, Personal Stuff, or Under the Hood.

sshot-2011-03-08-[21-36-26]

4. One of the cooler features is that you can search through the options to easily find what you’re looking for…no matter where you are in Options. For example I searched for home and everywhere in Options where the word Home appears, it’s highlighted and you can find the settings that correspond with it.

sshot-2011-03-08-[21-38-46]

5. If you’re looking for a specific tool just search the keyword for it and the tool will come up. Like in these two examples for Importing Bookmarks and setting up Sync.

sshot-2011-03-08-[22-12-48]

sshot-2011-03-08-[22-15-43]

6. You can also copy and paste specific sections of the Settings as well. For instance if you’re in the Under the Hood Section and want to manage content, just copy the URL.

sshot-2011-03-08-[22-20-25]

7. Then you can share that link with someone else and they can paste it into their Chrome browser and pull it up without having to search for it themselves.

sshot-2011-03-08-[22-21-05]

sshot-2011-03-08-[22-21-33]

This is a cool new feature added to the latest version of Chrome (which should automatically update the next time you launch it). The current stable version is 10.0.648.127.

sshot-2011-03-08-[22-25-47]

If you take a lot of screenshots of web pages, there is an easy way to do this in Google Chrome. You can also annotate and share them easily, all from within Chrome, using the Awesome Screenshot add-on.

To install Awesome Screenshot in Google Chrome, go to the following web page:

https://chrome.google.com/extensions/detail/alelhddbbhepgpmgidjdcjakblofbmce.

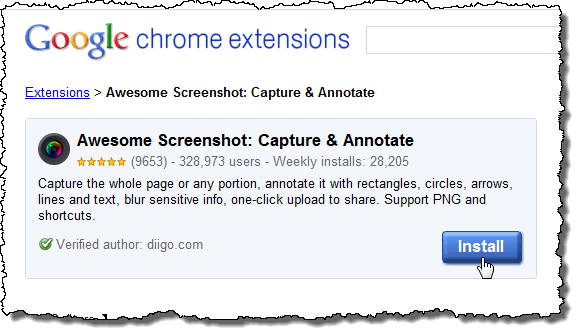
Click the Install button.

Clicking the Install button for Awesome Screenshot

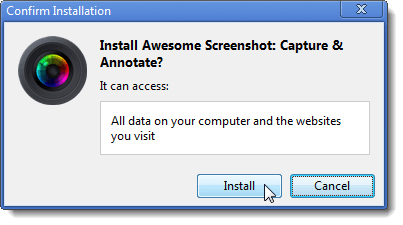
A Confirm Installation dialog box displays telling you what Awesome Screenshot can access. Click Install to continue with the installation.

NOTE: If you are nervous about the fact that Awesome Screenshot can access all the data on your computer, you can set up Windows 7 as a virtual machine using VirtualBox (see our post, How to install Windows 7 on a PC with VirtualBox), install Google Chrome in the virtual machine, and take your screenshots using Awesome Screenshot in Google Chrome in the virtual machine, saving the files in a directory shared between the virtual machine and your regular computer (see our post, Share Folders between Host and Guest OS in VirtualBox).

Confirm Installation dialog

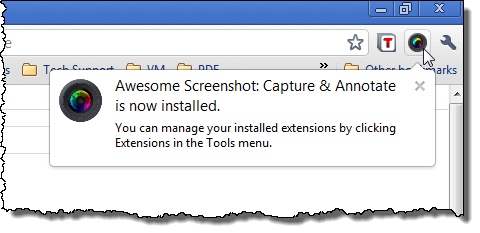
When the installation is finished, the Awesome Screenshot button displays on the toolbar and a message displays telling you the extension is now installed.

Awesome Screenshot button on toolbar

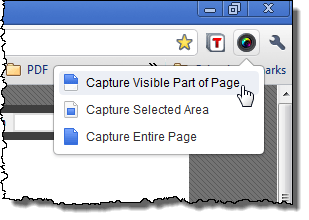
Once you have navigated to the web page you want to capture, click the Awesome Screenshot button on the toolbar and select an option. You can choose to capture only what is visible in the main part of the browser, a selected area, or the entire page.

Selecting Capture Visible Part of Page

The screenshot displays on a new tab titled Annotate Your Screenshot with a toolbar at the top. You can crop the screenshot to show only a portion of the screenshot. To do this, click the crop tool on the Awesome Screenshot toolbar.

Clicking Crop for a screenshot

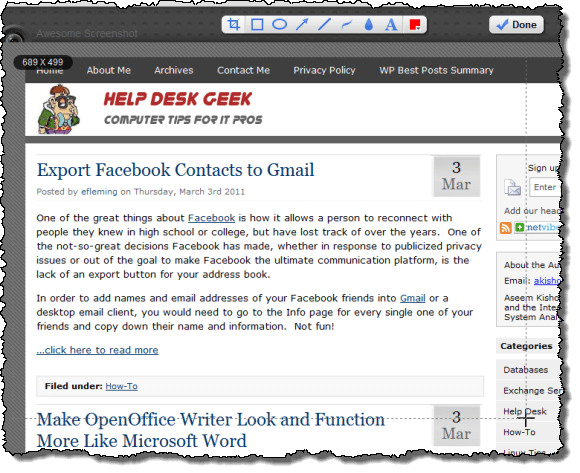
The cursor turns into a crosshair. Click and hold the mouse button in the upper, left corner of the area of the screenshot you want to save and draw a box down to the lower, right corner of the area. The measurements of the box you are drawing display in the upper, left corner of the box.

Drawing the crop border

Once you have the size box you want, release the mouse button. A box displays with the content of the selected area being lighter than the area outside of the box. Click the Crop button to finalize the cropped image. If you change your mind and want a different area, or don’t want to crop the image, click Cancel.

Clicking Crop once border has been drawn

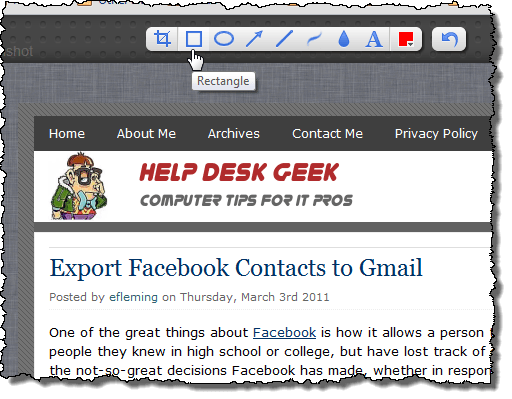
You can also add annotations (shapes, arrows, text, etc.) to your cropped screenshot, using the buttons on the Awesome Screenshot toolbar.

Annotating the cropped screenshot

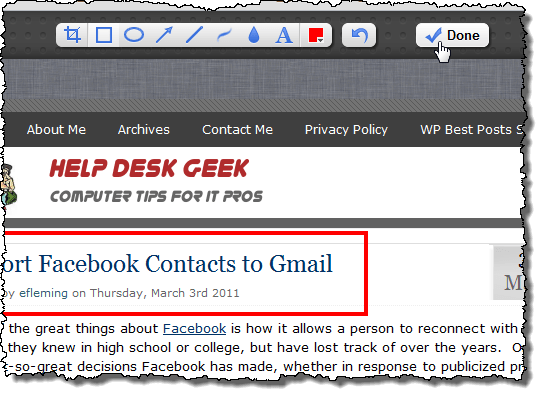
Once you have cropped and annotated your screenshot, click Done to finalize it.

Clicking Done when finished annotating screenshot

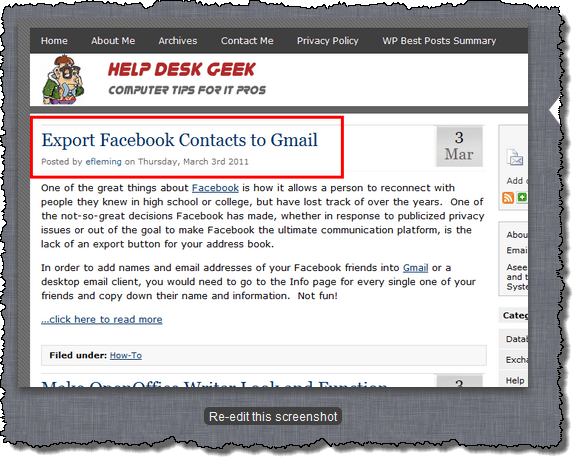
A new screen displays on the same Annotate Your Screenshot tab, showing your edited screenshot on the left. If you want to change your screenshot again, click Re-edit this screenshot below the screenshot.

Screenshot displayed with Re-edit this screenshot button

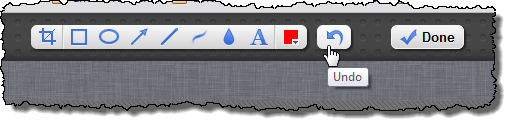
You can undo your previous actions by clicking the Undo button on the Awesome Screenshot toolbar, even after you click Done and then click Re-edit this screenshot.

Clicking Undo

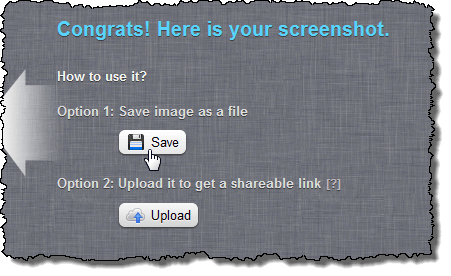
To save your screenshot, click the Save button under Option 1 on the right side of the Annotate Your Screenshot tab.

Saving the screenshot

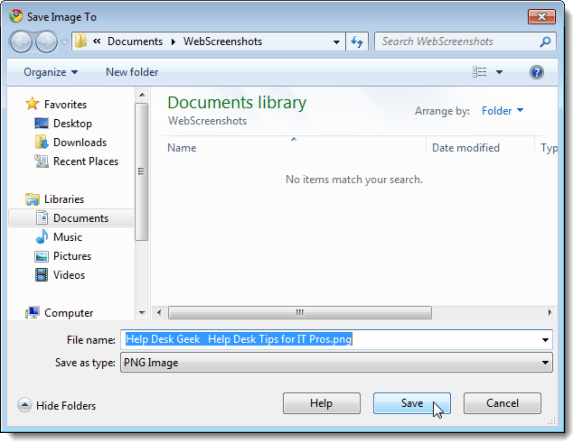
The Save Image To dialog box displays. Navigate to the folder in which you want to save your screenshot. A default name for the screenshot file is automatically entered into the File name edit box. Change the filename as desired, and select a different type for the file from the Save as type drop-down list, if desired. Click Save.

Save Image To dialog box

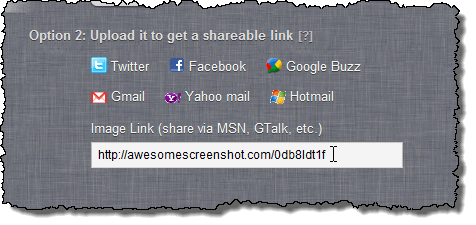
If you want to share your screenshot with family or friends, click the Upload button under Option 2, as pictured previously. Your screenshot is uploaded to the awesomescreenshot.com website and a link to your image displays in an edit box under Option 2. Select the text for the link and paste it into an email or on a social networking site to share with friends or otherwise save it to access your screenshot in the future.

Shared link for uploaded screenshot

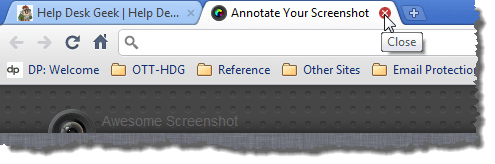
When you are done editing, saving, and sharing the current screenshot, click the close (x) button on the Annotate Your Screenshot tab to close it.

Closing Annotate Your Screenshot tab

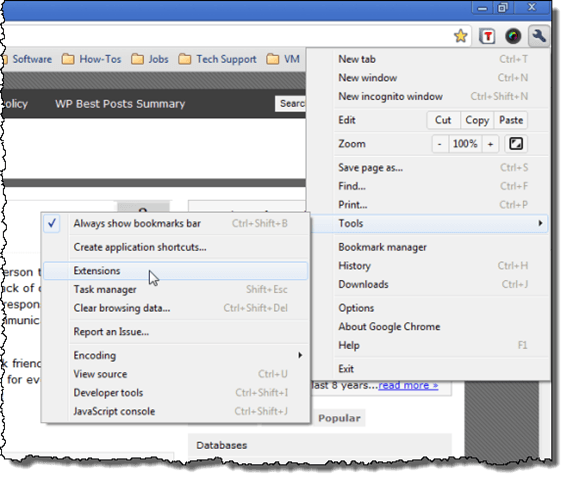
There are a few options you can set for Awesome Screenshot. To access these options, click the wrench button in the upper, right corner of the Chrome window. Select Tools | Extensions from the drop-down menu.

Opening Extensions

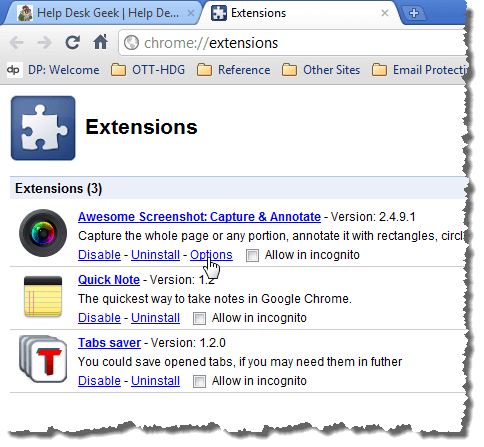
A new tab opens, titled Extensions, listing all the extensions installed in Google Chrome. If an extension has options you can set, there is an Options link under the description of the extension. Click the Options link for Awesome Screenshot.

Opening Options for Awesome Screenshot

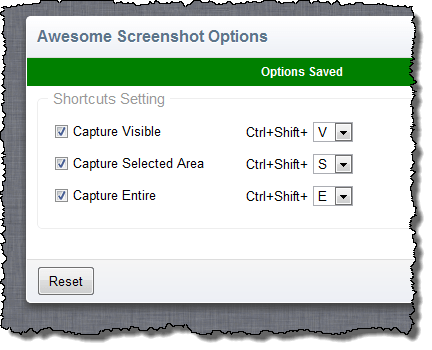
Another tab opens, titled Options, displaying the options available for Awesome Screenshot. The options available allow you to specify keyboard shortcuts for each of the options available on the Awesome Screenshot drop-down menu.

Select the check boxes for the shortcuts you want to turn on (the option is on when there is a check mark in the check box). The keyboard shortcuts all begin with Ctrl + Shift, which cannot be changed. However, you can specify the letters to use for the shortcuts. Select the desired letters from the drop-down lists. Click Save to save your changes.

Setting Options for Awesome Screenshot

A message displays saying “Options Saved.”

Options Saved message

To close the Options tab, click the Close button. You can also click the Close (x) button on the Options tab, just like you would close any other tab.

Closing Options

To close the Extensions tab, click the Close (x) button on the tab.

Closing the Extensions tab

Awesome Screenshot can be used for many purposes. You can use to document how to do something on the internet, show someone a cool website you found using the Upload feature, or take a screenshot of an online receipt for a purchase you made.

Firefox has a nice feature that allows you to assign keywords to bookmarks, so all you have to do to access a bookmarked web page is type the keyword in the address bar and press Enter (see our post, Assign Keywords to Bookmarks in Firefox). Unfortunately, Google Chrome does not have that feature. However, there is a workaround that allows you to assign keywords to bookmarks in Google Chrome.
To create a bookmark with a keyword, right-click in the address bar, or omnibox, in Google Chrome and select Edit search engines.

Selecting Edit search engines

The Search Engines dialog box displays. Click the Add button.

Clicking Add on Search Engines dialog box

The Add Search Engine dialog box displays. Enter a name for the bookmark in the Name edit box. Enter the desired keyword in the Keyword edit box. Enter the address for the web site in the URL edit box. Click OK.

NOTE: Like Firefox, Chrome’s keyword search tool allows you to enter %s in the URL to represent the search terms, which it replaces with with the search terms you enter. However, you can add a search engine in Chrome without adding the %s. When you type that keyword into the address bar, you will just be taken to the URL associated with that keyword.

Adding a web page as a search engine

The new bookmark you entered displays in the Other search engines section of the list of search engines, showing the keyword entered for the URL. Click Close to close the Search Engines dialog box.

Clicking Close on the Search Engines dialog box

To access the web site for which you created the bookmark with the keyword, type the keyword into the address bar in Google Chrome and press Enter.

Typing a keyword in the address bar

The website displays on the current tab.

Web page loaded

This method of adding keywords to bookmarks is more of a hack than a bookmark feature, but until the developers of Google Chrome decide to add this feature to the bookmark manager, it is a useful workaround.