Tips & Tricks, Tutorials, Hacking, Troubleshooting,

Showing posts with label MS-Office. Show all posts

Excel is such a powerful spreadsheet program that I doubt anyone can possibly know everything that it can do. There are so many aspects to the program, it’s amazing that it can all be encapsulated in such a simple interface. I was recently using Excel for some work at home and found myself using the IF function to write a few formulas.
Being able to write a simple IF statement in Excel is essential, especially if you deal with a lot of numbers all the time. It’s one of those things that’s not too complicated like macros, but not necessarily intuitive like summing up a column of numbers.
In this article, I’ll walk you through a short primer on writing a IF statement in an Excel worksheet. To get started, you should understand the basis of all IF statements:
IF condition THEN true ELSE false
That’s pretty much it. The condition is usually a comparison of something. That something is normally numbers or text. We’ll start off with some basic number comparisons, then text, then include operators like AND/OR, etc. So here’s our first example:
simple if formula
We have a very simple example here. Two columns with two numbers, 25 and 35. If Column C, we want to check if Column A is greater than 10, we will output the text Yes, otherwise the text No. A few things to note:
1. You don’t have to put a set of parenthesis around the actual comparison, but it’s very good practice, especially when the comparison becomes more complicated.
2. To output text for the true or false value, you have to use double quotes. If you don’t, it will think you are trying to refer to a named range in Excel.
Now let’s see some more stuff you can do. In the comparison section, you can also do math too. For example, you can do this if you like:
if statement
Here we are saying that if the value of A2 times 10 is greater than 10, then output Yes, otherwise output No. Pretty straight-forward eh? Now let’s say we wanted to output numbers instead of text. Here’s one example:
excel if statement
In this example, if the value in A2 is greater than 10, it will output the value times 2, otherwise it will multiply the value by 5. Pretty useless, but you get the point. You can also use the value of other cells too in the formula.
if formula
Here we are saying that if the value of A2 is greater than 10, then multiple B2 by 10, otherwise multiple B2 by 5 and output that value into cell C2. Now let’s make it more complicated. What if we wanted to output Yes if both A2 and B2 are greater than 10?
excel if
Here’s something new! If we want A2 > 10 AND B2 > 10, then we have to use the AND function inside the IF function. Sounds tricky, but not too bad. The AND function basically takes multiple comparison arguments (A2 > 10) and does an AND on them. They all have to be true in order for “Yes” to be displayed. You can add three or four or more comparison arguments if you like. If you want to do an OR, simply replace the AND above with the word OR.
What about if you want to return a value other than text or a calculated number. What if you want to return the value of a cell on a different sheet? Well, you can do something like this:
return value sheet
For the true value, I am going to return the value of cell A1 on Sheet 2. That’s pretty easy! So you can easily reference values from other sheets if you like. In the same light, you can also use a value from another sheet in the logical comparison too, i.e. Sheet2!A1 > 10. Let’s look at more stuff you can do! Let’s say you wanted to do an IF statement based on the type of value stored in a cell (number, text, or blank). You can do something like this:
isblank excel
You can use ISTEXT and ISNUMBER for the other two types of data. These functions can be really convenient when writing IF formulas. Note that you can basically use most functions in Excel inside of a IF statement, so feel free to run loose. For example, you can use functions like SUM, MAX, MIN, etc.
So far we’ve only been working with one value in the logical comparison, but let’s say we want to work with a group of cells. For example, if all the numbers in a range of cells is greater than 10, output True, otherwise False.
range cells excel
It’s as simple as using the colon like shown above, A2:A4. In this case, each value from A2 to A4 will be tested to see if it’s greater than 10. If all of them are, then the true value will be displayed. What about nested IF statements?
nested if
Here, I am saying that if A2 is greater than 10, output a value, but if not, then perform another IF comparison. IF B2 is greater than 10, then output a different value. You can nest IF statements 64 levels deep, which means you can do some pretty complicated stuff. You’ll probably never need to go that far, but sometimes it’s useful a few levels deep.
This is only a basic introduction to the IF statement, but hopefully it’ll get you started. Are you trying to write an IF statement to do something in Excel and can’t figure it out? Post a comment here with the problem and I’ll try to help you write the proper IF formula. Enjoy!
If you have a lot of fields in your Word document that you are not going to be updating, you may want to convert them to plain text. To do this, you will want to easily find your fields by turning on the field shading.

This post shows you how to turn on and off the field shading in Word 2003, Word 2007, and Word 2010. We will also show you the steps to convert fields to plain text, which are the same in all three versions.

Turn On and Off Field Shading in Word 2003

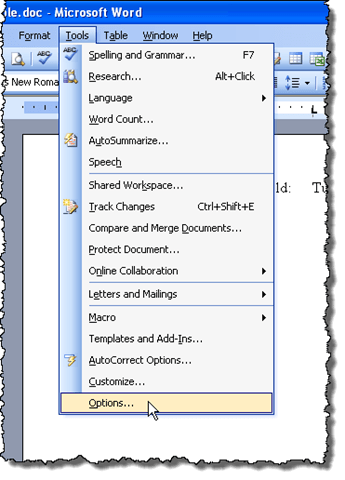
To turn on or off field shading in Word 2003, select Options from the Tools menu.

Selecting Options from the Tools menu in Word 2003

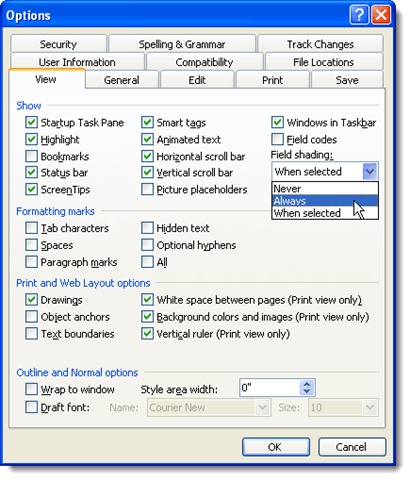
The Options dialog box displays. To turn off field shading, select Never from the Field shading drop-down list. To display field shading all the time, even when the field is not selected or the cursor is not in the field, select Always from the Field shading drop-down list.

This allows you to see your fields in your document at a glance. If you only want to see the field shading when the field is selected, or the cursor is in the field, select When selected from the Field shading drop-down list. This is the default choice when you install Word.

Selecting to Always show the Field shading in Word 2003

Click OK on the Options dialog box to accept your changes and close the dialog box.

Closing the Options dialog box in Word 2003

If you selected Always, you will notice that fields are highlighted even when the cursor is not in the field.

Example of field shading in Word 2003

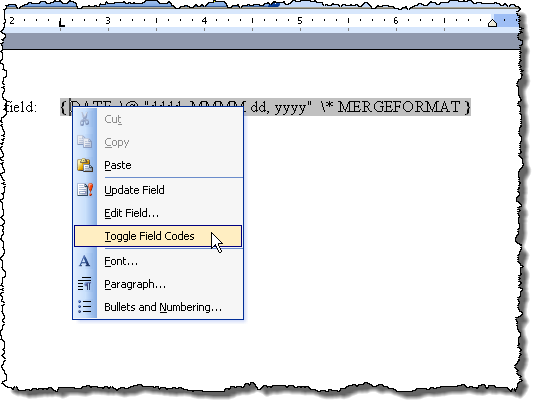
If you see what looks like code in your date field, for example, rather than the date, that means the field codes are being displayed rather than the value of the field. To view the value of the field, right-click in the field and select Toggle Field Codes from the popup menu. You will then see the date, as in the example image above.

Selecting Toggle Field Codes in Word 2003

If some or all of your fields show the field codes, you can display the values of all the fields by pressing Ctrl + A to select all the text in your document, right-clicking anywhere on the text, and selecting Toggle Field Codes from the popup menu.

You may have to select the option twice until the values of your fields display. The fields are all converted to the same state, even if some display field codes and some display values.

Turn On and Off Field Shading in Word 2007 and Word 2010

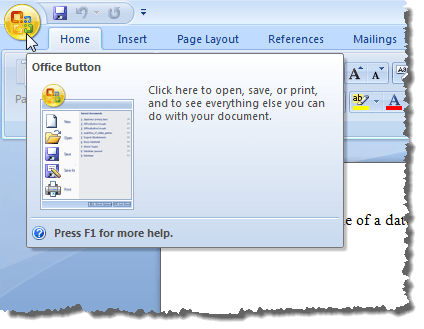
The procedure for turning on or off field shading in Word 2007 is essentially the same as in Word 2010. We will show you the steps for Word 2007 and point out the few differences for Word 2010. To start, click the Office button.

Clicking the Office button in Word 2007

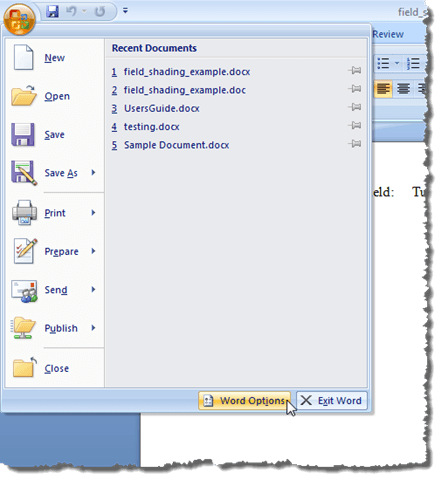
Click the Word Options button at the bottom of the Office menu.

Clicking Word Options in Word 2007

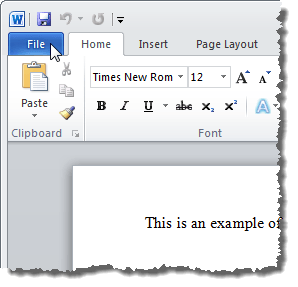
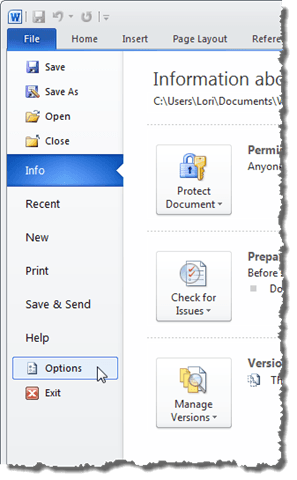
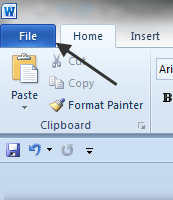
To access Word Options in Word 2010, click the File tab.

Clicking the File tab in Word 2010

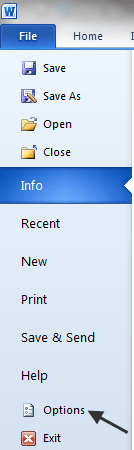
On the File tab, click Options.

Clicking Options on the File tab in Word 2010

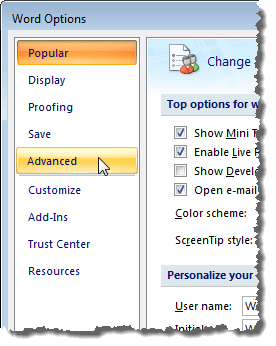
The rest of the steps are the same for Word 2007 and Word 2010. On the Word Options dialog box, click Advanced in the list on the left.

Clicking Advanced on the Word Options dialog box in Word 2007

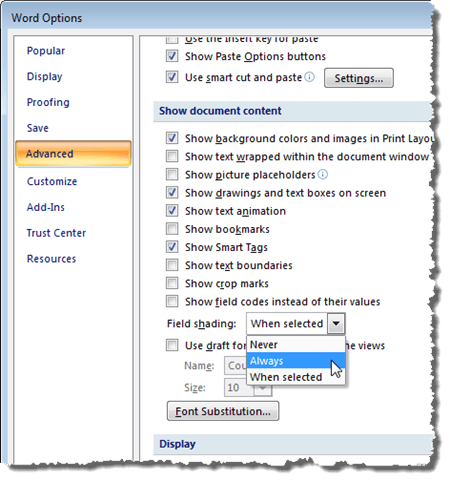
Scroll down to the Show document content section. Select the desired option from the Field shading drop-down list. The options perform the same functions as described for Word 2003 above.

Selecting to Always show the Field shading in Word 2007

Click OK on the Word Options dialog box to accept your changes and close the dialog box.

Closing the Word Options dialog box in Word 2007

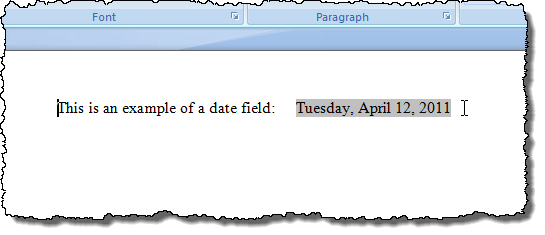
Again, if you selected Always, the field shading displays even if the cursor is not in the field.

Example of field shading in Word 2007

You can toggle the field codes the same way as described for Word 2003 above.

Update Fields

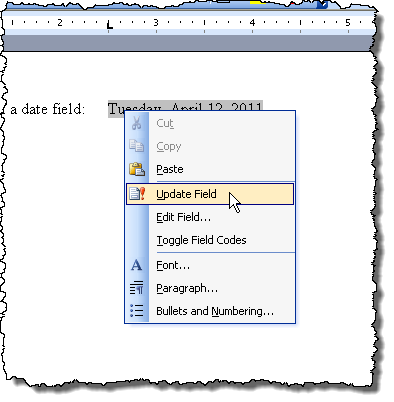
If you decide that you will not need to update a field anymore and you want to convert it to text, you can easily do so. However, first, you should update the field to make sure the value of the field is up-to-date. To do this in Word 2003, right-click on the field and select Update Field from the popup menu.

NOTE: You can also press F9 to update a selected field. If you want to update all the fields in a document, press Ctrl + A to select all the text in the document, including the fields, and press F9. All the fields in the document will be updated.

Updating a field in Word 2003

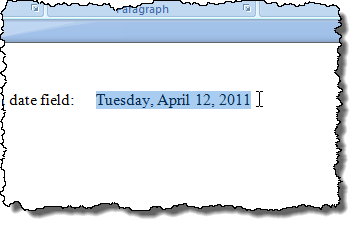
To update a field in Word 2007 and Word 2010, put the cursor in the field and either click the Update button that displays above the field or press F9.

NOTE: You can update all of the fields in your document the same way as described above for Word 2003.

Updating a field in Word 2007

Convert Fields to Plain Text

Converting a field to plain text is done the same way in all three versions of Word discussed in this post. Simply, put the cursor in the field you want to convert to text and press Ctrl + Shift + F9. The field is converted to text as the last value it contained when it was a field.

A field unlinked and converted to plain text

If you change your mind, and want to convert the text back to a field, you can undo the Unlink Fields action by clicking the Undo button on the Quick Access toolbar or press Ctrl + Z.

Undoing the Unlink Fields action

If you want to convert all of your fields to text, you can select all of the text in your document as described earlier in this post (Ctrl + A) and then press Ctrl + Shift + F9. You will then have no more fields in your document.

Once you have finished a first draft of your Word 2010 document, you may view it in Print Preview mode. Besides looking at the layout of the document, you may notice errors that need correcting. Instead of closing Print Preview, correcting the errors, and opening Print Preview again to make sure the document layout is still acceptable, there is a way to change text in Print Preview mode.

NOTE: This feature is not available in versions of Word earlier than 2010, such as Word 2007 and Word 2003.

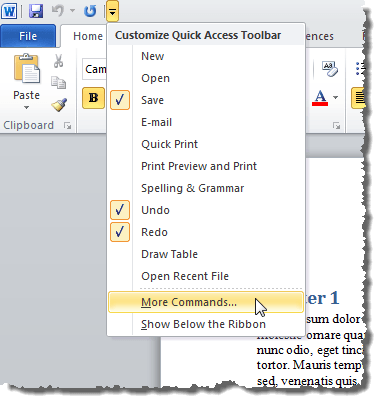
To be able to edit a document in Print Preview mode, you need to add a special button to the Quick Access Toolbar. To do this, click the down arrow on the right side of the Quick Access Toolbar and select More Commands from the drop-down menu.

Selecting More Commands from the Quick Access Toolbar menu

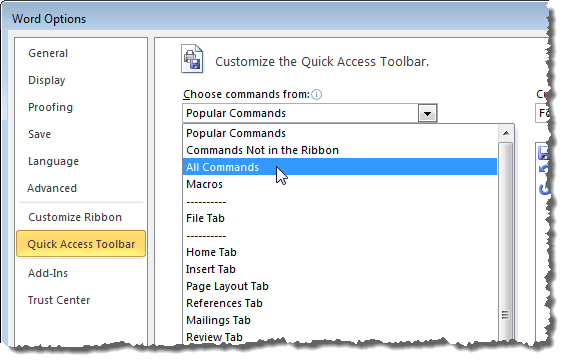
The Customize the Quick Access Toolbar screen on the Word Options dialog box displays. Select All Commands from the Choose commands from drop-down list.

Selecting All Commands from the Choose command from drop-down list

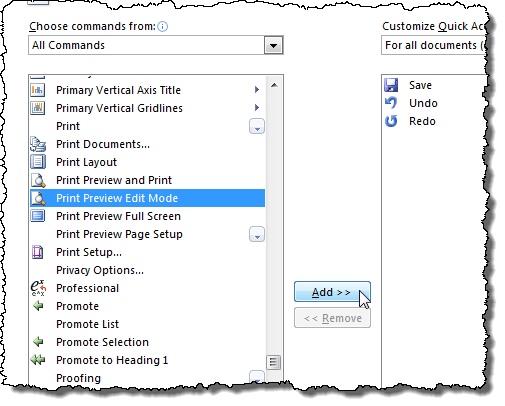
Scroll down in the list below the Choose commands from drop-down list and select the Print Preview Edit Mode command. Click Add to add it to the Quick Access Toolbar.

Adding the Print Preview Edit Mode button to the Quick Access Toolbar

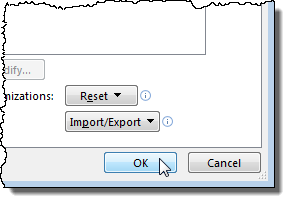
Click OK to close the Word Options dialog box.

Closing the Word Options dialog box

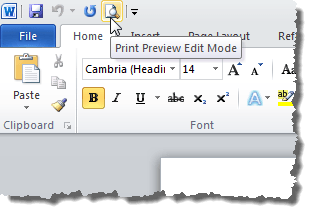
With your document open, click the Print Preview Edit Mode button on the Quick Access Toolbar.

Clicking the Print Preview Edit Mode button on the Quick Access Toolbar

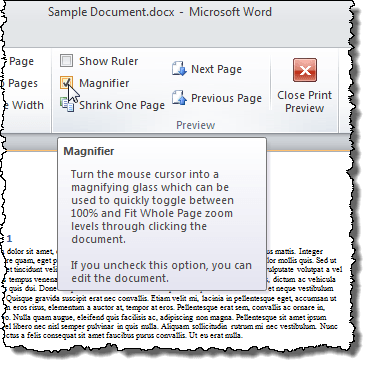
To be able to edit the document in Print Preview mode, you must turn off the magnifier. To do this, select the Magnifier check box in the Preview section of the Print Preview tab so there is NO check mark in the box.

Turning off the Magnifier

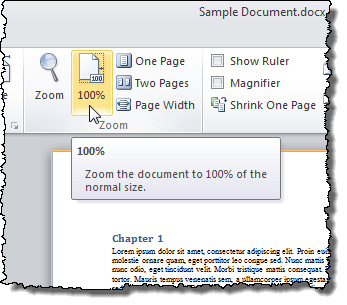
By default, the page is fit to the screen, so the text might be very small. To view the text at full size so it’s easier to read, click the 100% button in the Zoom section of the Print Preview tab.

Zooming in to 100%

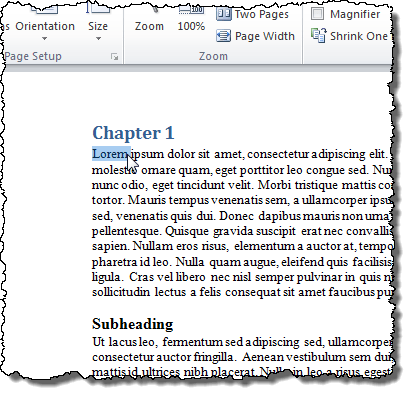
Now you can easily edit the text in your document while how your changes affect the layout of the document.

Editing a document in Print Preview mode

To go back to the normal editing view of your document, click the Close Print Preview button on the Print Preview tab.

Closing Print Preview mode

You can do basic editing in Print Preview mode. However, if you need to remove or insert page breaks, insert or change tables, or other more complicated editing or formatting, you must close the Print Preview mode and return to one of the normal document views listed on the View tab.

One of the many gripes people have had about Microsoft products, at least in the past, has been the lack of customization regarding menus, which led to claims that Microsoft was out to tell us all what to do and how to do it all the time, rather than let us do what we want with the products we buy.

Well, Microsoft has been listening, and now, for the first time, they have made the menu system in Office 2010 completely customizable. Here we describe how to customize the main menu (ribbon) in Word.

First, click on the File tab in the main ribbon to get to the Backstage area:

File Tab - Main Ribbon

Then, click on the Options menu choice:

Backstage Menu

Next, move down and click on the Customize Ribbon option:

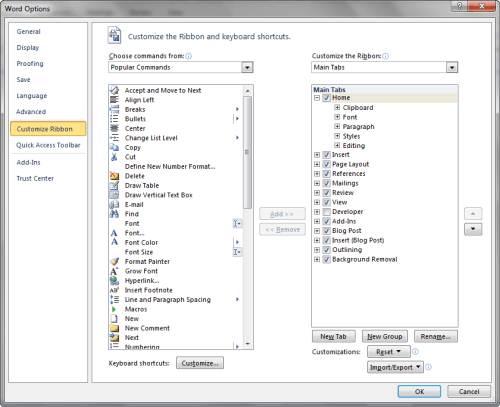
The screen should look like this:

Customize Ribbon Screen

This screen is divided into two sides; on the left are possible things you can add to your ribbon, while on the right are the things that are already there. To add something to the current ribbon, highlight it with your mouse, then click the Add button that sits in the middle between the two sides (or if you prefer, simply drag it from the screen on the left and drop it where you want it in the screen on the right).

In similar fashion, you can remove things from the ribbon by highlighting it in the window on the right and then clicking the Remove button under the Add button.

Before you can add any buttons however, you first have to add a new Group to your ribbon, because Word won’t allow you to add or remove commands from the existing groups.

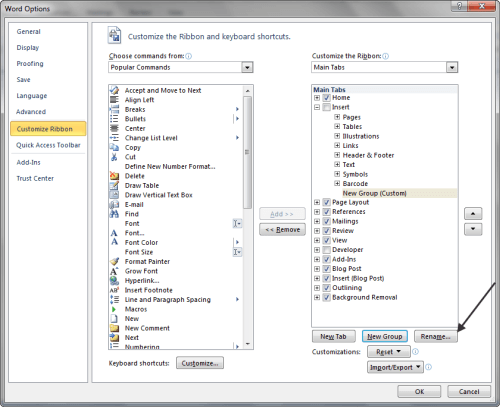
To add a group, first choose which ribbon you want to add the group to, by highlighting it on the right side of the menu. Then click the New Group button at the bottom of the screen:

Here we’ve added a new group under the Insert tab.

Add New Group

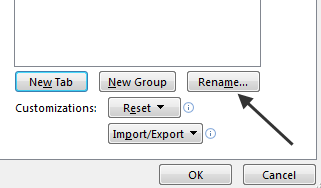
Because New Group isn’t exactly a great name, it’s best to rename the group once it’s been created by highlighting the group name and then clicking the Rename button:

Rename button

Once you have the new group created and renamed, the next step is to add commands to it. To do that, click once on any of the commands on the left side of the screen, drag it over to the right side of the screen and drop it on the new group you created.

Add Commands to Group

While adding or removing commands from your ribbon might be just what you need, the best approach is generally to add a new tab to your main ribbon and populate it with the stuff you most commonly use.

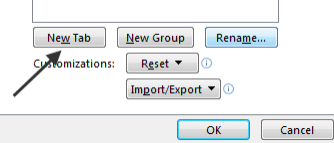
To add a new tab to the main ribbon, click on the New Tab button at the bottom of the right side of the screen:

New Tab Button

You should get the following screen:

New Tab Added

Note how the new tab was created and displayed in the center of the right hand screen. And then, because the name New Tab isn’t all that helpful, highlight the new tab by clicking on it, then move down and click the Rename button.

Rename Button for New Tab

Type in the new name for your tab, then press the Ok button. The new tab should now reflect the new name.

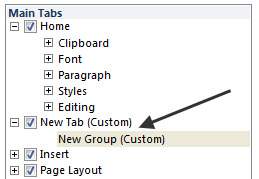
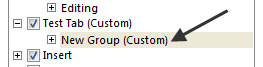
Next, notice that when you added a new tab, Word also created a group name underneath it…

Test Tab New Group

…and because the words New Group aren’t very helpful either, highlight it and then move down and click the Rename button again, and give your group name something meaningful.

Test Tab and Test Group

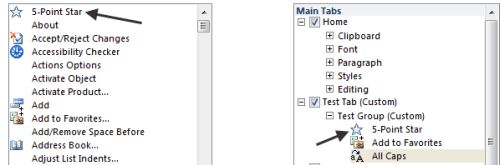
Now you’re ready to start adding stuff to your new tab. To do so, click one of the commands on the right hand side window, and then drag it over and drop it onto the tab you just created.

Note: If an option on the command side of the screen has a “+” next to it, click on it to see the commands under it.

New Tab Commands Added

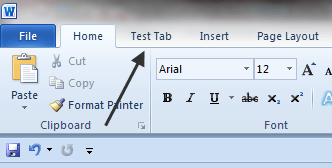
Once you’ve added the commands you want, click the Ok button at the bottom right hand side of the screen, and just like that, you now have a new tab on your ribbon with all of your most used and favorite commands on it.

New Tab in Ribbon

…and when you click on it, you’ll see your new commands added to it:

Contents of new Tab

The ability to customize the ribbon in Word allows you to make your ribbon look the way you want it, which should help make you more efficient when using Word.

Note: If you regret your customizations, click the Reset button at the bottom of the screen.

One of the best proofreading techniques is to have someone read your work to you so you can hear errors you would not normally see. But, it takes time to find someone you trust enough to read what you write, not to mention most of us who write do so alone.

WordTalk is an add-in for MSWord that reads your documents to you, and even saves them into an MP3 file if you choose.

The program is available from WordTalk.co.uk and is absolutely free. It is designed for people with reading and writing disabilities, but as noted above, it has practical uses for all of us. The complete package is a 50mb download, so those with slower connections will be waiting awhile.

After running the install file in the usual manner, you must click on the newly installed program from the start menu.

wordtalk start A window will appear asking if you want to add the toolbar to Word. Click the first option that says Add WordTalk Toolbar to Word.

add word talk

Now you can open word, click add-ins and see the new toolbar.

wordtalk toolbar

The program is straight-forward and simple to use. The first icon on the toolbar that looks like a chat bubble will start reading your document from where your cursor is placed. The P will just read a paragraph, while the S will read a sentence and the W will read a single word. The crossed-out chat bubble will make the program stop reading, and the speaker icon will record your text as an MP3 or WAV.

In recording an MP3, you will not hear the text read as it records—it just automatically creates an MP3. So, you could save your documents to an MP3 player or cell phone and listen to them in car.

While WordTalk is quite easy to use, some people report receiving Visual Basic and .Net errors. If you encounter these errors, there are solutions on WordTalk’s FAQ.

WordTalk will work with MSWord 2003/XP and 2007. Older versions are not compatible. Foreign language voices will also work with WordTalk if the are installed on your machine.