Tips & Tricks, Tutorials, Hacking, Troubleshooting,

Showing posts with label Web. Show all posts

XHTML Validation serves the purpose of rechecking our site to see if it follows the W3C standards. It not only ensures quality, but also teaches us good coding practices and thereby eases maintenance. Validating one's code before taking it live serves as a sign of good professionalism in a coder's career.
Common errors found during XHTML validation are listed below:

1. Not closing empty tags.
Empty tags are tags that do not contain any content.
Example:
<br />
<hr />
Wrong : <br>
Correct :<br />
Wrong : <hr>
Correct :<hr />

2. Not closing non-empty elements
Example:
Wrong : <p>This is a paragraph.<p>
Right : <p>This is a paragraph.</p>

3. Missing a / on self-closing tags.
Example:
Wrong : <img >
Right : <img />

Other self closing tags include:
<area />
<base />
<br />
<col />
<command />
<embed />
<hr />
<img />
<input />
<keygen />
<link />
<meta />
<param />
<source />
<track />
<wbr />

4. Using Uppercase characters in Markup Tags.
Example:
Wrong : <BODY> </BODY>
Right : <body> </body>

5. Not escaping Special characters.
Example:
Wrong : Using the ampersand character as "&" and the angled brackets as "<".
Right : Use them as "&" and "<" instead.

6. Nesting the block level elements
Example:
Wrong : <em><h2>About Us</h2></em>
Right : <h2><em>About Us</em></h2>

7. No specifying alternate text for images.
Example:
Wrong : <img src="images/image.jpg" />
Right : <img src="image.jpg" alt="Image Logo" />

8. Non inclusion of quotes around attribute values
Example:
Wrong: <td rowspan=2>
Right: <td rowspan="2">

9. Starting a class or ID with a number.
Class, ID or name attributes should not begin with a number but can include them
Example:
Wrong : <ul class="bottomregion" id="4">
Right : <ul class="bottomregion" id="level4">

Where should you place Google Adsense ads for highest CTR? Here are the best Adsense placement tips for blogs/ forums as suggested by Google Adsense team itself.

Google Adsense shares new recommendations for ad implementation, (which will vary depending on your web page), but are the outcome of Adsense testing across millions of blogs and forums. Of course the best way is to optimize your site through regular experimentation.

Best Adsense Placement for Blogs

Google Adsense ads on your homepage. 728×90, 160×600, 300x250px Adsense ad units work best for high CTR.

adsense blog homepage adsense blog homepage

Google Adsense ads on your article pages. 160×600, 336x280px

adsense blog article adsense blog article

Best Adsense Placement for Forums

Google Adsense ads on your forum homepage, category, post page - 728x90px banner is by far the best choice when used wiht link units.

adsense forum homepage adsense forum category page

adsense forum post page

So follow these Adsense placement guidelines and improve your CTR to make money online.

You may use Firefox as your main web browser, but you may find that there are times you need to open web pages in other browsers. Generally, to do this, you must open the other browser and then copy and paste the link into the address bar in the other browser. You can avoid this time-consuming method, by installing the Browser View Plus add-on in Firefox. This add-on allows you to open web pages in other browsers from within Firefox.

This two-part series of posts shows you how to install and use the Browser View Plus Firefox extension to easily open web pages and links in external browsers.

NOTE: We tried installing Browser View Plus in Firefox running in Windows 7, and found it didn’t work. We installed and tested it in Windows XP and Windows Vista, using the latest version of Firefox, and it worked fine.

Install Browser View Plus

To install Browser View Plus, go to the following web page:

https://addons.mozilla.org/en-US/firefox/addon/10601/.

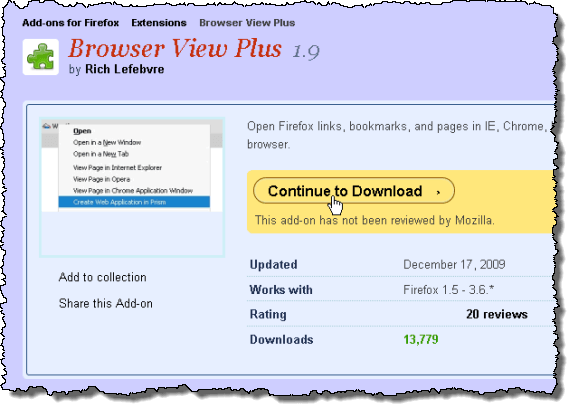
On the Browser View Plus add-on web page, click the Continue to Download button.

Browser View Plus installation page

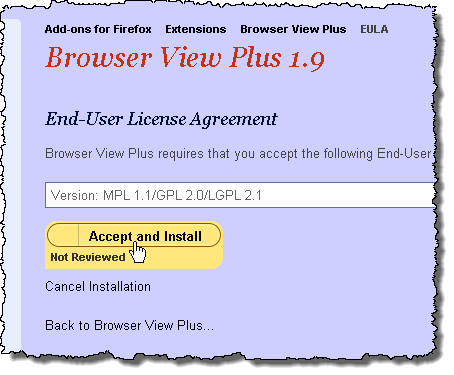
On the End-User License Agreement screen, click the Accept and Install button.

Browser View Plus License Agreement

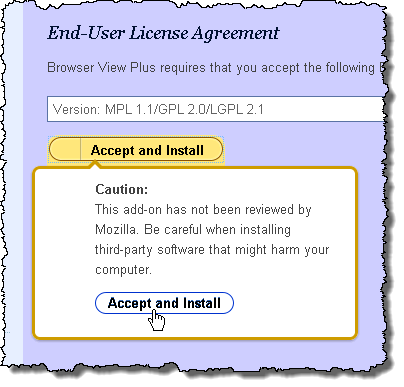
A Caution popup displays telling you that this add-on has not been reviewed by Mozilla. When we tried the add-on, it seemed to work fine (except in Windows 7) and didn’t cause any problems. Click Accept and Install on the popup to continue with the installation.

Caution popup

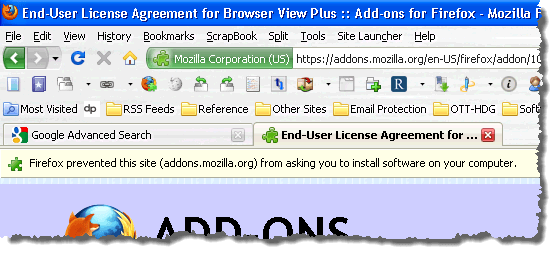
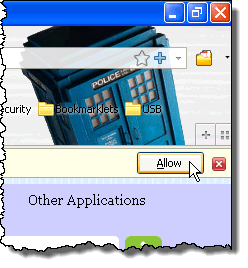
You may see a message display on a yellow bar right below the tabs telling you that Firefox prevented the site from asking you to install software on your computer.

Firefox prevented installation message

If you see the above message, click the Allow button on the right side of the yellow bar to begin the installation.

Clicking Allow

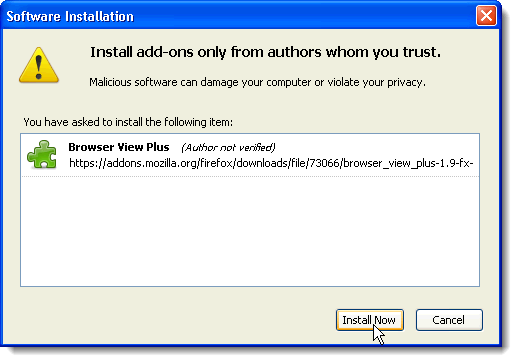
The Software Installation dialog box displays. There may be a countdown on the Install button, depending on your settings. If so, when it is done, click the Install Now button.

NOTE: See our post, Easily Tweak Firefox Configuration Settings Using a Graphical Interface, for information about turning off the add-ons installation delay, if desired.

Clicking Install Now on Software Installation dialog box

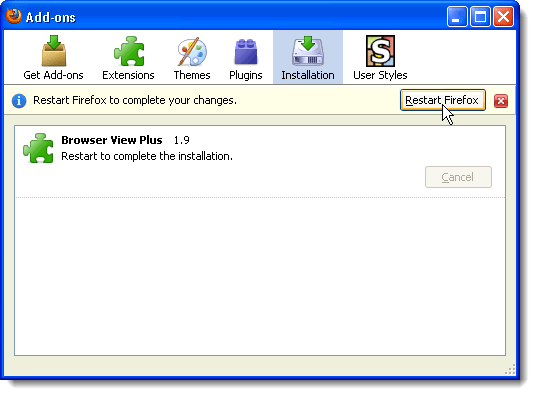
Once the installation if finished, the Add-ons dialog box displays again. You must restart Firefox for the changes to take effect. Click the Restart Firefox button.

Clicking Restart Firefox

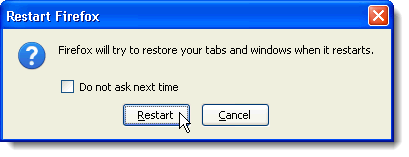
The Restart Firefox dialog box displays, telling you that Firefox will try to restore your tabs and windows when it restarts. If you don’t want to see this dialog box every time you restart Firefox, select the Do not ask next time check box so there is a check mark in the box. Click Restart.

Restart Firefox confirmation dialog box

Access Browser View Plus Options

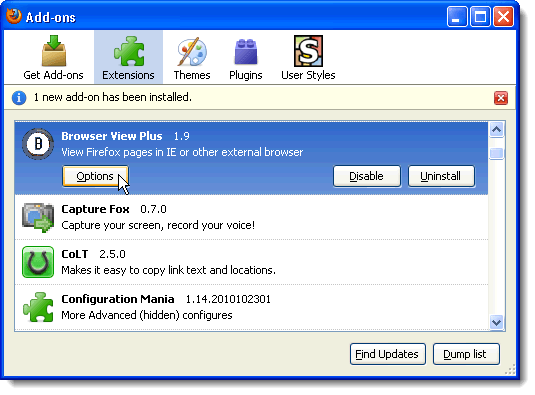
When Firefox reopens, the Add-ons dialog box may automatically display again. If it doesn’t, select Add-ons from the Tools menu to open it. The first thing to do with Browser View Plus is to set the options. Find Browser View Plus in the list on the Extensions screen and select it. Click the Options button.

Opening Options

Add External Browsers to the Context Menus

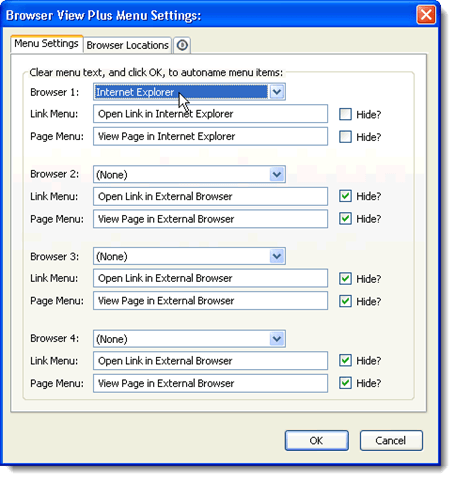
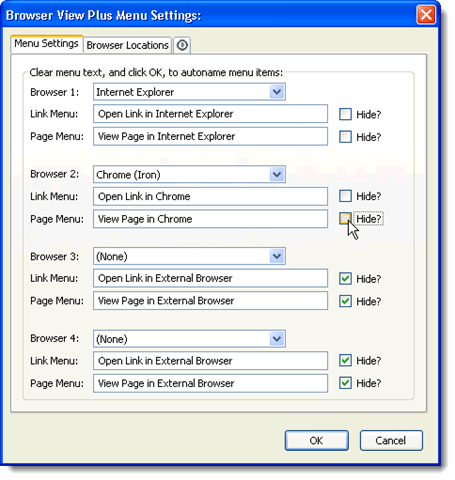
The Browser View Plus Menu Settings dialog box displays. You can specify up to four external browsers to be available on the Link Menu and/or the Page Menu.

The Link Menu displays when you right-click on a link on a web page. You can select an external browser from the Link Menu to open the selected link in that browser.

The Page Menu displays when you right-click on part of a web page that is not a link. Selecting an external browser from the Page Menu opens the currently open web page in that browser.

Menu Settings tab

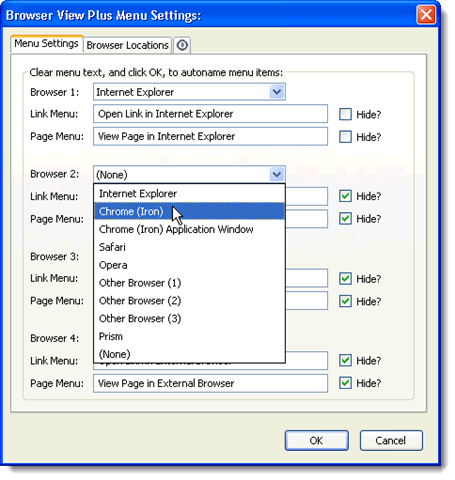
Select the browser you want to add to the menu from the Browser drop down list (1 – 4). For this example, we added Chrome as the second browser in the list, so we selected Chrome (Iron) from the Browser 2 drop-down list.

Selecting Chrome

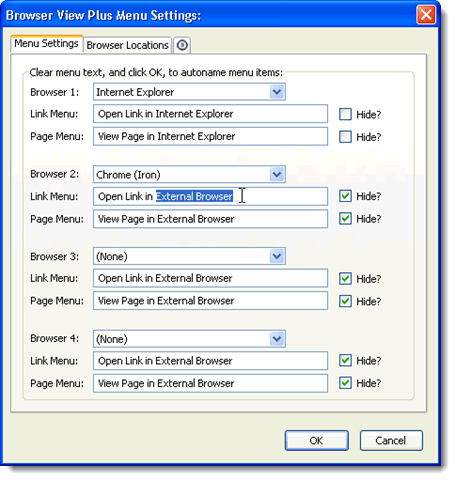
Change the Link Menu text and the Page Menu text to reflect the chosen external browser.

Changing the menu item text

To have the selected external browser show up on the Link Menu when you right-click on links on a web page, select the Hide check box to the right of the Link Menu edit box so there is NO check mark in the box. Do the same for Page Menu if you want to be able to open the current web page in the selected external browser.

Unhiding the Chrome menu item

Wrap Up

This was the first post in a two-part series about installing and using the Browser View Plus Firefox extension to easily open web pages and links in external browsers.

In this post we covered installing Browser View Plus and adding external browsers to the context menus for links and pages.

Stay tuned for Part II, where we will cover specifying the location of a custom browser and adding that custom browser to the context menus for links and pages, defining additional buttons, using the new context menu options to open a link in an external browser, and adding the Browser View Plus buttons to the Firefox toolbar.

Junk e-mail is at an all time high. Many people report that junk e-mail is more prevalent in their in-boxes than legitimate e-mails from people they know. Most e-mail clients, including Windows Live Mail, allow you to set a level of protection from junk e-mail. Learn how to choose the level of junk e-mail protection in Windows Live Mail.

Junk E-mail Protection

Like junk mail received from the post office, junk e-mails are unsolicited messages that normally ask you to take some action like buy a product, visit a website, or download a file. They are not only annoying, they are dangerous.

Unlike junk mail from the post office, junk e-mail can pose a threat to you and your family. They can contain links to viruses, malware, or even elicit material on a website. Some junk e-mail messages contain attachments that are dangerous to open.

Windows Live Mail offers you multiple levels of protection from junk e-mail. Which level to choose depends on the type of junk e-mail you commonly receive and the danger of having the application erroneously tag a legitimate e-mail as junk. Be careful of the level of protection you choose. Select too high a level and you may miss important e-mails from family, friends, or clients.

Selecting a Level of Junk E-mail Protection in Windows Live Mail

Open up Windows Live Mail and click on the Main Menu button. Hover your mouse over Options and select Safety Options from the menu.

Windows Live Mail Safety Options

This will open the Safety Options window. Click on the Options tab to change how Windows Live Mail handles junk e-mail.

Windows Live Mail Options Tab

On the Options tab, you will notice four main options of which you can only choose one. These are followed by two additional options. Below is a description of each option under Choose the Level of Junk E-mail Protection You Want.

Windows Live Mail Junk E-mail Options

No Automatic Filtering – This option essentially turns off all junk e-mail protection. However, mail sent from senders on your Blocked Senders list will still be moved to the Junk E-mail folder. Choose this option only if you rarely receive junk e-mail and are very careful about the e-mail that ends up in your in-box.

Low – This is the default option; it moves e-mail to your Junk E-mail folder only if it is obvious that it is junk e-mail. This includes e-mails that are blank or that contain suspicious attachments.

High – This option lowers the threshold for detecting junk e-mail and, therefore, catches more junk e-mail than the Low option. However, some legitimate e-mail will be tagged as junk even when they are not.

If you use this option, be prepared to occasionally dig through the Junk E-mail folder for e-mail you expected but never received. If you choose this option, you should make it a practice to look through the Junk E-mail folder to see if any of your e-mail has been erroneously tagged as junk.

Safe List Only – Users of Windows Live Mail rarely use this option because it is the most restrictive. If you select this option, only e-mail received from people on your Safe Senders List will make it into your in-box. All others will be tagged as junk and end up in the Junk E-mail folder.

Permanently Delete Suspected Junk Email Instead of Moving it to the Junk Email Folder – This option is dangerous to select because you will not receive any e-mail in your in-box that were legitimate but erroneously tagged as junk. If you choose this option, be prepared to miss e-mails messages.

Report Junk Email to Microsoft and its Partners (Recommended) – Although off by default, this option lets you take part in Microsoft’s efforts to better identify junk e-mail. There are no direct benefits or negative consequences of selecting this option; you are simply helping Microsoft help you and all Windows Live Mail users manage junk e-mail.

Windows Live Mail conveniently lets you choose the level of protection from the junk e-mail you receive in your in-box. Ranging from no filtering at all to automatically deleting e-mail tagged as junk, there is likely a level of junk e-mail protection for everyone in Windows Live Mail.

Firefox provides a lot of functionality available on menus, toolbars, and through add-ons. After a while, you may find that the amount of space left for display of the web pages has shrunk. You may have the menu bar showing, various toolbars, the tab bar, and maybe the Bookmarks bar.

There are many options for customizing the appearance of Firefox and minimizing the amount of “stuff” available at the top of the Firefox window. We will be discussing several extensions you can install and tips you can employ to expand your viewable web page space in Firefox.

First, we will show you a Firefox extension, called Tiny Menu, that can minimize the size of your Menu Bar.

To install Tiny Menu, select Add-ons from the Tools menu.

Selecting Add-ons from the Tools menu

The Add-ons dialog box displays. Click the Get Add-ons button on the toolbar at the top of the dialog box. Enter “tiny menu” (without the quotes) in the search box and either click the magnifying glass or press Enter.

Searching for Tiny Menu

The Tiny Menu extension should be the first item in the list of results. Click on it and then click the Add to Firefox button.

Clicking Add to Firefox

The Software Installation dialog box displays. There may be a countdown on the Install button, depending on your settings. If so, when it is done, click the Install Now button.

NOTE: See our post, Easily Tweak Firefox Configuration Settings Using a Graphical Interface, for information about turning off the add-ons installation delay, if desired.

Clicking Install Now

Once the installation is finished, you are returned to the Add-ons dialog box. You must restart Firefox to complete the changes. Click Restart Firefox.

Clicking Restart Firefox

If you have more than one tab open or more than one Firefox window open when you close Firefox, the Restart Firefox dialog box may display, telling you that Firefox will try to restore your tabs and windows when it restarts. If you don’t want to see this dialog box every time you restart Firefox, select the Do not ask next time check box so there is a check mark in the box. Click Restart.

Restart Firefox confirmation dialog box

When Firefox reopens, the Add-ons dialog box may automatically display again. If it doesn’t, select Add-ons from the Tools menu to open it. First, we will set the options for Tiny Menu. Find Tiny Menu in the list on the Extensions screen and select it. Click the Options button.

Clicking Options for Tiny Menu

The Tiny Menu dialog box displays. In the Do NOT collapse these menus box, you can select the menus that you don’t want to collapse into a single drop-down menu. Also, if you want the Tiny Menu drop-down menu available in full-screen mode, select the Menu toolbar visible in full screen mode check box. You must restart Firefox for these changes to take effect. Once you are finished selecting your options, click OK.

NOTE: When we installed Tiny Menu in Firefox 3.6.13 in Windows 7, 32-bit, there was an initial problem with the Options dialog box. The OK and Cancel buttons were not fully visible. We rebooted the computer and that fixed the problem.

Tiny Menu Options dialog box

You are returned to the Add-ons dialog box. To close the dialog box, click the X button in the upper, right corner.

Closing Add-ons dialog box

The Menu Bar is now condensed into a single, drop-down Menu containing all the menus from the Menu Bar that you chose to collapse.

Tiny Menu results

If you chose not to collapse any of the menus on the Menu Bar, they display next to the Menu drop-down menu, as shown below.

Tools menu not collapsed

Now that you have a minimized Menu Bar, you can combine the Menu bar with the Navigation Toolbar to save space. To do this, right-click on the Menu bar and select Customize from the popup menu.

Selecting Customize on Menu bar

The Customize Toolbar dialog box displays. You do not need to do anything on the Customize Toolbar dialog box, but it must be open to customize the toolbars and the Menu Bar. To move an item from the Navigation Toolbar to the Menu Bar, click and hold the mouse on the item.

About to move the Forward and Back buttons

Drag the item to the Menu bar and release the mouse button.

Moving Forward and Back buttons to Menu bar

We moved all of the items from the Navigation Toolbar to the Menu Bar, so the Navigation Toolbar is now empty. To turn off the Navigation Toolbar, right-click on any toolbar or the Menu Bar and select Navigation Toolbar from the popup menu, so there is no check mark to the left of the menu item.

Turning off the Navigation Toolbar

Once you are finished customizing the toolbars, you can close the Customize Toolbar dialog box. Click Done on the dialog box to close it.

Closing the Customize Toolbar dialog box

The Menu Bar and the Navigation Toolbar now take up only one line at the top of the Firefox window.

Menu bar and Navigation bar combined

Stay tuned for more ideas on how to expand your viewable web page space in Firefox.

We have previously provided a method for expanding the viewable web page space in Firefox by shrinking the size of the Menu Bar and combining it with the Navigation Toolbar (see our post, Expand Your Viewable Web Page Space in Firefox Using Tiny Menu) and hiding the Menu Bar altogether (see our post, Expand Your Viewable Web Page Space in Firefox by Hiding the Menu Bar).

You can also condense the Menu Bar to a single button on the toolbar and customize which options are available on that button, using an extension called Personal Menu.

This two-part series of posts is part of a collection of posts about using various extensions and tricks to expand the viewable web page space in Firefox. This post shows you how to use Personal Menu to condense the Menu Bar into a button on the Navigation Toolbar and customize it with selected menus, menu items, and even a toolbar.

Install Personal Menu

To install Personal Menu, select Add-ons from the Tools menu.

Selecting Add-ons from the Tools menu

The Add-ons dialog box displays. Click the Get Add-ons button on the toolbar at the top of the dialog box. Enter “personal menu” (without the quotes) in the search box and either click the magnifying glass or press Enter.

Searching for Personal Menu

The Personal Menu extension should be the first item in the list of results. Click on it and then click the Add to Firefox button.

Clicking the Add to Firefox button

The Software Installation dialog box displays. There may be a countdown on the Install button, depending on your settings. If so, when it is done, click the Install Now button.

NOTE: See our post, Easily Tweak Firefox Configuration Settings Using a Graphical Interface, for information about turning off the add-ons installation delay, if desired.

Clicking the Install Now button

Once the installation is finished, you are returned to the Add-ons dialog box. You must restart Firefox to complete the changes. Click Restart Firefox.

Clicking the Restart Firefox button

If you have more than one tab open or more than one Firefox window open when you close Firefox, the Restart Firefox dialog box may display, telling you that Firefox will try to restore your tabs and windows when it restarts. If you don’t want to see this dialog box every time you restart Firefox, select the Do not ask next time check box so there is a check mark in the box. Click Restart.

Restart Firefox confirmation dialog box

Add Menu Buttons to the Navigation Toolbar

When Firefox reopens, the Customize Toolbar displays with the Personal Menu dialog box displaying in front it it, asking if you want to add buttons to the Navigation Toolbar to access the Bookmarks menu, the History menu, and the items from the Menu Bar. Click OK to automatically add these buttons to the toolbar.

Adding the Menu button to the toolbar

Hide Menus on the Menu Bar

You are returned to the Customize Toolbar dialog box. An extra Settings button has been added to Hide these menus in Menu Bar. Click the Settings button.

Opening Settings for hiding the menus

The Hide Menus dialog box displays. Select the check boxes for menus you wish to hide on the Menu Bar. Any menus not selected on this dialog box will still display on the Menu Bar. To maximize your viewable web page space, it is recommended you hide all the menus using the dialog box. You can add the menus and menu options to the Menu button you added to the Navigation Toolbar as described later in this post.

If you use Personal Menu to hide the Menu Bar and you don’t add the Menu button to the toolbar, you can view the Menu Bar by pressing Ctrl + Shift + Alt + S. Moving your mouse over the red exclamation mark button next to Emergency Response Measures displays a message about using this keyboard option for accessing the menu.

Click OK to close the Hide Menus dialog box.

Hide Menu settings dialog box

You are returned to the Customize Toolbar dialog box. To close it, click Done.

Closing the Customize Toolbar dialog box

Wrap Up

This was the first post in a two-part series about using Personal Menu to hide the Menu Bar and expand your viewable web page space in Firefox.

In this post, we covered installing Personal Menu, adding the Menu buttons to the Navigation Toolbar, and hiding the menus on the Menu Bar.

Stay tuned for Part II, where we will cover editing the menu on the Menu button, changing the Personal Menu options, using the Menu button, hiding the Menu Bar, and moving the Menu button to another location on the toolbars.