Tips & Tricks, Tutorials, Hacking, Troubleshooting,

Showing posts with label Tricks. Show all posts

Internet Explorer 9 Beta is the new version of the browser available from Microsoft. To get a better browsing experience with it, you might want to make it always start in Full-Screen Mode, and here’s how to do it.

1. If you haven’t done so already, you’ll want to download and install Internet Explorer 9 Beta. For more about getting started, check out Our Beginner Guide to Set Up & Use IE 9.

sshot-2010-12-26-23-32-54

2. To manually toggle between Normal and Full-Screen Mode, simply hit the “F11” key. This allows you to use all of your monitor’s real estate making browsing your favorite websites a more fluid experience…especially if you have a large monitor.

sshot-2011-02-06-[19-21-22]

3. To make it always launch in Full Screen Mode you’ll need to tweak the Registry. Make sure you’re closed out of IE 9, then click on Start and type regedit into the search box and hit Enter.

sshot-2011-02-06-[19-32-24]

4. When the Registry Editor opens navigate to the following:

HKEY_CURRENT_USER\Software\Microsoft\Internet Explorer\Main

Then in the right panel scroll down to FullScreen and double-click on it.

sshot-2011-02-06-[19-49-42]

5. The Edit String window will come up and in the Value data field it will be set to no.

sshot-2011-02-06-[19-50-06]

6. Change the Value data field to Yes, then click OK.

sshot-2011-02-06-[19-50-21]

7. Now you can simply close out of Registry Editor.

sshot-2011-02-06-[20-03-55]

8. When you go back and launch Internet Explorer 9 Beta, it will start in Full-Screen Mode.

sshot-2011-02-06-[19-52-52]

sshot-2011-02-06-[19-56-22]

9. To keep this setting you’ll need to hover the mouse in the upper right corner of IE 9 and Minimize or Close out of it. If you use “F11” on the keyboard or click the Restore button, it will revert the value data you set in the Registry back to “No”. Then you’ll need to reset the Registry setting again or continue to toggle between Normal and Full-Screen mode by hitting the “F11” key.

sshot-2011-02-06-[20-11-07]

If you’re a fan of IE 9 and always want it to launch in Full-Screen Mode, this quick tip will do it for you.

Also be sure to check out our other IE 9 Beta tips:

There might be times when you want to lock your screen in Windows 7 or Windows Vista and still be able to see what is happening on the system. For example, if you are performing an unattended installation of a program or downloading a file, you might want to lock the screen to keep other people from messing with your computer.

If you can lock the screen transparently, you can also check on the progress of your tasks without unlocking the screen. We found a free tool, called ClearLock, that allows you to lock your screen and still be able to view the desktop.

Download ClearLock from

http://www.swanrivercomputers.com/programs/clearlock.

We installed and used ClearLock for this post in Windows 7. However, we tested it in Windows XP and Vista, also, and found it to work.

ClearLock does not need to be installed. Simply extract the .zip file you downloaded and double-click on the .exe file.

Running ClearLock

The first time you run ClearLock, the Set Password dialog box displays. Enter the password you want to use to unlock the screen in both edit boxes and click Save.

NOTE: Pressing Enter to save the password does not work. You must click the Save button.

Setting the password

The screen locks once you enter the password and the Enter Password dialog box displays for about 30 seconds before it goes away and you are able to see the whole desktop. To activate the Enter Password dialog box again, simply move the mouse.

05_screen_locked

You can make it quicker and easier to access ClearLock by pinning it to the Taskbar. To do this, right-click on the ClearLock.exe file and select Pin to Taskbar from the popup menu.

Add the “Add to Quick Launch” Context Menu Option in Windows XP

Pinning a shortcut to ClearLock to the Taskbar

Now, all you have to do to lock your screen is click the Transparent Screen Lock icon on your Taskbar.

Shortcut to ClearLock on the Taskbar

If you are using Windows XP, you can easily add ClearLock to the Quick Launch bar using a Visual Basic script discussed in our post, Add the “Add to Quick Launch” Context Menu Option in Windows XP. Install the script as described in the post and then right-click on the ClearLock.exe file and select Add to Quick Launch from the popup menu.

Selecting add to Quick Launch in Windows XP

The ClearLock icon is added to the Quick Launch bar. If you don’t see the icon on the bar, click the double right arrow button to access the icons that don’t fit on the visible portion of the Quick Launch bar.

ClearLock on the Quick Launch bar in Windows XP

In Windows Vista, you can add ClearLock to the Quick Launch bar without installing a script or a program. Simply, right-click on the ClearLock.exe file and select Add to Quick Launch from the popup menu.

Selecting Add to Quick Launch in Windows Vista

You can change settings and the password for ClearLock. To access these settings or change the password, you have to run ClearLock with an option on the command line. To do this, open the start menu and enter “cmd” (without the quotes) in the Search programs and files box.

NOTE: If you are using Windows XP, select Run from the Start menu, enter “cmd” (again, without the quotes) in the Open edit box and click OK. For Windows Vista, searching for “cmd” in the Search box on the Start menu will work.

Opening a command prompt window

To change the password, navigate to the directory containing the ClearLock.exe file. Type the following command at the command prompt and press Enter.

clearlock.exe /setpassword

The Set Password dialog box discussed earlier in this post displays allowing you to enter a new password.

Entering setpassword command

To access the settings for ClearLock, type the following line at the command prompt and press Enter.

clearlock.exe /config

Entering the config command

The ClearLock Configuration dialog box displays. The Access Control tab allows you to change the Unlock Password, the Lockout Policy, and the Lock Message (the message that displays on the Enter Password dialog box when the screen is locked).

ClearLock Configuration dialog box - Access Control tab

The Appearance tab allows you to change the Background Color and the Opacity (or transparency), select a Background Image, and enable or disable the Screen Saver, and Sound Effects. When you are finished changing the settings, click OK.

ClearLock Configuration dialog box - Appearance tab

The settings are saved in a file called ClearLock.ini that is saved in the same directory as the ClearLock.exe file. You can open the file and change some of the settings in this file.

NOTE: We do not recommend using the .ini file to change settings. You should use the /config command on the command line. DO NOT change the password in the .ini file. Use the Change Password button on the Access Control tab on the ClearLock Configuration dialog box or use the /setpassword command discussed earlier in this post.

The characters on the Password line in the .ini file are a hash generated by the the /setpassword command or the /config command. If you change the password in the .ini file, you will NOT be able to unlock your screen.

ClearLock .ini file after closing Configuration dialog box

To close the command prompt window, type “exit” (without the quotes) at the command prompt and press Enter.

Closing the command prompt window

The following image displays a custom message on the Enter Password dialog box.

Screen locked with custom message

Because ClearLock shows what is on the screen, even though the screen if locked, it is advisable not to have any private documents showing when you lock the screen. Anyone looking at your screen will be able to read any text showing on the screen.

NOTE: ClearLock does have does not have the ability to lock multiple monitors at once. So, if you have a dual monitor setup, ClearLock might not be the screen-locking tool for you.

The sidebar in Firefox is an area on the left side of the screen that you can use to view items such as bookmarks or history. It is also useful for running web applications. However, there are some limitations of the sidebar. This post discusses two tweaks that allow you to resize and move the sidebar.

By default, you cannot change the width of the sidebar, widening it for items that do not fit in the default width. The sidebar also displays on the left side of the Firefox window, by default. You may want to move it to the right, making it more natural to view websites if you use a language that reads left to right.

Both of the tweaks to remove these limitations need to be applied to the userChrome.css file, which is located in the the chrome folder for each profile in the Profiles folder, as listed below. Open the userChrome.css file for the profile for which you want to remove the limitations of the sidebar in a text editor. As an example, we opened the userChrome.css file for the default profile.

Open Windows Explorer and navigate to one of the following folders, depending on which version of Windows you are using.

For Windows 7 and Vista:

C: \ Users \ [username] \ AppData \ Roaming \ Mozilla \ Firefox \ Profiles \ 9pjrzgo3.default \ chrome

For Windows XP:

C: \ Documents and Settings \ [username] \ Application Data \ Mozilla \ Firefox \ Profiles \ 5ufmvdw2.default \ chrome

NOTE: Replace “[username]” with your user name in the path name to access the userChrome.css file.

If you only have a userChrome-example.css, copy it and rename the copy to userChrome.css and continue with the steps in this post. We suggest you copy the example file so you can preserve the example.

Right-click on the userChrome.css file and select Open with | Notepad from the popup menu.

Opening the userChrome.css file in Notepad

Add the following line to the end of the userChrome.css file to move the sidebar to the right side of the Firefox window.

#browser {-moz-box-direction: reverse;}

Entering line to move sidebar to the right

Add the following line to the end of the userChrome.css file to remove the maximum width limitation from the sidebar so you can resize it.

#sidebar {max-width: none !important;}

If you want no minimum width for the sidebar, you can use the following line, rather than the #sidebar line mentioned above:

#sidebar { max-width: none !important; min-width: 0px !important; }

Entering line to remove the maximum width on the sidebar

To save your changes, select Save from the File menu.

Saving the userChrome.css file

To close Notepad, select Exit from the File menu.

Closing Notepad

You must restart Firefox for these changes to take effect. Once Firefox is open again, and you open something in the sidebar, you will see a double arrow when you put your mouse over the border between the sidebar and the viewable web page space. Click and hold on that arrow and drag it either way to resize the sidebar.

Resizing the sidebar now on the right

Now, when you open web pages, links, or images in the sidebar, you can widen it to allow for wider content. There is an extension for Firefox, called Open in Sidebar, that allows you to easily open a web page, a link, or an image in the sidebar using the context (right-click) menu.

Defragmenting your hard drive makes sure that the data on the hard disk is in contiguous order. This provides easier and quicker access to files and programs. Windows 7 and Windows Vista are both set to automatically defragment your hard drive on a weekly basis, by default, or on a schedule you can customize (see our post, Modify the Disk Defragmenter Schedule in Windows 7 and Windows Vista).

Windows XP does not automatically defrag your hard drive on a set schedule, but you can set it up to do so. First, we will show you how to access the Disk Defragmenter in Windows XP and some of its features. Then, we will show you how to run the Disk Defragmenter automatically on a schedule.

Windows 7 Disk Defragmenter

There are a couple of different ways of accessing the Disk Defragmenter in Windows XP. One way is to select Run from the Start menu.

Selecting Run from the Start menu

On the Run dialog box, enter “dfrg.msc” (without the quotes) in the Open edit box and click OK.

Starting Disk Defragmenter from the Run dialog box

You can also access the Disk Defragmenter by opening My Computer, right-clicking on the hard drive you want to defragment and selecting Properties from the popup menu.

Selecting Properties for a hard drive

On the Properties dialog box, click the Tools tab and then click the Defragment Now button.

Clicking Defragment Now on the Tools tab

What’s nice about the Disk Defragmenter in Windows XP as opposed to the ones in Windows 7 and Windows Vista is you get a graphical interface in Windows XP showing you details about the disk usage before and after the defragmentation. This graphical interface is not available in Windows 7 or Windows Vista.

You can manually defragment a hard drive by selecting the desired hard drive from the list at the top of the Disk Defragmenter dialog box and clicking Defragment.

Windows XP Disk Defragmenter

You can also analyze the selected hard drive by clicking the Analyze button. When the analysis is complete, a dialog box displays telling you whether you should defragment the hard drive. Click the View Report button to view more details.

Analysis is complete dialog box

The Analysis Report dialog box displays, showing you information about the hard drive and the files on it that are the most fragmented. To defragment the hard drive, click Defragment. You can also click Save As to save the results of the analysis as a text file or click Print to print the results. Click Close to close the dialog box.

Analysis Report dialog box

To close the Disk Defragmenter, select Exit from the File menu.

Closing the Disk Defragmenter

If you accessed the Disk Defragmenter from the Properties dialog box for a specific hard drive, click OK to close the Properties dialog box.

Closing the Properties dialog box

Now, we will show you how to set up the Disk Defragmenter to run automatically on a custom schedule. Select Control Panel from the Start menu.

Opening Control Panel

On the Control Panel, click the Switch to Classic View link, if the Category View is active.

Switching to Classic View in the Control Panel

Double-click the Scheduled Tasks item.

Clicking on Scheduled Tasks

On the Scheduled Tasks dialog box, double-click the Add Scheduled Task item.

Clicking Add Scheduled Task

The Scheduled Task Wizard displays. Click Next.

Scheduled Task Wizard

A list of applications you can automatically run displays. Click Browse.

Clicking Browse to select program

The Select Program to Schedule dialog box displays. Enter the following line, including the percent signs, in the File name edit box and click Open.

%systemroot%\system32\defrag.exe

Selecting program to schedule

The next screen in the Scheduled Task Wizard displays. Enter a name for the task in the edit box. Select how often to perform the defragment task from the list of radio buttons under Perform this task. Click Next.

Entering a name and selecting timing

If you selected Daily, Weekly, Monthly, or One time only, the next screen allows you to specify the details about when to run the task. For example, if you selected Weekly, the options pictured below are available. Click Next when you have finished selecting your options.

Entering the time and selecting the frequency and the day of week

On the next screen, the currently logged in user is automatically entered in the Enter the user name edit box. You can change that to a different user name, if desired. Enter the password for the specified user in the Enter the password edit box and again in the Confirm password edit box. Click Next.

Entering the password

The next screen displays a summary of the scheduled task. To set more options for the task, select the Open advanced properties for this task when I click Finish check box. This allows you to specify a hard drive to be defragmented. Click Finish.

Clicking Finish

A dialog box displays with the name of the new task in the title bar. On the Task tab, add a space and the drive letter, such as “C:” (without the quotes) to the end of the line of text in the Run edit box.

If you want to only run the task if the specified user is logged into the computer, select the Run only if logged on check box. If this check box is not selected, the computer only has to be on for the task to run.

Adding the drive letter to the Run command

Click the Settings tab to customize additional settings for the new task. For example, you can specify to Only start the task if the computer has been idle for at least a certain number of minutes. This is useful if you happen to still be working on the computer when the time comes to run the task. The task won’t start if you are using the computer.

Click OK once you have changed the desired settings.

Changing Settings

When you change settings for a task, you are asked for the password for the user account specified for the task. Enter the password in the Password edit box and again in the Confirm password edit box and click OK.

Entering the password to save changed settings

An icon for the newly created task displays on the Scheduled Tasks dialog box.

Disk Defrag task icon

When the task runs, a command window opens displaying information produced by the task.

Defrag running in a command window

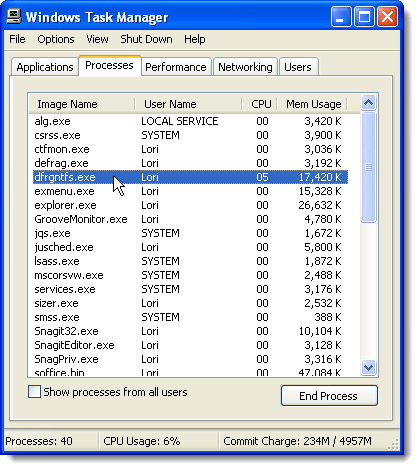
You won’t see the Disk Defragmenter graphical interface, but the Disk Defragmenter is running in the background. If you open up Task Manager (right-click on the Taskbar and select Task Manager), you’ll see the process running on the Processes tab.

Defrag task running in Task Manager

Now your Windows XP machine will automatically defragment the local hard drive on a specified schedule just like it does in Vista and Windows 7.

You can also use a tool called pycron to schedule task to defragment your hard drive. See our post, Replacing the Windows Task Scheduler, for more information. The Command to be entered would be “%systemroot%\system32\defrag.exe” (without the quotes), the same as earlier in this post. The Parameter would be “C:” (again, without the quotes).