- To get started, head over to the Desktop Media download page and download their free app, Desktop Media. Once the file has finished downloading (it’s very small) – open the .zip and run the installation program. The procedure is very straight forward – just click Next a bunch of times.
- Once the installation has completed, Desktop Media will launch. Now try plugging in a USB drive, an SD Card or CD/DVD. A shortcut to that drive will automatically appear on your Desktop.
- You can customize Desktop Media by right-clicking on its icon in the System Tray and then select Options…
- One item of note is the option to display Fixed drives. A “fixed” drive is one that’s “built in” to your PC (for example, your C: drive). Place a check in the Fixed box to have shortcuts created to them on your Desktop.
- Now you’ll be able to quickly access your fixed drives as well.
- For your external drives (USB, SD, CD/DVD) – you can also right-click on the shortcut and select Eject to safely remove them from your PC – a very handy option!
It can be really annoying if you are typing something and all of a sudden the cursor jumps to another part of the document! In this article, I’ll show you the different ways to disable the touchpad on OS X, Windows 7 and Windows 8.
Disable Trackpad OS X Mountain Lion
If you’re running the latest version of OS X and you have a bluetooth or USB mouse connected, you can have OS X ignore the trackpad by going to System Preferences and then clicking on Accessibility.Then scroll down to Mouse and Trackpad and check the Ignore built-in trackpad when mouse or wireless trackpad is present box.
Disable Trackpad on Windows
In Windows 7 and Windows 8, there are a couple of different ways you can disable the trackpad depending on how your system is configured. The first way you want to check is to see if there is a special button on the keyboard or switch on your laptop to disable the trackpad. For example, this is the key on a Dell laptop. You have to press the Function key and the trackpad button to enable/disable it.If you don’t have the button or the switch, the next way to disable the touchpad is to go to Mouse properties from Control Panel and check if there is a Device Settings or Touchpad tab.
Click on the Disable button and you’re good to go. If you don’t see the Device Settings tab in Mouse Properties, that means you don’t have the proper drivers installed or the full software for the trackpad. Go to the manufacturers website and download the full driver package.
Lastly, you can open up Device Manager from Control Panel, expand Mouse and other pointing devices and then disable the touchpad if it is listed there.
Everything is the same when disabling the trackpad in Windows 8 also. Of course in Windows 8, your trackpad may not even work unless you have the latest drivers! Synaptics still hasn’t released a Windows 8 generic Touchpad driver yet, so keep an eye out for that if you have a Synaptics touchpad on your laptop. Enjoy!
Follow these steps:
1) Open Notepad and copy the contents of the code below.
@ECHO OFF
title Folder MyPrivateLocker
if EXIST "Control Panel.{21EC2020-3AEA-1069-A2DD-08002B30309D}" goto UNLOCK
if NOT EXIST MyPrivateLocker goto MDLOCKER
:CONFIRM
echo Are you sure u want to Lock the folder(Y/N)
set/p "cho=>"
if %cho%==Y goto LOCK
if %cho%==y goto LOCK
if %cho%==n goto END
if %cho%==N goto END
echo Invalid choice.
goto CONFIRM
:LOCK
ren MyPrivateLocker "Control Panel.{21EC2020-3AEA-1069-A2DD-08002B30309D}"
attrib +h +s "Control Panel.{21EC2020-3AEA-1069-A2DD-08002B30309D}"
echo MyPrivateLocker locked
goto End
:UNLOCK
echo Enter password to Unlock folder
set/p "pass=>"
if NOT %pass%==change to your desired password goto FAIL
attrib -h -s "Control Panel.{21EC2020-3AEA-1069-A2DD-08002B30309D}"
ren "Control Panel.{21EC2020-3AEA-1069-A2DD-08002B30309D}" MyPrivateLocker
echo MyPrivateLocker Unlocked successfully
goto End
:FAIL
echo Invalid password
goto end
:MDLOCKER
md MyPrivateLocker
echo MyPrivateLocker created successfully
goto End
:End
3) Save it as FL.bat and close. (Note: Try to be innovative and save it in such a way that it sounds like a system file so that nobody will try to bother clicking it)
4) Double click run FL.bat.
5) It will create a new folder called ‘MyPrivateLocker’ automatically. (If you want the file name to be different, replace MyPrivateLocker in the code above with the name of your choice). This new locker folder will be created in the same folder/drive as the .bat file).
6) Copy/place the files to be locked and hidden inside the MyPrivateLocker
and double click run FL.bat, it will ask whether you want to lock. Say ‘Y’ and now your folder will get locked and hidden.
7) To unlock and unhide the folder, double click run FL.bat again and enter your password you have changed in the code (step 2).
Tested for invalid password : Gave error
And sure enough, I got one of these error message on my Windows 7 PC last week. The problem with these errors and the reason why they are so popular is because they have all sort of causes. It’s not just one issue that causes the error, otherwise it would be easy to fix. In this article, I’ll try to go through all the different methods you can use to fix the error.
Method 1 – Perform a Clean Boot
The hunt it on! This problem is normally caused by something on your computer other than the OS. Windows itself rarely crashes on it’s own with this error. So the first thing to do is try and isolate what service, program or startup item is causing the issue, if it’s one of those.You can do this by performing what is called a clean boot. It’s described here in detail on the Microsoft website:
http://support.microsoft.com//kb/929135
Basically, we use MSCONFIG to disable all third-party services and startup items and see if the problem goes away. If it does, then you know it’s one of those services or startup items and you have to start a cycle of enabling half the items, then rebooting, checking, etc. It’s a little time consuming, but worth it to have your computer running properly.
Method 2 – Disable Shell Extensions
If you perform a clean boot and the issue is still occurring, then you can try to disable all non-Microsoft shell extensions. You can do this by downloading a free program from Nirsoft called ShellExView.You want to run the program and then sort all the items by Manufacturer. Anything that is not from Microsoft should be disabled. Again, if the issue goes away, then you know it’s one of those shell extensions and you can enable them one by one. To disable, just select the item and then click on the red circle button.
Method 3 – Update Video Driver
Oddly enough, an old or corrupted video driver can cause this issue. Go to the manufacturer’s website and download the latest version for your version of Windows, making sure to get 32 or 64-bit depending on your system.Method 4 – Always Show Icons
Another strange fix is to go to Explorer, Tools, Folder Options and then the View tab for Windows XP. For Windows Vista and 7, you want to click on the Organize button, then Folder and Search Options, then View tab.On the View tab, check the box that says Always show icons, never thumbnails.
What does this do? Well, basically instead of trying to show a small thumbnail preview of a picture or video, it will just show an icon. That may not be ideal, but if it gets rid of the problem of explorer not responding, then it might be worth it.
Method 5 – System Restore
If you installed something like an update or a new driver and now all of a sudden you are having the explorer problem, it might be a good idea to restore your computer to a previous state. You can use System Restore to go back to a time before the update or installation that you believe is causing the problem. Click Start and type System Restore.Method 6 – Run System File Checker
If this problem happens to be caused by a corrupted file in Windows, which is pretty rare, you can fix it using a few different tools. The first one is running the system file checker command at the command prompt. You can do this by opening an elevated command prompt (Click Start, type command and then right-click and choose Run as Administrator).At the command prompt, simply type in the following command:
sfc /scannow
This will check all system and protected files and replace them if any of them are found to be corrupted. If this does not work, you can try a repair install.
Method 7 – Repair Install Windows
You can get to startup repair from the System Recovery Options dialog shown above when the computer first loads. Basically, you need to press and hold F8 while your computer is booting. Then you’ll get the list of Advanced Boot Options, where you will choose Repair your computer.
Click Startup Repair and let it do it’s thing. Also, while you are in the System Recovery Options, you’ll see an option for Command Prompt. From there, you can try running the following command:
chkdsk c: /r
Method 8 – Virus or Malware Removal
If absolutely nothing else is working for you, then you may be a victim of a virus or malware. If you think you may have a virus, you should try to install some anti-virus and anti-spyware software to see if you can find any problems. If you have a really bad virus infection or lots of malware, your only choice may be to do a fresh install of the OS.For example, I have a printer attached to my Windows 7 computer in my home office and I wanted to be able to print to it from my MacBook Pro running Lion. I thought it was going to take a long time, but luckily it didn’t! In this post, I’ll walk you through the steps to share a printer from Windows XP or Windows 7 to your Mac.
Note that the part about adding the printer to your Mac is the same regardless of whether it’s from Windows XP or Windows 7. The only difference is the way your share the printer in XP and 7.
Share Windows XP Printer
The first thing that needs to be done is the share the printer. In Windows XP, you can do this by going to Control Panel and clicking on Printers and Faxes.Next, right-cick on the printer and choose Properties.
Finally, click on the Sharing tab and choose Share this printer.
It’s probably a good idea to keep the name of the printer short (less than 8 characters) and also not to include any spaces or special characters. Just keep it to letters and numbers. Click OK and you’re done. Now skip down to the adding printer to your Mac section for the rest of the instructions.
Share Windows 7 Printer
In Windows 7, the process of sharing a printer is slightly different. First, go to Control Panel and click on Devices and Printers.Next, right-click on the printer and choose Printer Properties. In XP, you had to choose just Properties.
Finally, go to the Sharing tab and check Share this printer. That’s it for the Windows part!
Add Windows Printer to OS X
Now for the final part. In OS X, go to System Preferences and click on Print & Scan.Now click on the little + button at the bottom of the box that shows you the currently installed printers.
Now you’ll get a pop up dialog that has a few options across the top. In our case, we want to click on Windows. This will automatically find all the Windows computers on your network! Sweet!
Click on the name of the computer with the shared printer and you’ll be asked to connect to it as a guest or registered user. In my experience, I was only able to connect as a registered user and only to Windows computers that had a username AND password. If you don’t have a password on your Windows user account, you won’t be able to connect and therefore won’t be able to see the shared printers. I can’t figure out a way to get it to work without having a password on the Windows account.
Now you’l see the last box on the right will have the name of the shared printer(s).
Click on the printer and then at the bottom you have to choose how to print. You have an option for Generic Postscript or Generic PCL, but normally you’re going to want to choose Select Printer Software. By default, OS X has a lot of drivers for the most common printers.
They even had my Lexmark 7600 printer in the list, meaning I didn’t have to worry about downloading the latest Mac driver for my printer and installing that.
And that’s about it. The software will be installed and you should be able to print. If your printer is not in the list, then you had to choose Other in the drop down and then choose the driver manually. You’ll have to download the latest Mac driver for your printer in order to do that.
If you don’t have a fax machine or want to scrap your fax machine, you can still send faxes from your computer if you have Windows XP. The Windows XP Fax service is a program that uses your modem instead of a fax machine to send faxes.
To use the Windows XP Fax service, you will also need a scanner to scan existing documents or a word processing program or text editor to create documents to fax. Ensure that your modem is connected to the phone line before continuing.
Installing and Configuring the Windows XP Fax Service
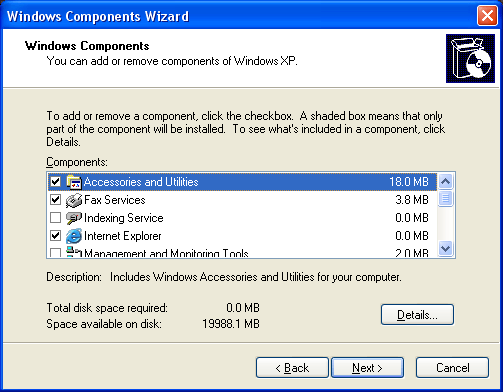
Windows XP Fax Services aren’t installed by default in Windows XP Home Edition. To install the fax software, click Start, then Control Panel and Add or Remove Programs. Select Add/Remove Windows Components, then select Fax Services and click Next.
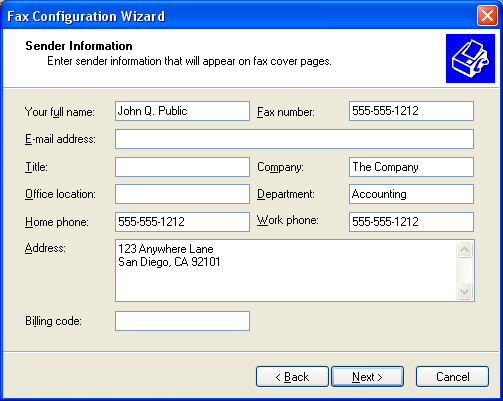
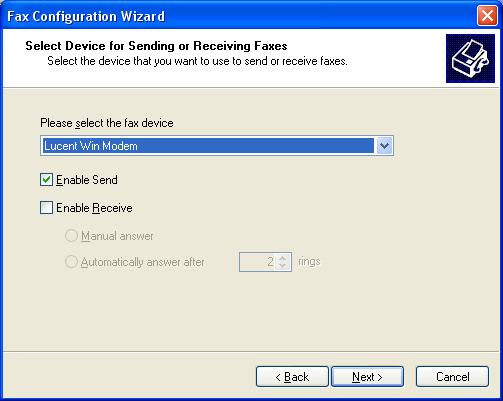
Click Start and access the All Programs menu. Select Accessories, Communications, Fax and then Fax Console. From the Tools menu, select Configure Fax and click Next. Type your name and fax number in the Sender Information window. Select your modem in the Select Device for Sending and Receiving Faxes window. Select the check box beside Enable Send, then select Next.
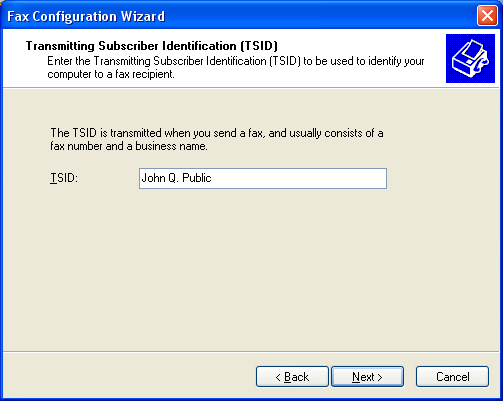
In the Transmitting Subscriber Identification window, type your name and fax number again and click Next.
Then in the Tools menu, choose Fax Printer Configuration. Type a name such as Fax. Click the Devices tab. Make sure that your modem appears under Device Name then click OK.
Sending Faxes with Windows XP Fax Service
If you would like to send a text or word processing document as a fax, open your text editor or word processor to create a file. If you’d like to fax a printed document or a photograph, scan it and open the image in an image viewer or image processing program.
If you have to send multiple text or word processing documents as a fax in Windows XP, you can easily do so by creating a multi-page file in your word processor or text editor. However, if you want to send multiple scanned documents in Windows XP Fax Services, you will have to use the scans to create a PDF file.
You can do this using Create Adobe PDF Online. For a small monthly fee, this service allows you unlimited PDF file conversions, unlimited print to paperless PDF and combining multiple files into one PDF file.
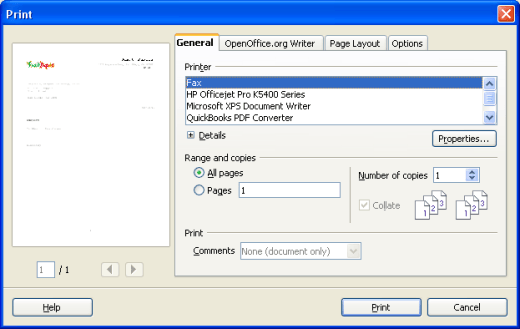
When you’re ready to send your fax, select Print from the program’s File menu. In the Send Fax Wizard, type the name and fax number of the person to whom you’d like to fax your document or image. Type a cover page, if necessary. Click Next. Choose when to send your fax and choose the priority of the fax. Click Next and Finish to send the fax.
For more information, you can read faxZero – Free online Internet fax service – Send faxes for free.
The Encrypting File System (EFS) is a security feature in Windows XP Professional which prevents unauthorized users from accessing your files. You can continue to use the encrypted files without having to decrypt them manually. You can even share them with other users on your computer.
However, if your computer is stolen or attacked by a hacker, the unauthorized user will get an access denied message when trying to access the encrypted files. The Encrypting File System works only on NTFS volumes and isn’t included with Windows XP Home Edition.
Encrypting Files in Windows Explorer
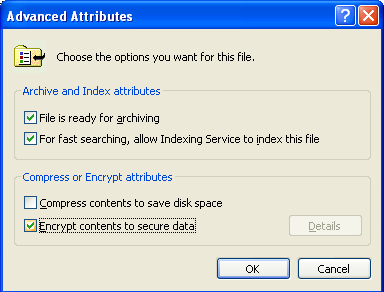
Click Start, then click My Computer. Navigate to the file you’d like to encrypt. Right-click it, then select Properties. Click the General tab, and click Advanced. Under the Compress or Encrypt attributes heading, click the check box beside Encrypt contents to secure data and click OK twice.
You will receive an encryption warning if the file is in an unencrypted folder. If you just wish to encrypt the file, select Encrypt the file only and click OK. If you want to encrypt the folder as well, select Encrypt the file and the parent folder, then click OK. When you encrypt a folder, every file added to that folder will be encrypted. Successfully encrypted files and folders appear green in Windows Explorer.
Safely Using the Encrypting File System
In Windows XP Pro, encrypted files are protected by a user’s username and password. You must create a strong password and keep it hidden from unauthorized users for the encryption to protect your confidential files. Windows XP also uses public and private encryption keys to decrypt the data automatically.
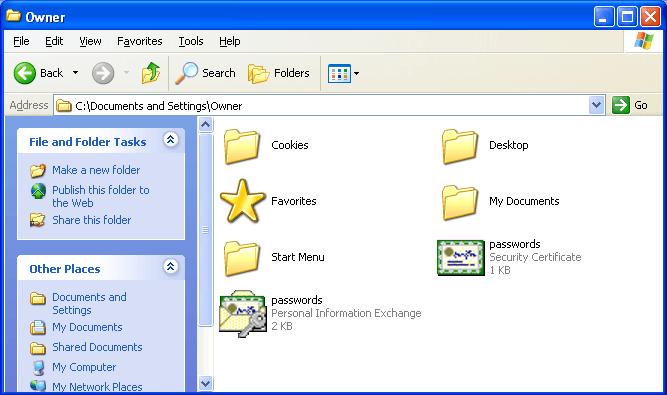
If the private key is lost or damaged, the encrypted data may be unrecoverable. So you must export the EFS keys to removable media and keep them in a secure place to guard against data loss. To export your recovery certificates and private key, make sure you’re logged in as the user that created the encrypted files.
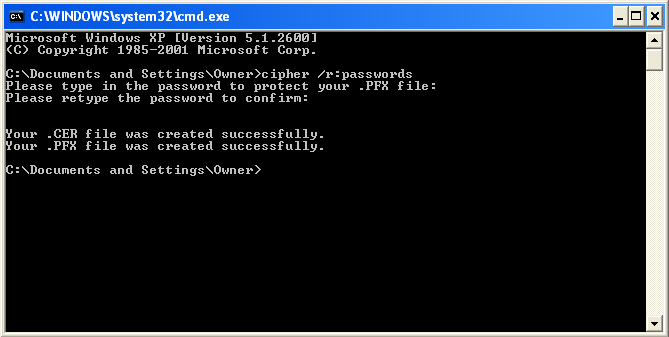
Click Start, then Run, type cmd and click OK. Type cipher /r:filename, where filename is the name of the encrypted file, and press Enter. Type your password when prompted to do so, then confirm the password. No text will appear on the screen as you type your password. These steps will create two files, one with a *.cer extension and one with a *.pfx extension.
Navigate to the folder where you saved these files, then back them up to a floppy disk or CD.
Recovering Encrypted Files
To recover the encrypted files in Windows XP Professional, you must import the EFS recovery certificates and the private key. Log onto the computer as an administrator, then click Start and Run.
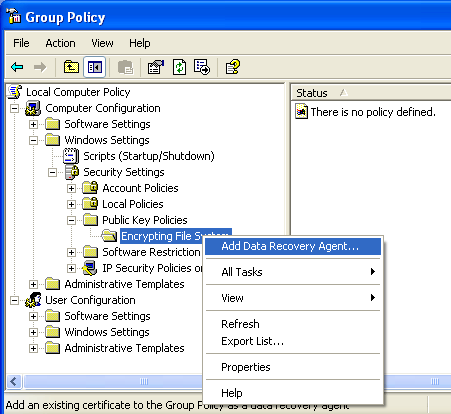
Type gpedit.msc and click OK. Expand the nodes for Local Computer Policy, Computer Configuration, Windows Settings, Security Settings and Public Key Policies. Right-click the Encrypting File System entry, then select Add Data Recovery Agent.
Click Next and then Browse Folders. Navigate to the *.cer file you created when you exported your recovery certificate, select it, then click Open.
To encrypt and password protect your files in other operating systems, read Encrypt and Password Protect Text Files for Free.