Tips & Tricks, Tutorials, Hacking, Troubleshooting,

Today I noticed that there was an update for iTunes and figured this would be a good time to demonstrate how to check for updates so you’re sure to have the latest version.

1. If you have Automatic Updates enabled then when you launch iTunes it should notify you an update is available.

sshot-2011-01-28-[22-12-36]

2. To make iTunes for Windows automatically check for updates, click on Edit then Preferences.

sshot-2011-01-29-[01-26-04]

3. Click the General tab and check the box next to Check for new software updates automatically then click OK.

sshot-2011-01-29-[01-23-54]

4. If you don’t set iTunes to check for updates automatically, you can check for them manually. To do that click on Help then Check for Updates.

sshot-2011-01-28-[22-14-11]

5. It will check the update database and let you know if there is an update. In this example there is a new version 10.1.2…click Download iTunes.

sshot-2011-01-28-[22-14-39]

6. The Apple Software Update window comes up and click on the iTunes + QuickTime update then Install 1 item. You can also install other new software like Safari if you want but it’s not required. Also notice it gives you an overview of what’s included or fixed with the update.

sshot-2011-01-28-[22-15-08]

7. Accept the License Agreement…

sshot-2011-01-28-[22-15-17]

8. Then wait while the update is downloaded and installed.

sshot-2011-01-28-[22-15-37]

9. When it’s done you’ll get the following message letting you know the update has been installed successfully.

sshot-2011-01-28-[22-22-34]

10. It will then go back to the Apple Software Update screen, click Quit to close out of it.

sshot-2011-01-28-[22-23-03]

11. You’ll need to agree to another iTunes Software License Agreement.

sshot-2011-01-28-[22-23-32]

12. Then the new version of iTunes will launch and you can begin using it.

sshot-2011-01-29-[01-54-24]

13. To check which version you have click on Help then About iTunes.

sshot-2011-01-28-[22-24-16]

14. The a About iTunes screen will come up and the version and other information will scroll up so you can check it out.

sshot-2011-01-28-[22-25-28]

Whether you have iTunes check for updates automatically or do it manually, it’s always a good idea to make sure you have the current version for fixes, security patches, and extra features.

If you’ve moved from XP to Windows 7, one feature you have is Windows Media Center. Even if you don’t have a TV tuner card to watch or record Live TV, it includes Internet TV and here’s how to set it up.

For this article we’ll assume you’ve already have Windows Media Center setup.

1. Click on Start >> All Programs and open Windows 7 Media Center.

sshot-2011-01-30-[17-16-52]

2. Next scroll down to TV then Internet TV.

sshot-2011-01-30-[17-18-22]

3. The Internet TV setup screen comes up and you’ll need to agree to the terms of service then click Install.

sshot-2011-01-30-[17-18-46]

4. Wait while the Internet TV feature is downloaded…you’ll see a progress screen in the lower right corner of the screen, it only takes a few seconds.

sshot-2011-01-30-[17-19-14]

5. After it’s finished downloading and installed, you’ll get an Internet TV guide and can start browsing through the available programs – in the United States most of the content comes from CBS.

sshot-2011-01-30-[17-19-41]

6. It also provides some technology podcasts along with the other shows.

sshot-2011-01-30-[17-20-21]

7. There is plenty of different news programming to select from as well…as you scroll through you’ll notice the shows are separated into different categories.

sshot-2011-01-30-[17-20-53]

8. Click on the show you want to watch and you’ll see an overview of it at the bottom of the screen.

sshot-2011-01-30-[17-21-39]

9. Then another synopsis comes up showing the length of the show and what it’s about…click Play to start watching.

sshot-2011-01-30-[17-21-59]

10. Before the show starts you might be prompted to upgrade to the latest version of Adobe Flash Player.

sshot-2011-01-30-[17-22-27]

sshot-2011-01-30-[17-22-59]

11. Of course they make you watch a commercial before a show starts and they’ll also show 30 second ads intermittently throughout the show…similar to the way Hulu does.

sshot-2011-01-30-[17-24-01]

12. After the commercial, the show will start and you can kick back and enjoy it. Click on the screen to bring up a navigation bar to get to different sections of the show. You can control the screen size and basic playback controls like pause, stop, and volume.

sshot-2011-01-30-[17-25-00]

13. Pull up the TV guide from the main menu under the TV category.

sshot-2011-01-30-[17-54-28]

14. If you have a TV Tuner Card you’ll see the available Live TV shows and it also shows the Internet TV programming too.

sshot-2011-01-30-[17-25-49]

If you don’t have a TV Tuner Card to watch Live TV, you can still enjoy some of your favorite shows by setting up the Internet TV feature. If you don’t see Netflix or the Internet TV option, check out our article on how to restore these features if they’re missing.

sshot-2011-01-30-[17-26-46]

That’s all there is to it…have fun!

When I am cleaning up computers from the slowdown of malware and unwanted programs, there is one consistent thing I find in common.

There are usually several programs, toolbars, search assistants and more that are loaded onto the computer, without the user’s knowledge.

Most users never use the stuff, and don’t need it. Almost all of it is garbage and just slows things down on the computer and many track what you are doing.

Some of the common things that load uninvited are Google, Yahoo or MSN’s toolbars, Google desktop, Search helpers, disk defraggers, registry cleaners and more.

Google products are so intrusive, they can be hard to remove, including scheduled tasks, that most people don’t realize even exist, and it is another thing that will slow the system down.

One of the main ways these junk programs get on your systems is when you try to download a program that you need. Something such as Adobe Reader or Adobe Flash. Even big name software will try to include crud you don’t need.

When you download a file, you have to be a detective on the page and make sure you do not click on anything but the actual download link. They disguise other links that say DOWNLOAD NOW, and they download one of these other programs.

In the mean time, your program will download and you will have the program you wanted, and something else.

Here is an example of this, and what is crazy, it happens on more than one page, just to get one file. Let’s say you need to get the Mega Codec pack to make your videos work correctly.

You search on Google, and here is the top choice, below. Note all the Red X’s. Those are all links you do not want, and have nothing to do with your download. You need to look carefully when clicking.

Bad Download

In this case you have to click on a mirror or another site that actually has the file that you can download.

Ok, you made it through the first mine field, now you get a second page, the one that should have the file you want. Hmmmmm. Looks a bit familiar huh?

Bad Download 2

Now look at the above page, and how many Red X’s do we have here? There is only one link to actually download the file, and even it is not really obvious. The green circle is the download button.

As you can see, many things on a website look “legit” but they are just junk begging you to download them and slow down or infect your computer.

Now you need to have Adobe Flash if you are going to do anything on the Internet, including watching videos. Let’s go to the Adobe site and Download Adobe Flash:

Downloadcheckboxes

Here we go again, and this is Adobe doing it as you are trying to download it. You need to UNCHECK any free software helper junk they are trying to push on you. Uncheck the “include in your download.”

Let’s say you got through both minefields of crud to download a file, and now you have the program saved on your computer. You double click the icon to install it. Let’s use good ol’ Ccleaner, a program I like, as an example.

downloadcheckbox

This one is a bit sneakier. They try to put it on your computer after you download it, during the installation. Most of us just Click Install>NEXT>NEXT>OK>Done. We never really look at what it is asking us. I find myself doing this at times, and it can get you in trouble.

Ccleaner is a very good and reputable program, but Google and other companies make money each time someone installs it on their system or they pay a certain amount of money to have the software include the junk on their webpage or inside the software.

Why do they do this? Because they get free data from you, your surfing habits, demographics, and then they push out ads to you on the sides of web pages. Your free information makes people like Google Rich.

The key to safe downloading is to be careful, and watch what you download and make sure you uncheck any extra programs they try to install.

Hopefully these tips and examples will help you keep you computer a little cleaner!

You may still be using Windows XP and have not been able to move to Windows 7. You may have heard about or tried out the improved Taskbar (or “Superbar”) in Windows 7, and would like to have that functionality in Windows XP. Now you can using a free tool, called ViGlance, that imitates the Windows 7 Taskbar in Windows XP.

Download ViGlance from

http://lee-soft.com/viglance/.

ViGlance does not need to be installed. To use it, simply unzip the .zip file you downloaded and double-click on the .exe file.

Running ViGlance

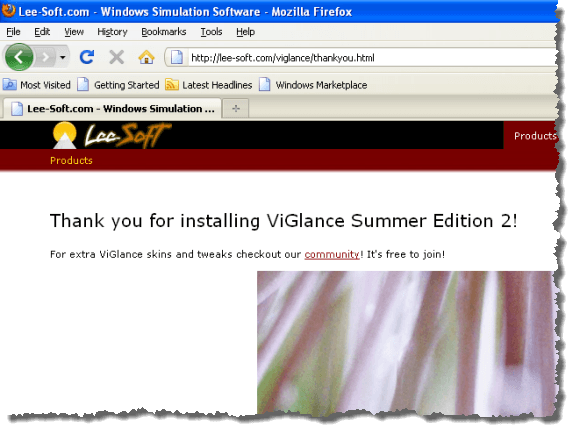
When you run ViGlance for the first time, the Thank You web page displays in your default browser. You can close your browser.

ViGlance Thank You web page

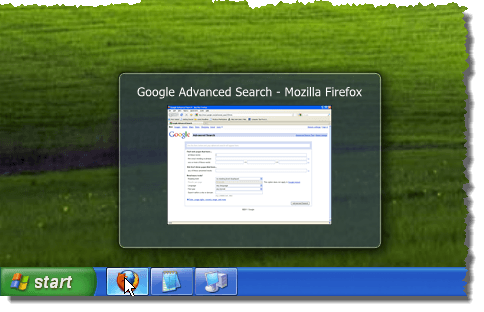
ViGlance runs in the background (putting an icon in the system tray), converting your Windows XP Taskbar into a Windows 7 Taskbar.

NOTE: When you hold Shift key down and left-click on a program’s icon on the Taskbar, with ViGlance running, a new instance of the program will open, just like in Windows 7.

Windows 7-like Taskbar in Windows XP

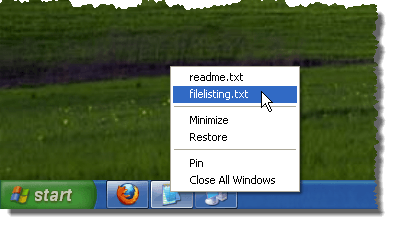
ViGlance even simulates the Jump List feature in Windows 7 by retrieving your most recently opened documents from several locations on the operating system. Now, you can easily access your recently opened files for your currently opened or pinned programs. Simply, right-click on a program’s icon on the Taskbar to access recently opened files for that program.

Simulated Jumplist

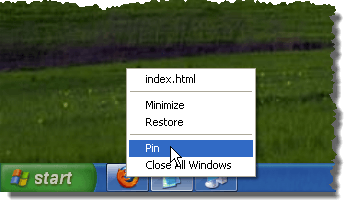
Speaking of pinned programs, ViGlance allows you to pin programs onto the Taskbar like you can in Windows 7. When a program is open or minimized to the Taskbar, right-click on the program’s icon and select Pin from the popup menu.

Pinning a program to the Taskbar

When the program is closed, the icon for the program remains on the Taskbar, allowing you to start the program by clicking on that icon.

Firefox pinned to the Taskbar

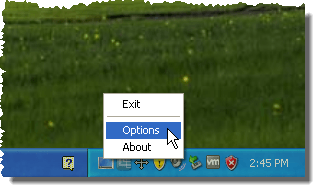
There are some options you can set in ViGlance. To change options in ViGlance, right-click on the ViGlance icon in the system tray and select Options from the popup menu.

Opening Options

On the Options dialog box, select the check boxes for the desired options. We turned on the Enable Start button (ViOrb) check box to convert the Start button to the Windows 7 Start orb. Click OK.

NOTE: If you want to unpin all programs you have pinned to Taskbar, click the Clear Pinned Items button. The Options dialog box automatically closes when you press the Clear Pinned Items button.

Options dialog box

If you select the Enable Start button (ViOrb) option on the Options dialog box, the Start button converts to the Start orb from Windows 7, as pictured below.

Windows 7 orb on Taskbar in Windows XP

NOTE: If you are looking to obtain other Windows 7 Taskbar functionality in Windows XP, we have also written about how to organize the Taskbar buttons in Windows XP and Vista like you can in Windows 7 (see our post, Organize Your Taskbar Buttons in Windows XP and Vista ).

The Hibernate feature in Windows is a power-saving state designed primarily for laptops. There is also a Stand By feature that writes your current work and settings to memory and draws a small amount of power. However, of all the power-saving states in Windows, the Hibernate feature uses the least amount of power.

It puts your open documents and programs on your hard disk and turns your computer off. Hibernate takes a bit longer than Stand By to shut down and resume since you essentially go through the normal shut down and boot up processes. You can leave your laptop in Hibernate mode for days without harming it.

NOTE: You must be logged on as an administrator or a member of the Administrators or Power Users group to use the Hibernation feature. If your computer is connected to a network, network policy settings may prevent you from using this feature.

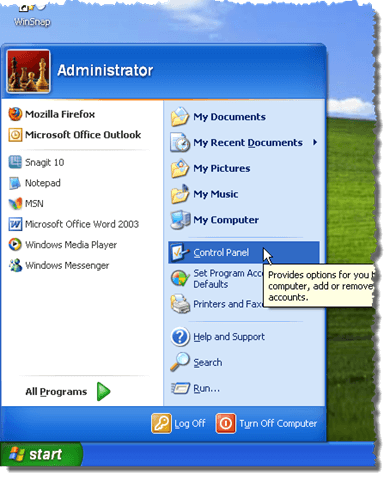
Before putting your computer into hibernation, check to see if the feature is enabled. To do this, select Control Panel from the Start menu.

Opening Control Panel

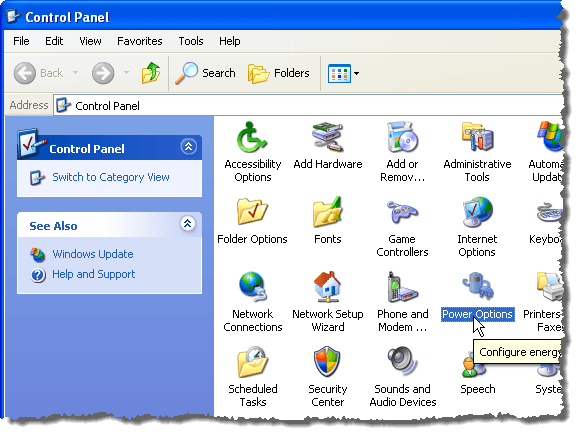
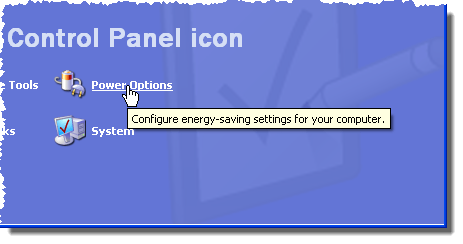
If you are viewing the Control Panel in Classic View, double-click on the Power Options icon.

Opening Power Options in Classic View

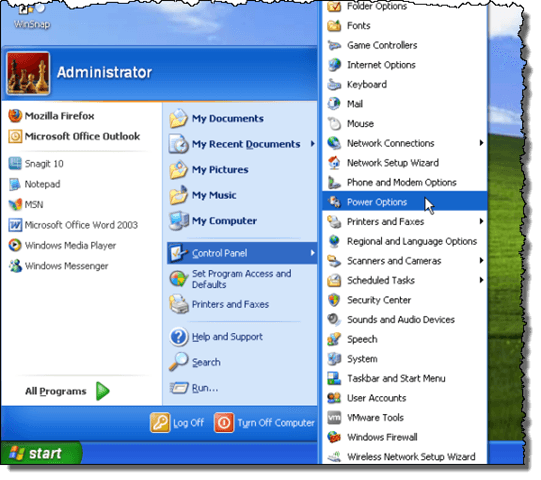
NOTE: If the Control Panel items display as a submenu from the Control Panel option on the Start menu, select Power Options from the submenu.

Selecting Power Options from the Control Panel menu

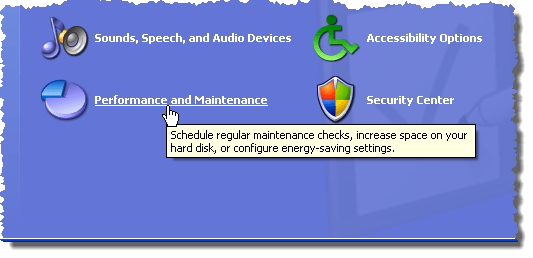
If you are viewing the Control Panel window in Category View, click the Performance and Maintenance link.

Opening Performance and Maintenance in Category View

On the Performance and Maintenance screen, click the Power Options link.

Opening Power Options

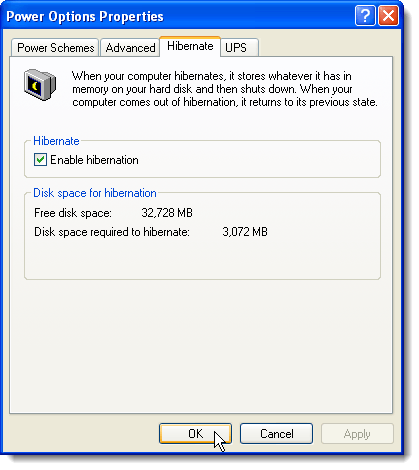
The Power Options dialog box displays. Click the Hibernate tab and select the Enable hibernation check box so there is a check mark in the box to turn on the feature. The amount of Free disk space displays and the Disk space required to hibernate is listed. Make sure you have enough disk space, and then click OK.

Hibernate tab on the Power Options Properties dialog box

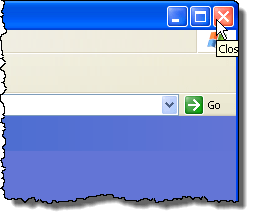
You are returned to the Control Panel window (if you didn’t open the Power Options dialog box from a Control Panel submenu on the Start menu). Click the X button in the upper, right corner of the window to close the Control Panel.

Closing the Control Panel

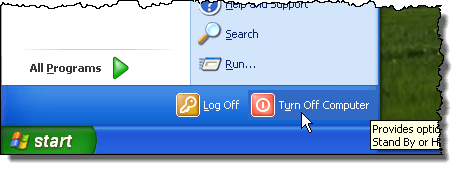
To use the hibernation feature, select Turn Off Computer from the Start menu.

Selecting Turn Off Computer from the Start menu

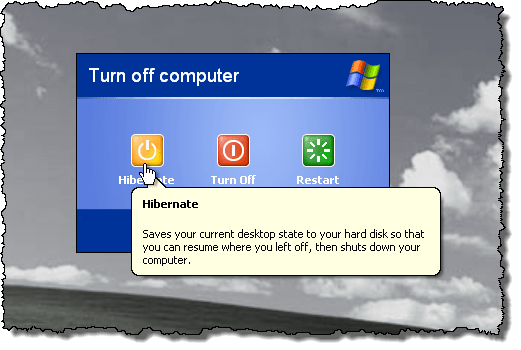
The Turn off computer dialog box that displays with three options. By default, the button on the far left, is Stand By. Press the Shift key to change the Stand By button to Hibernate. Keep the Shift key pressed and click the Hibernate button.

Selecting Hibernate

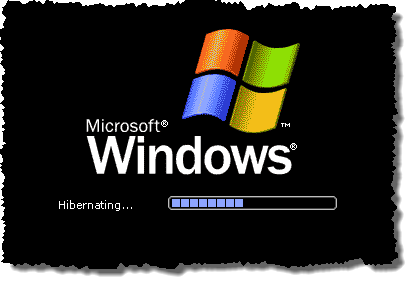
A screen displays the progress of the hibernation and your computer shuts down when the process if finished.

Hibernating screen

Use any of following methods to resume your computer from a Stand By or Hibernation state.

  1. Press any key on the keyboard.
  2. Press the computer’s Power button.
  3. Move or click the middle button on the mouse.
  4. Open the laptop lid.

Some of the above methods for waking up your computer may not work, depending on the manufacturer of your computer. Check your the manufacturer’s documentation for your computer to see if there is a special procedure for waking up your specific computer.

When you turn the computer back on, all programs and documents that were open when you put the computer into hibernation are restored on the desktop. Hibernate is the perfect mode for shutting your laptop down for the night or the weekend.