Tips & Tricks, Tutorials, Hacking, Troubleshooting,

Each document you create in Word contains information about the document or Properties, such as the date the file was created, the author of the document, and the number of pages and words in the document.

When you save the document, some of these properties are updates, such as the date on which the document was last saved, or modified. You can insert this date into your document, and have it update automatically. First, we will show you how to view the document properties for Word 2010, Word 2007, and Word 2003 documents. Then, we will show you how to insert the last modified date into your documents for Word 2010. The procedure is the same for Word 2007, and we will point out the one difference for Word 2003.

View Document Properties in Word 2010

To view properties for an open document in Word 2010, click the File tab.
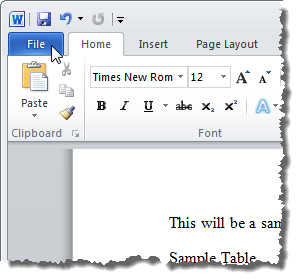
Clicking the File tab in Word 2010

On the right side of the window, the document properties are listed, including the Last Modified date, the date the document was Created, the Author, and the number of Words in the document.
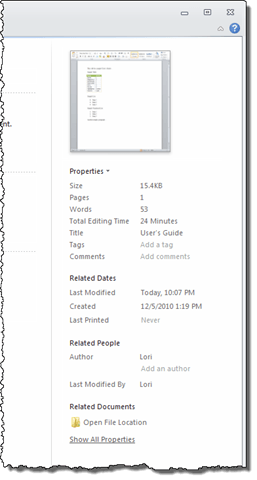
Document Information in Word 2010

You can also show the document properties in a panel at the top of your document. To do this, click the Properties button and select Show Document Panel from the drop-down menu.
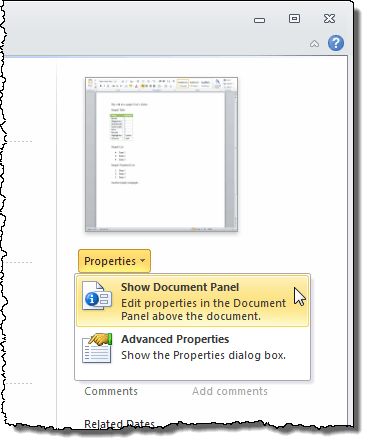
Showing the Document Panel in Word 2010

The Document Properties panel displays. From this panel, you can also access a dialog box displaying all the properties stored for the document. To do this, click the Document Properties button in the top, left corner of the panel and select Advanced Properties from the drop-down menu.

NOTE: You can also select Advanced Properties from the drop-down menu on the Properties button on the File tab mentioned above.
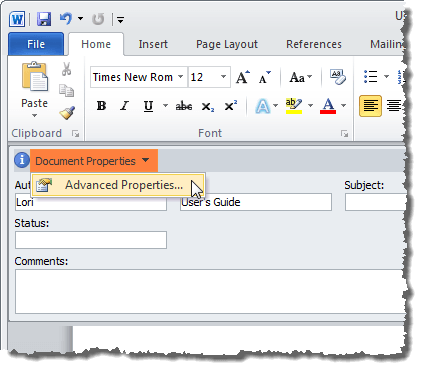
Selecting Advanced Properties in Word 2010

The Properties dialog box displays. You can view various tabs showing different information about the document, including the Created, Modified, Accessed, and Printed (if applicable) dates, and the Statistics about the document, such as the number of words and characters in the document. Click OK or Cancel to close the dialog box.
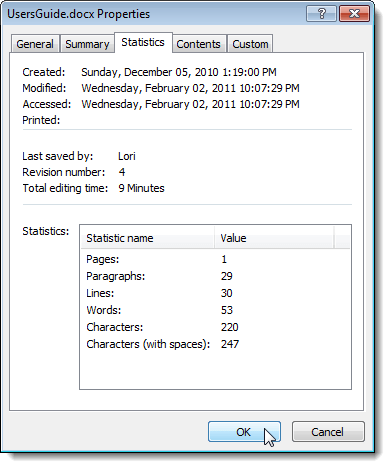
Properties dialog box in Word 2010

You can also change some properties on the Summary tab. When you have finished viewing the document properties, click OK if you have made changes you want to save, or click Cancel to close the Properties dialog box without saving changes.
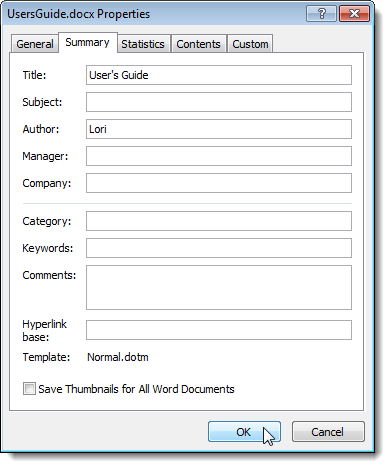
Summary tab on the Properties dialog box

View Document Properties in Word 2007

To view properties for an open document in Word 2007, click the Office button.
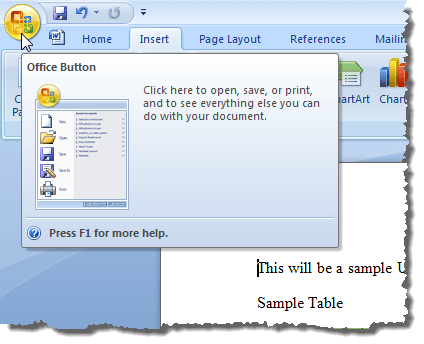
06_clicking_office_button_2007

Select Prepare | Properties from the Office menu.
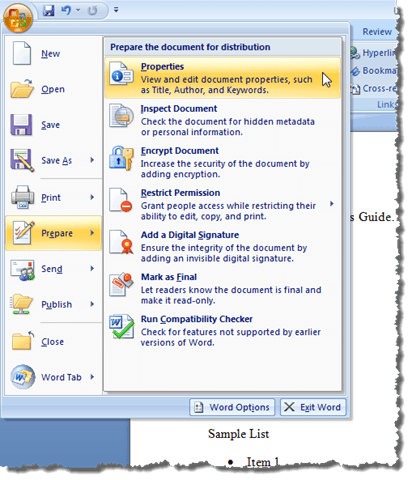
Selecting Prepare | Properties from the Office menu in Word 2007

The Document Properties panel displays at the top of the document. To access the Properties dialog box, click the Document Properties button, just like you did in Word 2010, and select Advanced Properties.
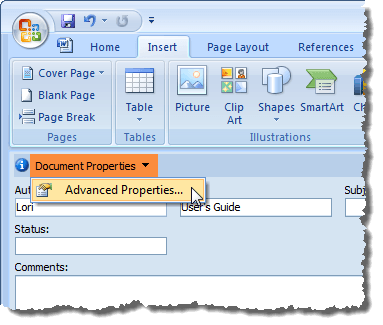
Selecting Advanced Properties in Word 2007

The Properties dialog box is the same as it is in Word 2010.
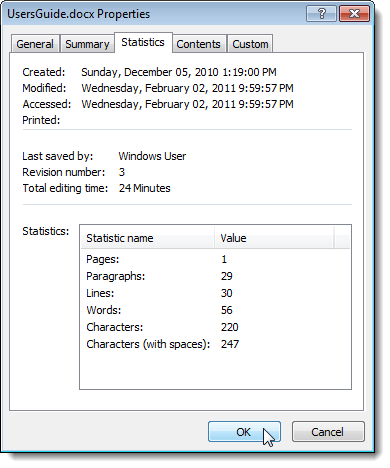
Properties dialog box in Word 2007

View Document Properties in Word 2003

To view properties for an open document in Word 2003, select Properties from the File menu.
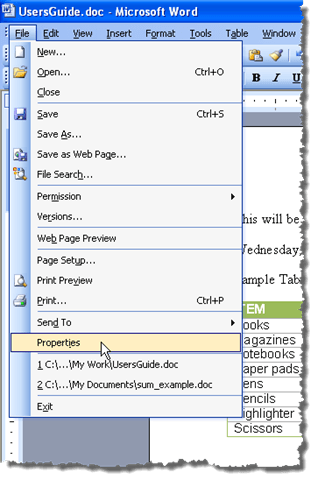
Selecting Properties from the Insert menu in Word 2003

The Properties dialog box displays and is the same as it is in Word 2010 and Word 2007.
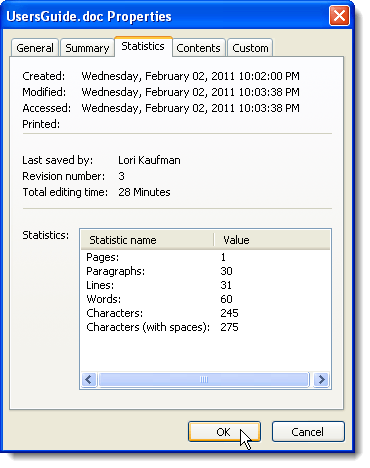
Properties dialog box in Word 2003

Insert the Last Modified Date into a Word Document

In Word 2010 or Word 2007, to insert the date the currently open document was last saved, or modified, click the Insert tab.
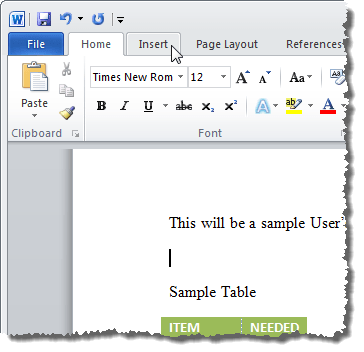
12_clicking_insert_tab_2010

In the Text section of the Insert tab, click the Quick Parts button and select Field from the drop-down menu.
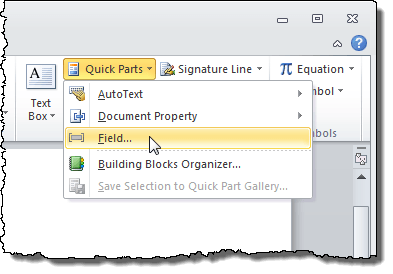
Selecting Field from the Quick Parts drop-down menu

If you are using Word 2003, select Field from the Insert menu.
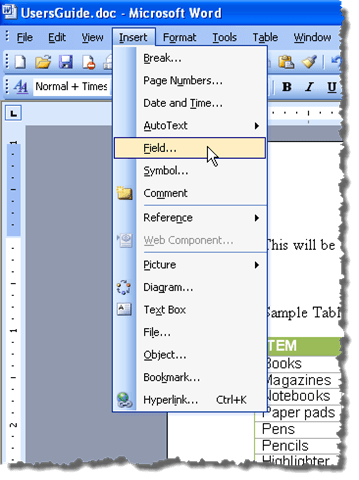
Selecting Field from the Insert menu in Word 2003

The Field dialog box displays. Select Date and Time from the Categories drop-down list.
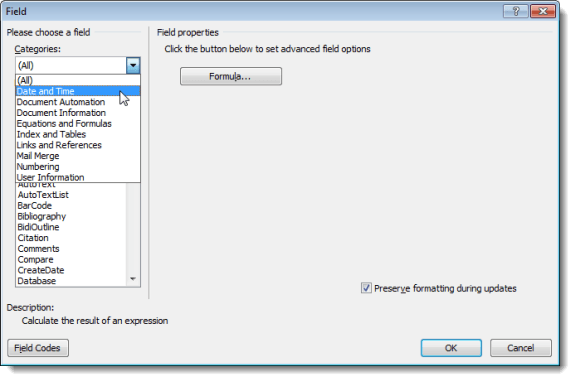
Selecting the Date and Time category

Select SaveDate in the Field names list and select a desired format for the date in the Date formats list in the Field properties box. Click OK.
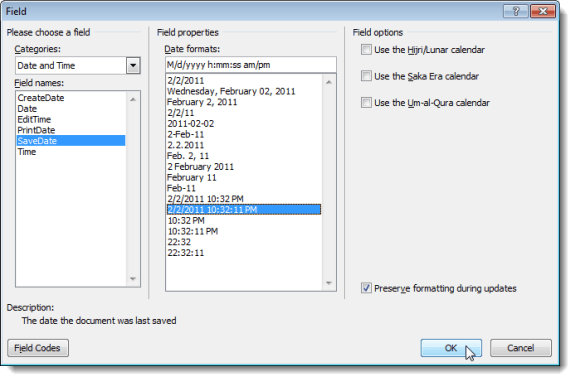
Selecting SaveDate field name and the Date format

The Last Modified date is inserted into your document. If you put the cursor anywhere in the date, you will notice that the date has a gray background. That indicates it is a field.
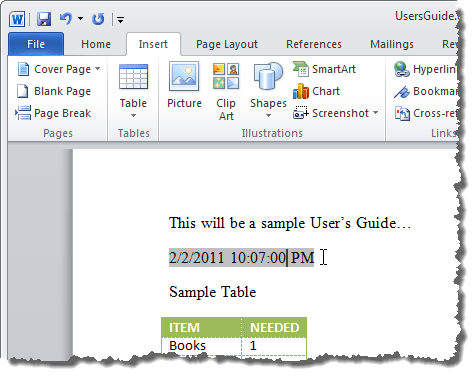
Field inserted into document

When you save the file, the field does not automatically update. To manually update the field, right-click anywhere on the field and select Update Field from the popup menu.
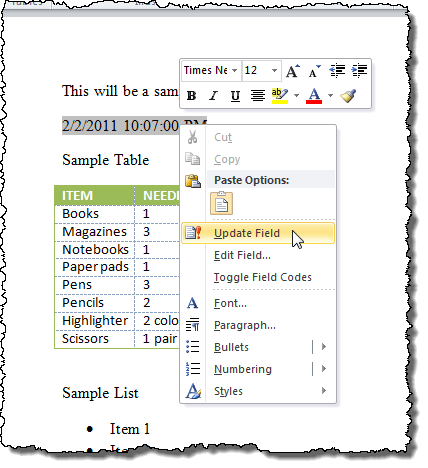
Updating the field manually

The field updates to the date (and time, if applicable, depending on the chosen date format) the file was last saved.
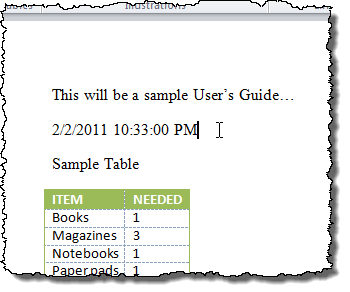
Field updated

NOTE: The SaveDate (or Last Modified date) field you inserted will automatically update each time you open the file.

You can also insert other date and time information from the document properties into your document using fields, such as CreateDate and EditTime. To insert other types of document properties into your document, select Document Information from the Categories drop-down list on the Field dialog box and select a property such as Author, FileName, Title, etc.
Windows 7 allows you to customize the appearance of the desktop, icons, background, and other items using themes. There are third-party themes available out there, but you have to patch parts of the Windows system in order to install third-party themes.

There are even some hidden themes within Windows 7 (see our post, Easily Access Hidden Windows 7 Themes). We found another easy, free method of customizing the appearance of Windows 7 (32-bit or 64-bit) using a tool, called CustoPack Tools. This tool also allows you to change the appearance of Windows Vista (32-bit or 64-bit) and Windows XP (32-bit only).

This two-part series of posts shows you how to install and use CustoPack Tools to easily customize the look of Windows.

Download CustoPack Tools from

http://www.custopack.com/en/home.

Install CustoPack Tools

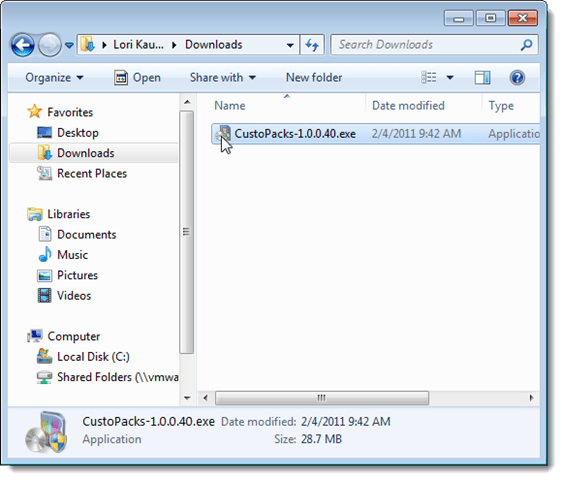
To install CustoPack Tools, double-click on the .exe file you downloaded.

Running CustoPack Tools installation file

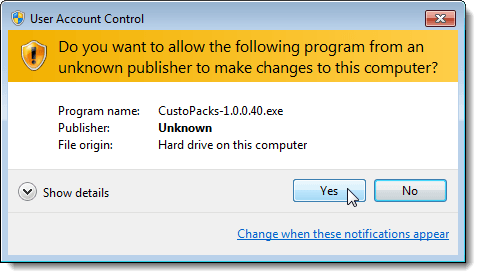
If the User Account Control dialog box displays, click Yes to continue.

NOTE: You may not see this dialog box, depending on your User Account Control settings. See our post, Windows 7 – How to configure UAC (User Account Control), for more information.

User Account Control dialog box for installing CustoPack Tools

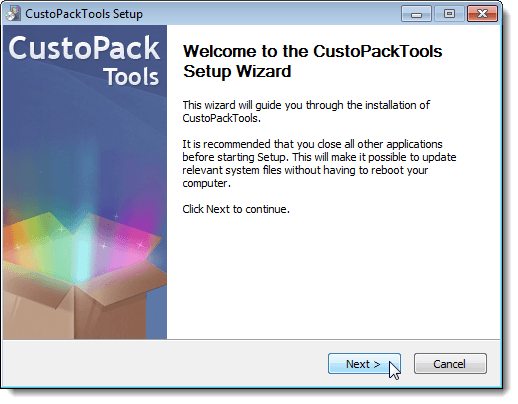
The CustoPack Tools Setup Wizard Welcome screen displays. Click Next.

Setup Wizard Welcome screen

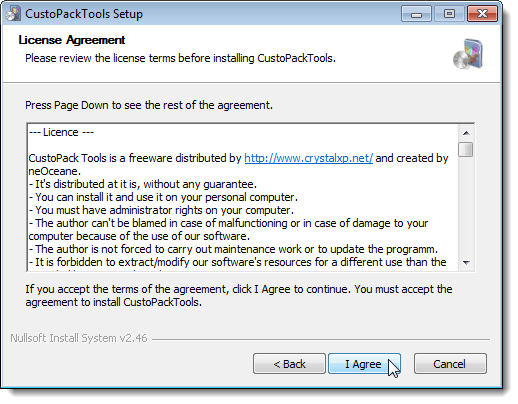
Read through the License Agreement and click I Agree to continue.

License Agreement

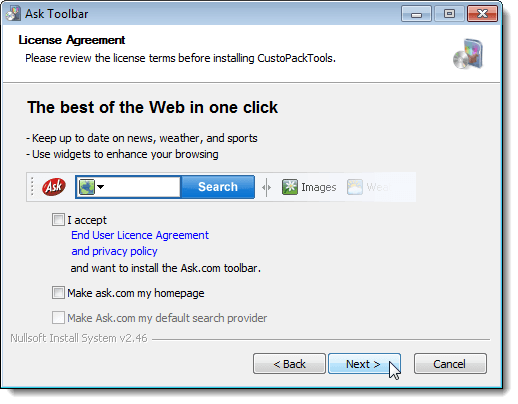
If you want to install the Ask Toolbar in your web browser, click the I accept check box so there is a check mark in the box. You can also choose to make ask.com your homepage and your default search provider. We chose to turn all of these options off. Click Next.

Ask Toolbar installation

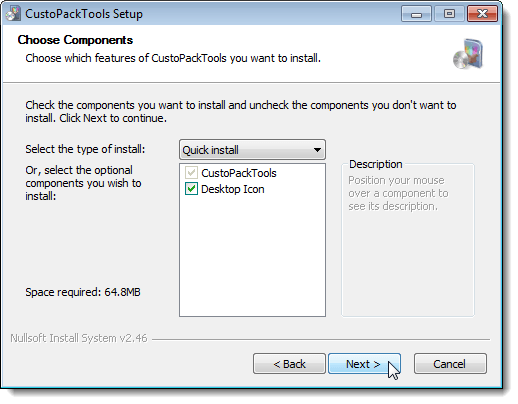
The Choose Components screen displays. Select either Quick Install or Custom from the Select the type of install drop-down list.

NOTE: Both options seem to provide access to the same components in the list.

CustoPack Tools must be checked, so, you cannot turn that check box off. If you want a shortcut on the desktop for CustoPack Tools, select the Desktop Icon check box. Click Next.

Choose Components

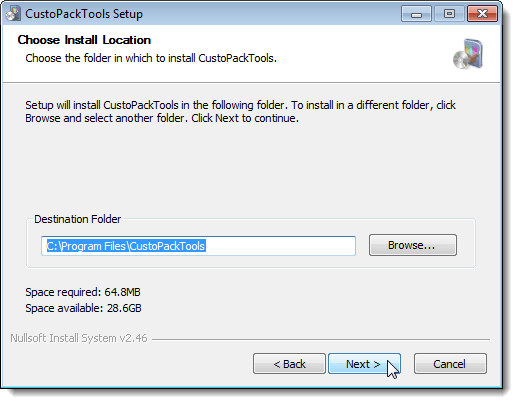
The Choose Install Location screen displays. If you want to install CustoPack Tools to a different location other than the default location listed in the edit box, use the Browse button to select another location. We accepted the default location. Click Next to continue.

Choose Install Location

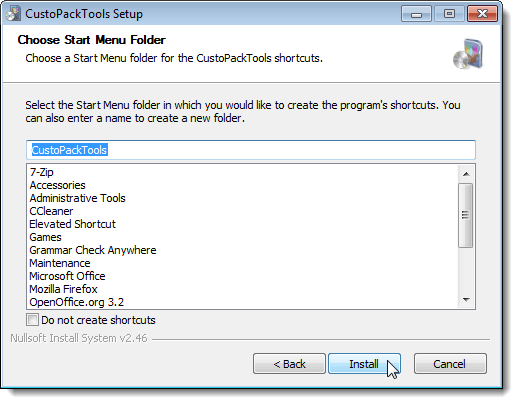
The Choose Start Menu Folder screen displays. If you want to add the shortcuts for CustoPack Tools to a different Start menu folder than the default listed in the edit box, use the Browse button. We accepted the default Start menu folder. Click Next to continue.

Choose Start Menu Folder

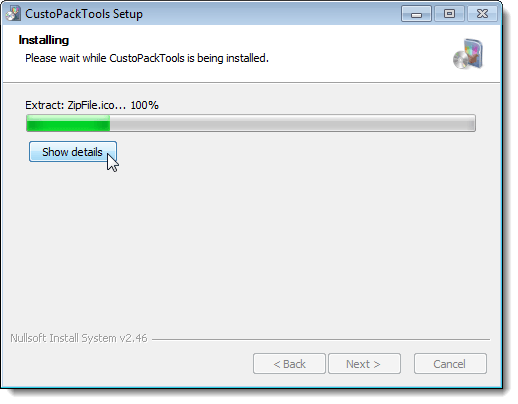
The Installing screen displays the progress of the installation. To see the details of the installation, click the Show details button.

Installation progress

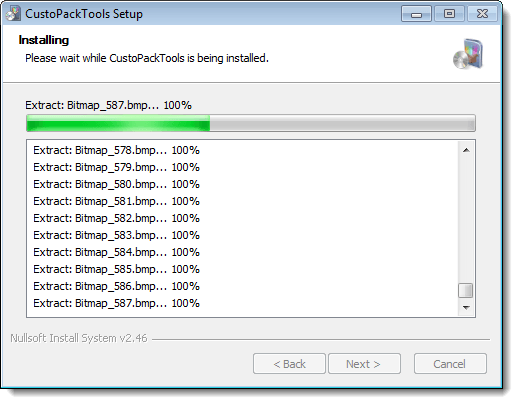
A list displays below the progress bar, reporting the actions being taken during the installation.

Showing Installation details

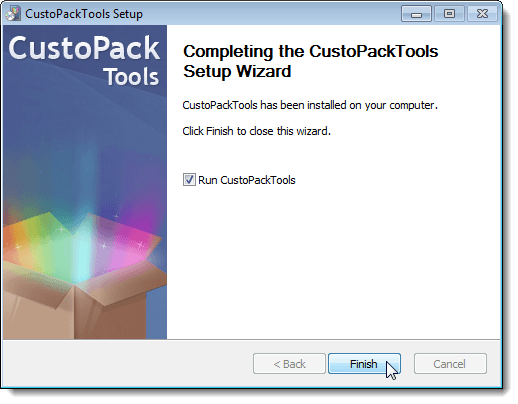
When the installation is finished, the Completing the CustoPack Tools Setup Wizard screen displays. If you do not want to start CustoPack Tools automatically when you close the Setup Wizard, select the Run CustoPackTools check box so there NO check mark in the box. The check box is turned on by default. Click Finish.

Completing the Setup Wizard

View Available CustoPacks

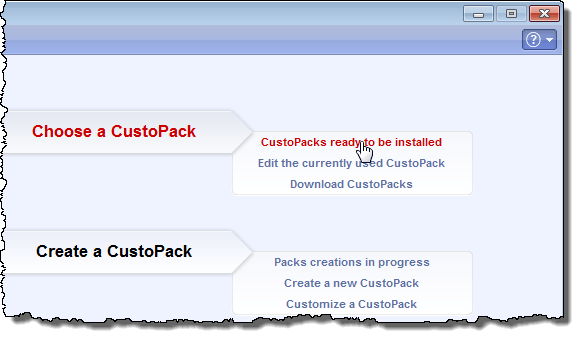
The main CustoPack Tools dialog box displays. To view the CustoPacks included with CustoPack Tools ready to be installed, click the CustoPacks ready to be installed link under Choose a CustoPack.

CustoPacks ready to be installed link

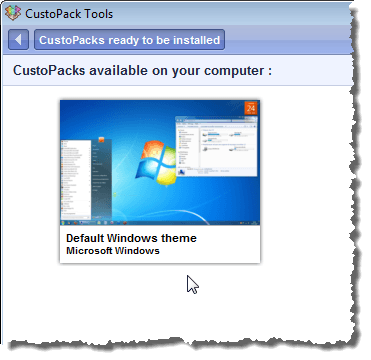
A screen displays showing the one CustoPack available on your computer when you first install CustoPack Tools, the Default Windows theme.

CustoPacks available on your computer

Download CustoPacks

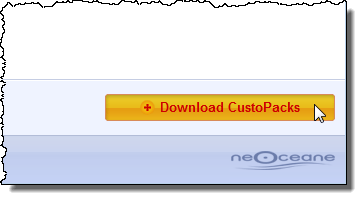
To download additional CustoPacks, click the Download CustoPacks button in the lower, right corner of the CustoPacks ready to be installed screen.

Clicking Download CustoPacks button

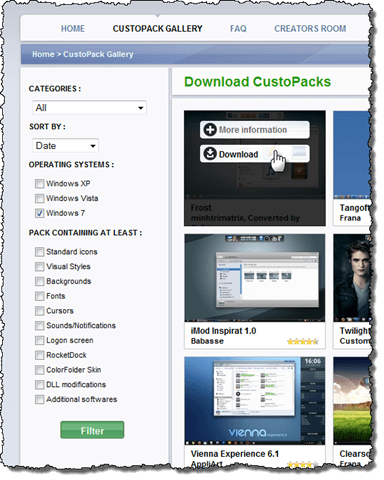
The CustoPack Gallery web page displays. You can select to show CustoPacks in a specific categories or all categories by selecting an option from the Categories drop-down list. If you want to sort the CustoPacks by something other than the default option of Date, select an option from the Sort By drop-down list.

Select the check box under Operating Systems for the version of Windows you are using. You can further filter the list of CustoPacks by selecting check boxes under Pack Containing at Least.

To download a CustoPack, move your mouse over the selected CustoPack and click the Download button that displays.

CustoPack Gallery website

Wrap Up

This was the first post in a two-part series about installing and using CustoPack Tools to easily change the look of Windows.

In this post, we covered installing CustoPack Tools, viewing CustoPacks available on your computer, and downloading CustoPacks.

Stay tuned for Part II, where we will cover installing a CustoPack, creating your own custom CustoPacks, and changing CustoPack Tools options and configurations.

Windows 7 has brought several improved features. However, one new feature that is not quite as obvious, is the new advanced functions built into the standard Windows 7 calculator.

Previous versions of Windows, such as Windows XP, featured two basic calculator types: Standard and Scientific. Windows 7 builds on the existing popularity of past calculators by adding several new modes: Standard, Scientific, Programmer, Statistics, Unit Conversion, Date Calculation, Mortgage, Vehicle lease, Fuel economy (mpg), and Fuel economy (km).

Calculator Windows 7 Date

Aside from being a convenient tool to use at home, it’s most likely that students will benefit most from these new Windows 7 calculator additions. Not only in the classroom, but with online classes as well.

Over the past 5 years, online classes have slowly but surely become one of the most popular methods of learning. Thus, students can submit assignments and homework, and even take tests using their PCs.

Because most all class work is being done on a PC, the new features that Windows 7 built-in calculator offer may be the ultimate convenience. Here is a general overview of some of the new features:

Programmer Mode

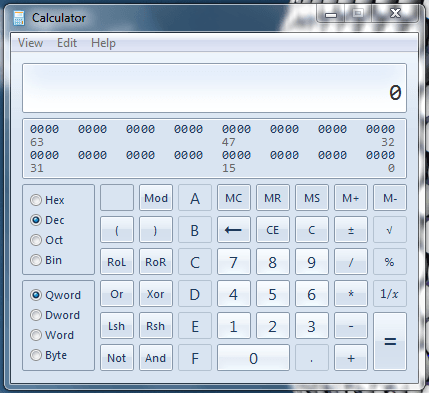
According to Microsoft, the calculator in Windows 7 (Programmer Mode), has these notable features:

  • Accuracy up to 64 bits, which may differ depending on the word size that is selected.
  • Operator precedence for Programmer Mode.
  • Integer only. Decimals are not used.

Windows 7 Calculator - Programmer Mode

Statistics Mode

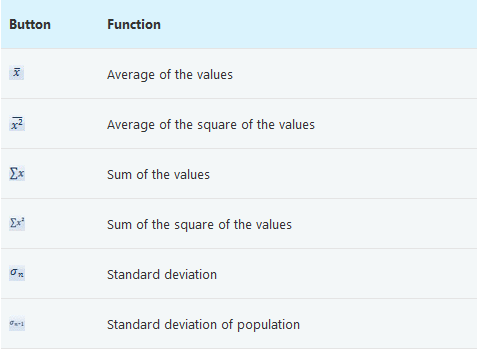
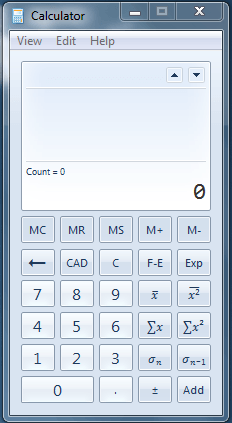
At first glance, Statistics Mode may appear to be the same as Standard Mode. However, it does feature several several additional functions, which can be very handy when trying to solve equations involving averages, sums of values, and deviations. Here are some notes on Statistics Mode, directly from Microsoft:

Microsoft Statistics Mode

Statistics Mode

Unit Conversion

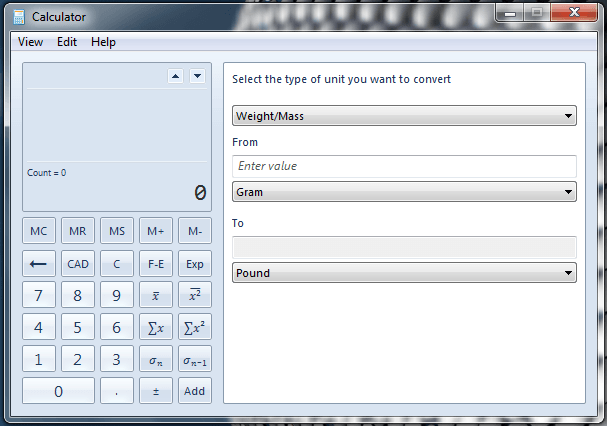
The units conversion feature very well may be the best, new feature of the Windows 7 calculator. With this handy feature, you can easily work with angles, area, energy, length, power, pressure, temperature, time, velocity, volume, weight, and mass.

Each one of these according values will be converted into according related variables. For example, the Weight/Mass option can convert values in the form of: carat, centigram, decigram, dekagram, gram, hectogram, kilogram, long ton, milligram, ounce, pound, short ton, stone, and tonne. The Windows 7 calculator in Unit Conversion mode is a highly accurate conversion tool.

Windows 7 Unit Converter

Date Calculation

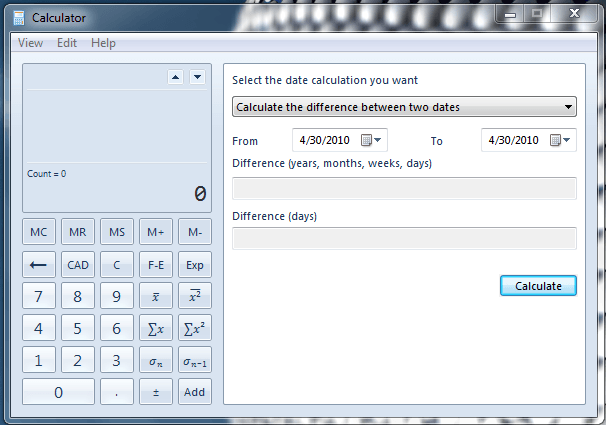
Date calculation is probably the easiest to understand mode in Windows 7 calculator. The concept is simple, calculate the number of days between two dates. For an organizer or office assistant, the new Date Calculation feature is promising, effective, and convenient.

Calculate Date

Mortgage, Vehicle Lease, and Fuel Economy

The Mortgage, Vehicle Lease, and Fuel Economy Windows 7 calculator modes are easy to understand and very accurate, assuming that you are entering accurate variables.

Fuel Economy Calculator

Mortgage Calculator

Payment Calculator

The purpose of these three modes is obvious, and although you probably won’t use them as much as some other modes, they are all still convenient options to have.

If you have a small business or are starting a small business, the costs add up quickly. You need equipment, a workspace, internet connections, and web hosting among other things. In our increasingly web-oriented society, phone services are falling by the wayside.

Traditional providers charge way too much for limited services, and consumer-grade VoIP may not cut it for a small business. Your phone system, voicemail, and call handling can make a significant impact on both existing and new customers.

A professional presence on the phone will let clients know that you take your business seriously. Phonebooth can help your small business make a great first impression starting out, and it is free.

Phonebooth has several core functions:

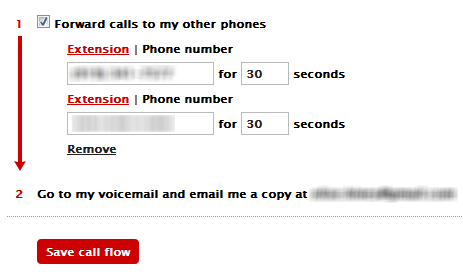
1. It is a call forwarding service. The Find Me, Follow Me function will ring multiple telephone numbers for a few seconds each before the call goes to voicemail. If you step out of the office to get lunch, but are waiting for an important call, Phonebooth will ring all of the numbers you specify for a designated amount of time before going to voicemail.

You can pick your call up on your cell phone, and your client does not have to remember to call you at a different number. If you set up more than one employee in Phonebooth, you can also have it ring other extensions.

Phonebooth Call Flow

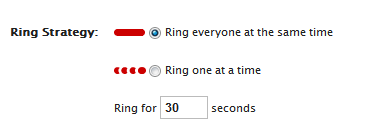
2. You can set up a group, give it an extension, and have Phonebooth ring all of the employees in the group at once or ring their phones one at a time. This would be a good way to set up an emergency line, so callers have the best chance of talking to a live person rather than being forwarded to voicemail if there is a major problem.

Send calls to a group extension.

3. If you need to route calls to certain people or extensions for certain reasons (technical support, emergencies, customer service, etc.), you can set up an Auto Attendant in Phonebooth.

You can record custom messages telling callers how to get to the right person, and they will press the appropriate buttons to be redirected. Even though people do not like automated phone services, since you are using your own voice, you can make the messages welcoming, and give the caller that you are running a professional operation.

4. Phonebooth transcribes your voicemail messages (50 per month on for free) so you can read them as well as save a digital recording of them. This allows you to hold onto important voicemails, and keep a transcription for your records. It is a good (passive) way to collect customer information.

Phonebooth’s free service is restricted to 50 users, and 200 inbound minutes a month, which is not bad to start. If you need to upgrade, they also provide premium services for your business.

Even though it is an extremely good service, we did have some difficult getting a number local to our area, but that will become less frequent as they add additional numbers. There also seems to be a large gap between the free service and the paid service that could possibly be filled with another paid tier of service.

The premium service, Phonebooth OnDemand, is a bit too much for a sole proprietorship or a business with less than 5 full-time employees. Hopefully Phonebooth will fill those gaps and provide more services to very small business and teleworkers in the future.

If you’re a fan of eBooks and purchase them from Amazon, sometimes you might want to be able to deliver them to other devices. If you’ve purchased eBooks from Amazon, they allow you to download them again and here’s how.

1. First head to Amazon.com/Kindle and click the Sign In link to log into your account.

sshot-2011-01-29-[16-07-22]

2. Then enter in your email address and password to sign into your Amazon account.

sshot-2011-01-29-[16-08-54]

3. On the right side of the Amazon page click on Your Account.

sshot-2011-01-29-[16-49-56]

4. On the Your Account page scroll down a bit and on the right side you’ll see Kindle Help…in that section under Kindle Community click on Manage Your Kindle.

sshot-2011-01-29-[16-51-14]

5. On the Manage Your Kindle page, scroll down to the Your Orders section and select the eBook(s) you need to download again.

sshot-2011-01-29-[16-52-22]

6. Then on the right side of that section select the device you want it sent to where in this case it’s an iPad with the Kindle software.

sshot-2011-01-29-[16-53-05]

7. After you’ve selected the device you want the eBook sent to, click on the GO button…it just takes a couple seconds to send to your device.

sshot-2011-01-29-[16-53-37]

8. Then on the device you selected, launch the Kindle software is it isn’t already and you’ll see the eBook is downloading.

sshot-2011-01-29-[17-09-41]

9. After the download is complete just click on the eBook icon and enjoy reading your book!

sshot-2011-01-29-[17-10-06]

Whether it’s an iOS, Android, Kindle for PC, or any other device you have the Kindle software installed, you can always re-download your purchased eBooks. You just need to know where to go and this should help you out!