Tips & Tricks, Tutorials, Hacking, Troubleshooting,

Windows

Even though the Disk Cleanup utility shows that it’s removing temp files, you can save even more space by deleting them manually. If you have a computer that’s running low on disk space, manually removing temp files in addition to running Disk Cleanup can clear more space on your HD.

When running Disk Cleanup in Windows, it shows that it’s removing temp and Internet Temp files, unfortunately it’s not removing them all. Here is an example of just running Disk Cleanup…notice there are not temp files listed.

sshot-2011-03-07-[12-04-03]

Really Remove Temp Files

Before removing Temp Files using this method, make sure you’ve saved your data, and are closed out of all programs.

1. Click Start then type the following into the Search box and hit Enter.

%temp%

sshot-2011-03-02-[19-42-29]

2. This opens the Temp folder in Windows where any program that’s been running stores its files. Or maybe you had an installer or video encoding program store temp files there. Hit Ctrl + A to highlight all the files in the Temp directory, right-click, then click Delete.

sshot-2011-03-02-[19-43-46]

3. Agree that you really want to move the files to the Recycle Bin…click Yes.

sshot-2011-03-02-[19-43-57]

4. You might see that certain system files cannot be deleted, just check Do this for all current items, then click Skip.

sshot-2011-03-02-[19-44-10]

5. Then empty the Recycle Bin.

sshot-2011-03-07-[12-20-39]

sshot-2011-03-07-[12-40-45]

Run Disk Cleanup

1. Now to reclaim even more space on your hard drive, run the Disk Cleanup utility. Click Start >> Computer.

sshot-2011-03-02-[19-44-24]

2. Right-click on your local drive (typically C:) then click Properties.

sshot-2011-03-02-[19-44-56]

3. In Local Disk Properties, click the General tab, then the Disk Cleanup button.

sshot-2011-03-02-[19-45-07]

4. Wait while the utility calculates what can be removed.

sshot-2011-03-02-[19-45-18]

5. Scroll through Files to delete and check the ones you want gone. In this example, we didn’t clean the Recycle Bin after moving the files from the Temp folder to it…so it includes 147 MB of files. After you’ve checked what you want to delete, click OK.

sshot-2011-03-02-[19-45-55]

6. Click Delete Files when the dialog comes up asking if you’re sure.

sshot-2011-03-02-[19-46-06]

7. Then wait while the files are permanently deleted from your local hard drive.

sshot-2011-03-02-[19-46-14]

That’s it. If you have a desktop PC with a ton of hard drive space, you probably don’t need to run these procedures very often…maybe every 3-6 months. However, for machines with a smaller drive like a Netbook, you may want to reclaim disk space on a more regular basis.

If you’ve ever heard about a great bittorrent file while at work, or somewhere else you couldn’t easily download it (or weren’t allowed to because of network policies), a great option is using Transmission’s web interface. Transmission is a lightweight bittorent client available for Mac and Linux (with an experimental Windows build also available), that includes an easy-to-configure web interface. Here’s how to put it to use.

Installing Transmission

If you don’t already have Transmission on your computer, you can grab it from the main download page, found here:

Download Transmission from the official website

Linux users should be able to install the package from their distribution’s software repositories, while Mac users can simply download a disk image, which only needs to be mounted and the application bundle dragged to the Applications folder (or to the Desktop, or wherever else you’d like to keep it). Installing for Windows users isn’t much more difficult. Go to the Transmission-Qt Windows downloads page and grab the setup .exe of your choice.

Windows users will need this special build

While this is an unofficial port, versions 2.20 and 2.21 are posted from the current release series, while older versions are still available.

Configuring the Transmission Web Interface

Once Transmission is installed, navigate to the Transmission Preferences window to set up the web interface. In Windows or Linux, (The Linux version is shown below), click the Edit menu and choose Preferences.

Go to the Preferences to set up the web interface

In the Mac version of Transmission, you access the Preferences window by clicking the Transmission menu, then choosing the Preferences option.

Once the preferences window opens, click the Web tab (the Remote tab in the Mac version), and make sure the Enable web client option is checked. If you want users to log into the web interface, check the Use authentication checkbox (Require authentication in the Mac version), and fill in a username and password. And if you only want someone from a particular IP address to be able to connect, check that box and fill in the allowed address or addresses.

Transmission Web Interface Options

When you’re finished setting up the web interface, click the Launch web interface button (also shown above), and your web browser will open to it. If you’ve set up a username and password, enter those, and in a few seconds the web interface will load, looking practically identical to the standard Transmission client.

Transmission Web Interface

Using the Transmission Web Interface

The web interface is nice for those people who may have a second computer set up to download and share torrents, and just want a simple way to monitor their progress. It’s also nice, as mentioned, for people who may be away from their home computer.

If you’ll be using the web interface away from home, you’ll need to know your computer’s IP address. There are many utilities that can do this for you, but a simple way is to go to What Is My IP Address? and let it tell you.

Check your IP Address

Once you know this information, simply launch your web browser (the Transmission desktop client on your home computer needs to be on with the Web Interface set to be running for this to work), and type in the following:

http://your.ip.add.ress:9091

In the above address, substitute your actual IP address for “your.ip.add.ress,” and if you’ve changed the listening port from 9091 (the default setting), modify that as well. Log in if you need to.

When the interface loads, you’ll see all the torrent currently downloading to your home machine. So what can you do with this interface, besides simply monitoring upload and download progress?

Web Interface Features and Options

In the main toolbar (shown earlier), you’ll see options to pause individual torrents (or all of them), resume a single torrent (or all paused torrents), as well as adding the torrent mentioned above. The nice thing about adding a torrent via the web interface is that you can either point to a .torrent file you’ve downloaded, or the address of one on the web, so that you wouldn’t need to download even that (great for a restrictive network at the office).

Add a Torrent from your hard drive or the Web

Once you’ve loaded a torrent, or want to modify one already downloading, right click on it, to bring up more options.

Web Interface Torrent Options

Here you can remove a torrent from the list (while still keeping all downloaded data), or trash everything. You can verify what’s already loaded, hide the inspector (or show it if it’s currently hidden), as well as selecting or deselecting all running torrents.

The inspector is a great tool with options housed in five separate panes. Shown below is the Files pane of the web inspector.

Web Inspector Files Pane

From this pane you can select which individual files inside a torrent should be downloaded, as well as whether individual files should be given greater priority over others.

Not shown are the four other inspector panes, which show information about the torrent, how much data you’ve downloaded and shared, how many peers you’re connected to, their IP addresses and speeds, as well as the tracker or trackers your torrent is using.

A full preferences area exists solely for the web interface. This, along with other options, can be accessed by clicking the gears button in the lower left corner.

Web Interface Other Options

By clicking Preferences from the above menu, you’ll see an overlay with two tabs. The first, the General tab, is shown below:

Web Interface General Preferences

From this pane you can control where newly-added torrents are downloaded on your home machine, whether or not to start transfers immediately after being added, the listening port your client should use, and how to treat unencrypted peers, as well how often the web interface should refresh.

Finally, the Speed pane.

Web Interface Speed Preferences

This pane allows you to control how much bandwidth your Transmission client uses by default (rates are not capped at all by default), as well as to set up temporary speed limits (Turtle mode). Turtle mode can be turned on and off by clicking the little turtle icon in the lower left corner, beside the gears menu in the main interface. Finally, the speed pane gives you control over torrent scheduling.

As you can see, the Transmission web client is a powerful option for torrent lovers. It allows users to set up torrents at home, but still be able to access and monitor their progress, add or delete new torrents, and more, all from remote locations.

All you need is Web access. Using a web interface is a new experience for many, but the thought of learning something new shouldn’t cause much anxiety. The learning curve is small and the features and flexibility the web interface offers are well worth the effort.

MIDI stands for Musical Instrument Digital Interface. MIDI is a standard developed to facilitate the exchange of musical instructions between electronic musical instruments and computers. MIDI files are not sound files.

Instead, they’re data files containing instructions on how to reproduce a selection of music. There are MIDI devices such as keyboards and guitars that can control other MIDI devices.

These are called MIDI controllers. When you connect a MIDI controller to your computer, you can use it to record music on your computer if you have the right software. You can also have your computer play MIDI files through a MIDI device.

Connect a MIDI Instrument to Your Computer

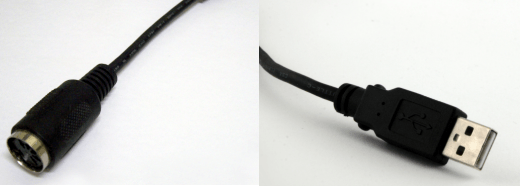
One way to connect your MIDI instrument to a computer is by using a MIDI cable, which has a 5-pin DIN connector on each end. However, if your computer doesn’t have a MIDI input, you may have to install a special sound card to connect your instrument with this type of cable. If your MIDI instrument has a USB output, you can connect it to your computer by USB.

Midi and USB Cables

Install MIDI Software

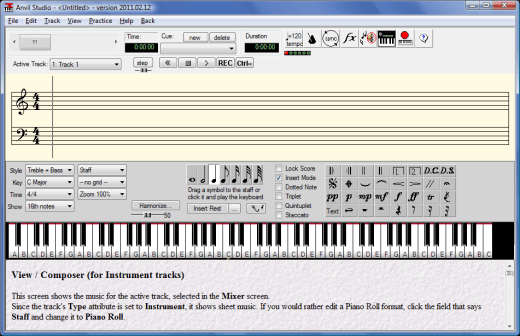
There’s no end of powerful software programs you can use to record, play back and edit MIDI files. If you want a free MIDI software program, you should try Anvil Studio, a free Windows program for multi-track music recording, composing and editing program. Anvil Studio can be configured to connect directly to your MIDI instruments, either by MIDI cable or USB.

Anvil Studio MIDI Creation Software

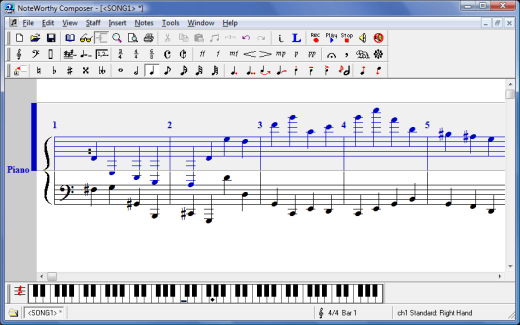
If you’re willing to spend some money, but only want the software for home use, try a product like Noteworthy Composer. This inexpensive Windows music composition and notation software program is very intuitive and easy to use. Noteworthy Composer makes it easy to enter notes either from your keyboard on the onscreen keyboard to create MIDI music files.

noteworthycomposer

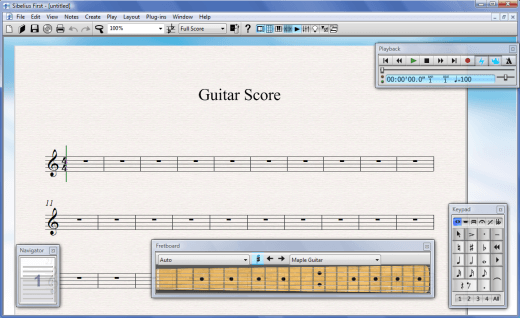
Another excellent music creation program for home use is Sibelius First, developed by Avid. With this program, you can create music with up to 16 staves. Sibelius First has an onscreen keyboard and fretboard and online publishing capabilities. It will run under Windows XP, Vista and 7 as well as Mac OS X.

Sibelius 6 First with Guitar Fretboard

Avid has also developed Sibelius, a professional music creation program with additional features. Sibelius has all the features of Sibelius first, in addition to more advanced features for students, educators and professional musicians.

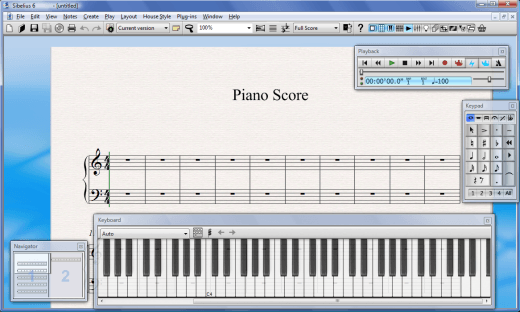
These features include Magnetic Layout which automatically cleans up musical scores, a tracking feature which keeps track of previous versions of a saved score, and ReWire support, which lets you sync Sibelius with other music software products.

Sibelius 6 with Piano Keyboard

Free trial editions are available for each of these music production software programs. Click on the links to download the installation files.

For additional tips, read Create, edit or remix music and songs online for free.

As most Linux users have found out, there are any number of software applications unavailable for their chosen platform. Whether this is Microsoft Office, Adobe Photoshop or smaller utilities, Linux ports of Windows software often seem to be slow in arriving, if at all. For many applications, however, a solution does exist, called WINE.

A recursive acronym (the name of the program is part of the acronym itself), WINE stands for WINE Is Not an Emulator. Attempting to enable Windows programs to run on Linux as natively as possible, without emulation, WINE has allowed many Linux users to “get by,” by letting them use that one “must have” Windows program up and running in Ubuntu, Fedora, OpenSUSE, or whatever their favorite Linux distro happens to be.

One of those programs unavailable for Linux is the Kindle For PC software released by Amazon. Allowing Kindle owners (or those who simply enjoy reading ebooks), to download and read their entire Kindle ebook library, Kindle For PC is a nice piece of software that Amazon has not released for Linux. Thankfully, it is relatively simple to get up and running. Here’s how to do it.

Install WINE

If you already have WINE working on your computer, go ahead and skip to the next section. If not, no worries, because WINE is nice and easy to install. The first step is to head to the WineHQ downloads page and select the package for your distribution.

WineHQ Download Page

For Ubuntu users, the process is quite simple. You can use the package manager to enter the correct information into your Software Sources list, but an easier way is to open the Terminal (found in Applications -> Accessories), and type the following command:

sudo add-apt-repository pap:ubuntu-wine/ppa

Now that this is done, type the following to update your sources.list:

sudo apt-get update

Now, use the following command to install the most up-to-date beta version:

sudo apt-get install wine1.3

Your package manager will grab all the required libraries and will proceed to download and install everything you need to run WINE. After it is full installed, a new entry will appear in your Applications menu.

New Wine Menu

Installing Kindle For PC

Once WINE is installed, adding Windows programs (assuming they are supported by WINE), isn’t all that different from installing them in Windows. So, to install the Kindle For PC software, simply navigate to the Kindle For PC page and click the blue Download now button.

Click the Download now button

If you download the installer file to your computer, simply right-click it and the following pop-up menu will appear. Choose the new Open With Wine Windows Program Loader option at the top.

Install Kindle From Desktop

You also have the option at download (just as Windows gives you the option to download an installer or run it). When the download window pops up (in Firefox), you’ll see, at the top, the same option: Open with Wine Windows Program Loader.

Launch Installer From Download Dialog

If you want this option, simply click OK, and once the installer downloads and starts (or if you’ve saved it to your computer and started it up by right-clicking as shown earlier), you’ll see a quick “Setup is loading” window while the installer is unpacked and prepared.

Installation in Progress

After this, the installation takes place as it would if you were using Windows. When it is finished, the program will start up and you’ll need to register your software with your Amazon username and password, which will allow the software to synchronize with your Amazon account.

Register Kindle for PC

Using Kindle For PC

Once installed, you can access Kindle For PC either by double-clicking the desktop launcher, or in by using the Applications menu. You can find Kindle PC at this path:

Applications -> WINE -> Programs -> Amazon -> Kindle For PC

Launch from Applications menu

Now that you have it launched, set up and synchronized, Kindle For PC will notice any new purchases and automatically add them to your library.

Kindle Library

To read a book, double-click it and if it’s already downloaded your reading experience will begin immediately. If the book is in your archive, Kindle For PC will download it for you, and in a minute or so, you can begin reading.

Reading A Kindle Book

So there it all is. How to download and install WINE, as well as Kindle For PC. It’s a simple process, yet will give you a fully functioning Kindle desktop experience, just as if you were on a Mac or using Windows.

If you take a lot of screenshots of web pages, there is an easy way to do this in Google Chrome. You can also annotate and share them easily, all from within Chrome, using the Awesome Screenshot add-on.

To install Awesome Screenshot in Google Chrome, go to the following web page:

https://chrome.google.com/extensions/detail/alelhddbbhepgpmgidjdcjakblofbmce.

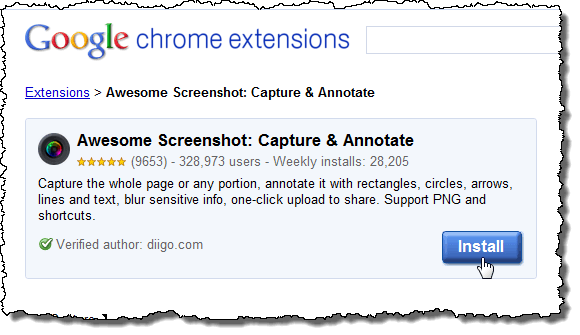
Click the Install button.

Clicking the Install button for Awesome Screenshot

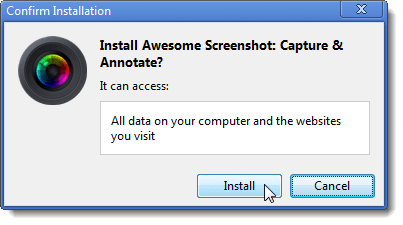
A Confirm Installation dialog box displays telling you what Awesome Screenshot can access. Click Install to continue with the installation.

NOTE: If you are nervous about the fact that Awesome Screenshot can access all the data on your computer, you can set up Windows 7 as a virtual machine using VirtualBox (see our post, How to install Windows 7 on a PC with VirtualBox), install Google Chrome in the virtual machine, and take your screenshots using Awesome Screenshot in Google Chrome in the virtual machine, saving the files in a directory shared between the virtual machine and your regular computer (see our post, Share Folders between Host and Guest OS in VirtualBox).

Confirm Installation dialog

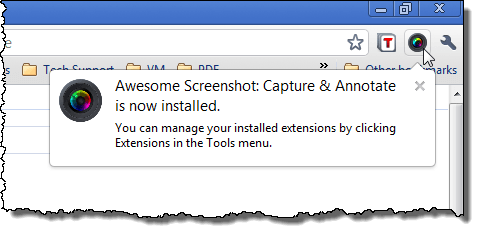
When the installation is finished, the Awesome Screenshot button displays on the toolbar and a message displays telling you the extension is now installed.

Awesome Screenshot button on toolbar

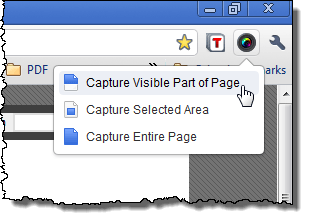
Once you have navigated to the web page you want to capture, click the Awesome Screenshot button on the toolbar and select an option. You can choose to capture only what is visible in the main part of the browser, a selected area, or the entire page.

Selecting Capture Visible Part of Page

The screenshot displays on a new tab titled Annotate Your Screenshot with a toolbar at the top. You can crop the screenshot to show only a portion of the screenshot. To do this, click the crop tool on the Awesome Screenshot toolbar.

Clicking Crop for a screenshot

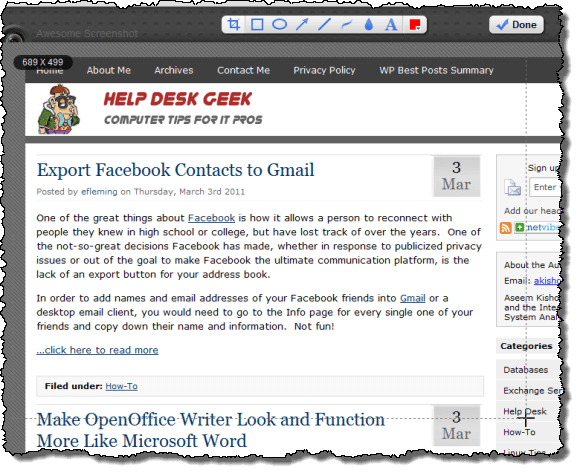
The cursor turns into a crosshair. Click and hold the mouse button in the upper, left corner of the area of the screenshot you want to save and draw a box down to the lower, right corner of the area. The measurements of the box you are drawing display in the upper, left corner of the box.

Drawing the crop border

Once you have the size box you want, release the mouse button. A box displays with the content of the selected area being lighter than the area outside of the box. Click the Crop button to finalize the cropped image. If you change your mind and want a different area, or don’t want to crop the image, click Cancel.

Clicking Crop once border has been drawn

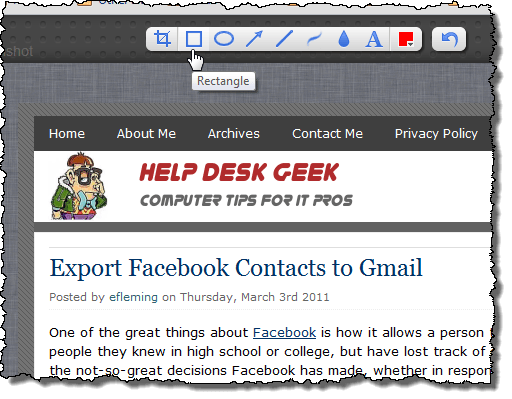
You can also add annotations (shapes, arrows, text, etc.) to your cropped screenshot, using the buttons on the Awesome Screenshot toolbar.

Annotating the cropped screenshot

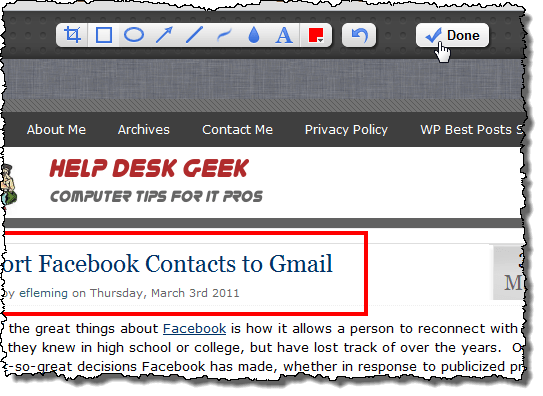
Once you have cropped and annotated your screenshot, click Done to finalize it.

Clicking Done when finished annotating screenshot

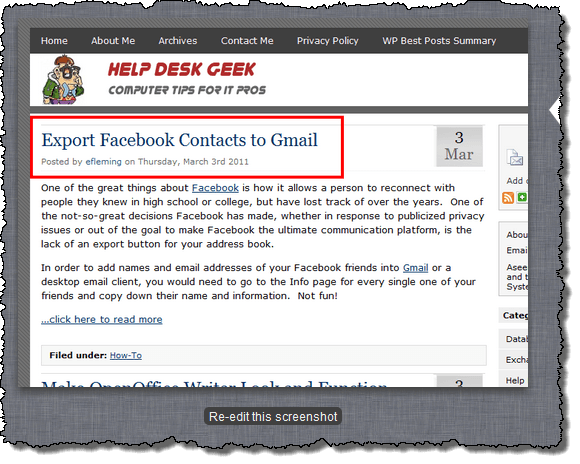
A new screen displays on the same Annotate Your Screenshot tab, showing your edited screenshot on the left. If you want to change your screenshot again, click Re-edit this screenshot below the screenshot.

Screenshot displayed with Re-edit this screenshot button

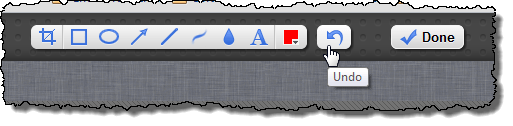
You can undo your previous actions by clicking the Undo button on the Awesome Screenshot toolbar, even after you click Done and then click Re-edit this screenshot.

Clicking Undo

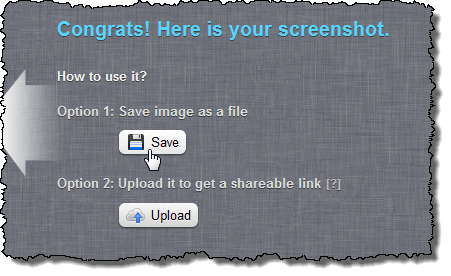
To save your screenshot, click the Save button under Option 1 on the right side of the Annotate Your Screenshot tab.

Saving the screenshot

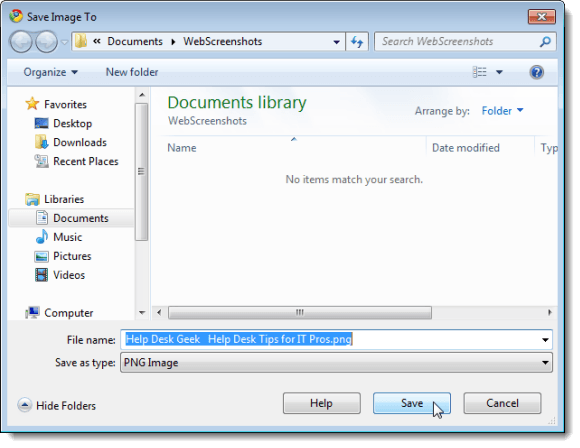
The Save Image To dialog box displays. Navigate to the folder in which you want to save your screenshot. A default name for the screenshot file is automatically entered into the File name edit box. Change the filename as desired, and select a different type for the file from the Save as type drop-down list, if desired. Click Save.

Save Image To dialog box

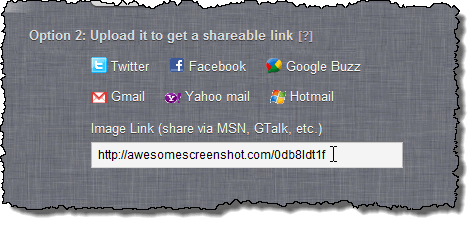
If you want to share your screenshot with family or friends, click the Upload button under Option 2, as pictured previously. Your screenshot is uploaded to the awesomescreenshot.com website and a link to your image displays in an edit box under Option 2. Select the text for the link and paste it into an email or on a social networking site to share with friends or otherwise save it to access your screenshot in the future.

Shared link for uploaded screenshot

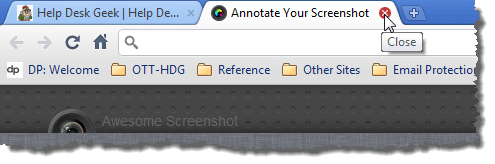
When you are done editing, saving, and sharing the current screenshot, click the close (x) button on the Annotate Your Screenshot tab to close it.

Closing Annotate Your Screenshot tab

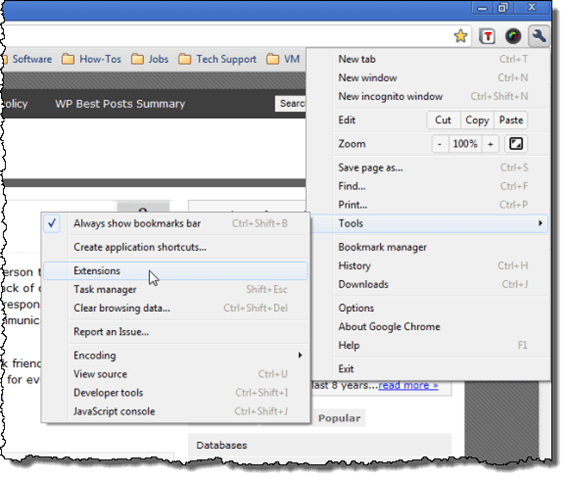
There are a few options you can set for Awesome Screenshot. To access these options, click the wrench button in the upper, right corner of the Chrome window. Select Tools | Extensions from the drop-down menu.

Opening Extensions

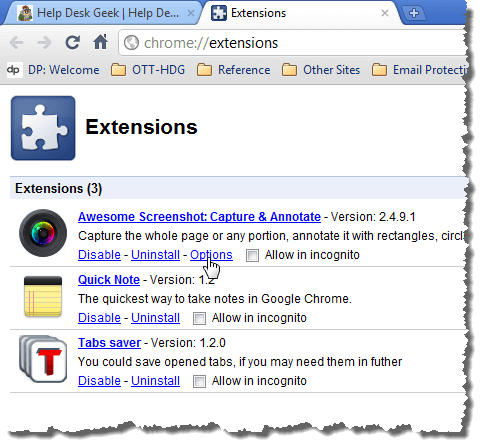
A new tab opens, titled Extensions, listing all the extensions installed in Google Chrome. If an extension has options you can set, there is an Options link under the description of the extension. Click the Options link for Awesome Screenshot.

Opening Options for Awesome Screenshot

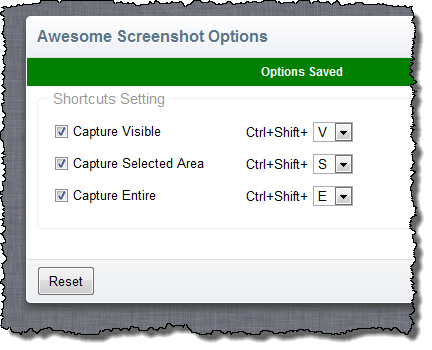
Another tab opens, titled Options, displaying the options available for Awesome Screenshot. The options available allow you to specify keyboard shortcuts for each of the options available on the Awesome Screenshot drop-down menu.

Select the check boxes for the shortcuts you want to turn on (the option is on when there is a check mark in the check box). The keyboard shortcuts all begin with Ctrl + Shift, which cannot be changed. However, you can specify the letters to use for the shortcuts. Select the desired letters from the drop-down lists. Click Save to save your changes.

Setting Options for Awesome Screenshot

A message displays saying “Options Saved.”

Options Saved message

To close the Options tab, click the Close button. You can also click the Close (x) button on the Options tab, just like you would close any other tab.

Closing Options

To close the Extensions tab, click the Close (x) button on the tab.

Closing the Extensions tab

Awesome Screenshot can be used for many purposes. You can use to document how to do something on the internet, show someone a cool website you found using the Upload feature, or take a screenshot of an online receipt for a purchase you made.