Tips & Tricks, Tutorials, Hacking, Troubleshooting,

The Desktop Cleanup Wizard is a utility that ships with all versions of Windows 7 and is designed to help you keep your Desktop neat and tidy. The utility does this by recommending the removal of old, out-of-date, and unused files and shortcuts currently on your desktop. If you find the Desktop Cleanup Wizard annoying, you can remove it by editing a group policy.

The Desktop Cleanup Wizard

The Desktop Cleanup Wizard is one of those good-intentioned but annoying features Microsoft built in to Windows 7. It’s one of those features that isn’t really useful because if a user wants to clean up the desktop, he/she just does it manually by moving shortcuts and files to the Recycle Bin. Do people really need help cleaning up their desktops?

The most frustrating aspect of the Desktop Cleanup Wizard is the false positives it creates. Icons are apparently deemed old and out-of-date by the wizard in relation to how often other icons and files on the desktop are used.

The result is an automated process that requires too much intervention to be considered automatic. Luckily, you can remove the Desktop Cleanup Wizard from ever appearing by using the Local Group Policy Editor to change just one variable’s value.

Removing the Desktop Cleanup Wizard

Truthfully, you are not going to remove the wizard from the computer; you are simply preventing the wizard from ever popping up again.

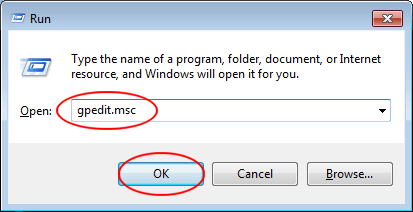
Begin by logging into Windows 7 using an account that has administrative privileges. Click on Start>Run, type in gpedit.msc in the Run dialogue box, and click the OK button. If you don’t have the Run command on your Start menu, hold down the Windows key on your keyboard and press the R key.

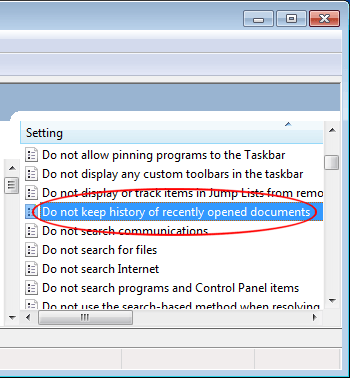
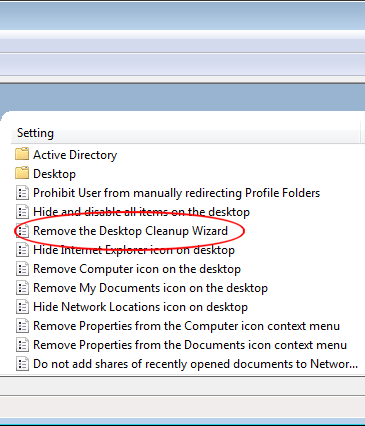
You should now be looking at the Local Group Policy Editor. In the left hand pane, open User Configuration>Administrative Templates>Desktop. Be sure to click on the Desktop folder rather than expanding it.

Open up Desktop in Local Group Policy Editor

In the right hand pane, locate and double click on an entry labeled Remove the Desktop Cleanup Wizard.

Click on Remove the Desktop Cleanup Wizard

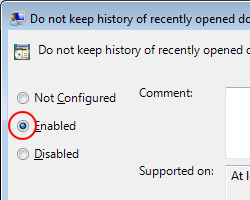
You should now be looking at the Remove the Desktop Cleaning Wizard window. If no one has changed this setting before, the current state should be Not Configured. Click on the Enabled option, click the OK button, and you are done. Note that by selecting Enabled, you are actually disabling the wizard, not enabling it. This is due to how the setting is worded in the negative.

Remove the Desktop Cleaning Wizard from Windows 7

Although the Desktop Cleaning Wizard seems like a good idea, most users of Windows 7 find it annoying when it pops up and not very useful while using it. The most frustrating part is how the wizard decides which files and shortcuts are old and which are still in use enough to keep on the desktop.

The wizard requires so much input from the user that it isn’t much of a wizard at all. Removing the Desktop Cleaning Wizard is an easy way to stop users of Windows 7 from being frustrated by a good-intentioned but ultimately useless utility.

Many Windows 7 applications keep a history of recently opened documents in the File menu or another location. This practice represents a security risk for companies and even home users because the list of recently opened documents is kept in a single location. Learn how to prevent Windows 7 from keeping a history of recently opened documents for all users of the operating system.

Recently Opened Documents and Security

Keeping a list of recently opened documents is one of those good intentioned features added to many Windows 7 applications that actually poses a security risk to users of the operating system. The reason is because Windows keeps a list of all recently opened documents in a single location. That location is:

c:\users\USERNAME\recent

Each person who has an account in Windows 7 has this folder where shortcuts to recently opened documents are stored. Since they are all stored in one location for each user, anyone gaining access to that folder can see all of that user’s recent documents, those that are most likely to contain important and updated information.

Recently Opened Documents in Word

Starting with Windows 2000, all third-party applications written for the operating system and certified by Microsoft are required to adhere to the standard of using this folder as the default location for recently opened documents.

By changing one group policy setting, you can prevent applications from displaying recently opened documents in the File menu or anywhere else. In fact, changing this one setting affects all users of the operating system so administrators don’t have to deal with this issue on a user-by-user or application-by-application basis. The setting even affects the history of documents kept on the Start menu.

Preventing Applications from Keeping a History of Recently Opened Documents

To make the changes to the operating system discussed here, you need to log in to Windows 7 using an account that has administrative privileges. Then, click on Start>Run to open the Run dialogue box.

Hold down the Windows key on your keyboard and press the R key if the Run command does not appear on your Start menu. In the Run box, type in gpedit.msc and click the OK button.

You should now be looking at the Local Group Policy Editor. It is with this editor that you can make system-wide policy changes that affect all users. In the left hand pane, locate the policy settings at User Configuration>Administrative Templates>Start Menu and Taskbar.

Start Menu and Taskbar Local Group Policy Editor

In the right hand pane, locate and double click on the policy titled Do Not Keep History of Recently Opened Documents.

Do Not Keep History of Recently Opened Documents

You should now be looking at the Do Not Keep History of Recently Opened Documents policy window. If no one else has ever changed this policy’s settings, the current option should be set to Not Configured. Simply click on the Enabled option, click the OK button, and you are done.

Enable Do Not Keep Document History

To prevent a security risk, many administrators and home users enable the local group policy that keeps Windows 7 and applications from displaying a history of recently opened documents.

Enabling this policy affects all users of the operating system so it is wise to inform everyone of the change before you change the policy. Some users rely on that application feature and may have trouble finding their documents after the policy is enabled.

The Gadgets Platform introduced in Windows Vista and carried over into Windows 7 is an attempt by Microsoft to add small, convenient apps to the desktop. In work environments, many administrators are charged with the task of removing Windows applications that detract workers from their work. One such element is the gadgets that users have installed themselves. Learn how to turn off user-installed desktop gadgets in Windows 7.

Why Turn off User-Installed Gadgets?

Most users of Windows 7 are familiar with the stock gadgets that ship with the operating system such as the calendar, clock, currency conversion, weather, and others. These gadgets are useful to users in a work environment so most managers are not concerned about these gadgets wasting employees’ time. User-installed gadgets, however, range from entertainment apps such as music players and movie viewers to apps that clog up networks with non-essential bandwidth use.

Consequently, many companies have a policy that forbids users from installing and using gadgets that didn’t ship with Windows 7. This policy is enforced by the system administrators. Rather than police each PC or individual using the PC, it is much easier to enable a group policy at the administrative level that turns off all user-installed gadgets but leaves the stock ones available for use. Luckily, Microsoft built in just such a group policy that is accessed using the Local Group Policy Editor.

Turning off User-Installed Gadgets

Begin by logging in to Windows 7 using an account that has administrative privileges. Click on Start>Run to open the Run dialogue box. If you don’t see the Run command on your Start menu, hold down the Windows key on your keyboard and press the R key. In the Run dialogue box, type in gpedit.msc and click the OK button.

Windows 7 Run Dialogue Box

You just opened the Local Group Policy Editor. This editor organizes various policies into categories so you need to find the policy you are looking for. Locate the folder at User Configuration>Administrative Templates>Windows Components>Desktop Gadgets. Be sure to click on the folder titled Desktop Gadgets.

Desktop Gadgets in Local Group Policy Editor

In the right hand pane, locate and double click on the policy labeled Turn Off User-Installed Desktop Gadgets. Be sure not to confuse this one with the one labeled Turn Off Desktop Gadgets.

Turn Off User Installed Desktop Gadgets

You should now be looking at the Turn Off User-Installed Desktop Gadgets policy window. Unless you or someone else changed this policy’s setting in the past, the policy should be set to the default Not Configured. Click on the Enabled option and click the OK button. Now all users will no longer have access to user-installed Desktop Gadgets.

Enable Turn Off User-Installed Desktop Gadgets Policy

In work environments, many administrators are charged with the task of removing elements and applications from Windows 7 that distract employees from work. Although the stock Gadgets that ship with Windows are generally considered useful, gadgets installed by individual users can include music players, movie viewers, and a number of other time wasters.

Turning off user-installed Desktop Gadgets using a group policy retains use of the stock Gadgets but turns off all others.

Microsoft introduced the world to desktop Gadgets in Windows Vista and also made them a feature of Windows 7. Gadgets are little desktop elements that can display just about any information that can be displayed using XML, HTML, and image files.

Anyone with administrative privileges can uninstall a gadget from a Windows 7 computer. Uninstalling a gadget from Windows 7 affects anyone else using that gadget. Luckily, Microsoft makes it easy to both uninstall and reinstall the gadgets that ship with Windows.

It is good administrative practice to warn other users of the computer that you are about to do something that will affect them. Many people try to streamline Windows by eliminating any elements not used or needed.

However, gadgets are made up of nothing but XML, HTML, and image files that hardly take up any space on the hard drive at all. Rather than do something that may adversely affect others, look for other ways to streamline Windows if you want to make it more efficient or if you need the hard drive space for other uses.

Uninstall a Windows 7 Gadget

To uninstall a gadget from Windows 7, you must be logged in with an account that has administrative privileges. Before you uninstall the gadget, make sure it isn’t currently running on your desktop or any other desktop in an account that is logged in. Now, right click on your desktop and choose Gadgets from the menu.

Right Click and Choose Gadgets fromt the Menu

The gadgets window should now be open. Right click on the gadget’s icon that you want to uninstall and choose Uninstall.

Right Click the Gadget and Choose Uninstall

Windows will ask you to confirm if you want to uninstall the gadget. Click the Uninstall button.

Click the Uninstall Button

The gadget will disappear from the Gadgets Window and will no longer be one of the gadgets that users can display on their desktops.

Reinstall a Windows 7 Gadget

If you or someone else with administrative privileges uninstalled a Windows 7 gadgets and you want to reinstall it, follow these directions. Remember that you can only reinstall default gadgets or gadgets that shipped with Windows 7. To reinstall custom gadgets, you will have to download and install them from scratch.

Begin by clicking on Start and then clicking on Control Panel. In the top right of the Control Panel window, type Restore in the Search Control Panel box and press Enter. The Control Panel window will change its content to those options associated with restoring different features in Windows 7.

Type Restore in Control Panel

Locate the option titled Desktop Gadgets and click the option underneath it titled Restore Desktop Gadgets Installed in Windows.

Reinstall Windows 7 Desktop Gadgets

Immediately, Windows 7 will open up the Gadget window and you will see that all of the default gadgets that shipped with Windows 7 are reinstalled and ready to be placed on the desktop.

Windows 7 was able to reinstall these gadgets so quickly because the operating system doesn’t actually delete them from your computer when you or someone else uninstalls them. Windows 7 simply makes them not appear in the gadgets window. In a sense, they are deactivated rather than actually uninstalled from your hard drive.

One of the best proofreading techniques is to have someone read your work to you so you can hear errors you would not normally see. But, it takes time to find someone you trust enough to read what you write, not to mention most of us who write do so alone.

WordTalk is an add-in for MSWord that reads your documents to you, and even saves them into an MP3 file if you choose.

The program is available from WordTalk.co.uk and is absolutely free. It is designed for people with reading and writing disabilities, but as noted above, it has practical uses for all of us. The complete package is a 50mb download, so those with slower connections will be waiting awhile.

After running the install file in the usual manner, you must click on the newly installed program from the start menu.

wordtalk start A window will appear asking if you want to add the toolbar to Word. Click the first option that says Add WordTalk Toolbar to Word.

add word talk

Now you can open word, click add-ins and see the new toolbar.

wordtalk toolbar

The program is straight-forward and simple to use. The first icon on the toolbar that looks like a chat bubble will start reading your document from where your cursor is placed. The P will just read a paragraph, while the S will read a sentence and the W will read a single word. The crossed-out chat bubble will make the program stop reading, and the speaker icon will record your text as an MP3 or WAV.

In recording an MP3, you will not hear the text read as it records—it just automatically creates an MP3. So, you could save your documents to an MP3 player or cell phone and listen to them in car.

While WordTalk is quite easy to use, some people report receiving Visual Basic and .Net errors. If you encounter these errors, there are solutions on WordTalk’s FAQ.

WordTalk will work with MSWord 2003/XP and 2007. Older versions are not compatible. Foreign language voices will also work with WordTalk if the are installed on your machine.

Although AutoCorrect is a useful feature most of the time, it can produce some strange errors that are more annoying than the errors it is supposed to fix in the first place.

Like most modern word processors, OpenOffice Writer has a built-in AutoCorrect feature that usually works in the user’s favor to reduce or eliminate typos. For the other times, you can learn how to change the AutoCorrect options in OpenOffice Writer to create a more customized experience with the feature.

Why Change AutoCorrect Options?

Publishers of word processors are constantly adding features to their software to make editing text faster and more convenient. Checking your spelling and grammar as you type are passive features that let you choose whether to make the changes suggested by the program. Other features such as AutoCorrect are applied automatically, forcing you to correct whatever errors the feature adds to your document.

One example of an AutoCorrect error occurs when using parentheses. For example, when typing (c) into OpenOffice Writer, AutoCorrect changes it to the copyright symbol or ©. This is OK if that’s what you intended but if you often need a C in parentheses, the feature is more work than it’s worth. Luckily, OpenOffice offers a simple way to change AutoCorrect’s options to make the feature work more like the way you need it to.

Changing OpenOffice Writer’s AutoCorrect Options

To use the example above, we will remove the AutoCorrect feature that automatically changes a C in parentheses into a copyright symbol. Open Writer and click on Format>AutoCorrect>AutoCorrect Options.

OpenOffice Writer AutoCorrect Options

You should now be looking at the AutoCorrect window. Click on the Replace tab and notice that the window displays many different entries. Locate and click on the one labeled (C) and note at the top of the window that (C) is in the Replace box and © is in the With box.

Delete Copyright Symbol AutoCorrect Option

Since we no longer want AutoCorrect to automatically make this change, click the Delete button and the feature will no longer appear in the list of entries. Note that you can do this for any of the entries in the list.

Change AutoCorrect Options in OpenOffice Writer

You can also add entries by placing text in the Replace box and the text you want AutoCorrect to automatically change it to in the With box. Clicking the Replace button adds the entry to the list. If you want to restore the entries to their default settings, click the Reset button and all entries will be restored just as they were when Writer was first installed.

Although the AutoCorrect feature in any word processing program can be a help with typos, there are times when the feature actually adds errors to your document. OpenOffice Writer adds an easy way to change AutoCorrect’s options to stop these errors.

You can even add custom options to AutoCorrect to speed up your creation of a document. One click of the Reset button restores all AutoCorrect options to the way they were before you added or deleted any entries to the list.

A number of newer Linux applications (GNOME Do and Docky are two examples that quickly come to mind), either don’t work, or are less than optimal without using a compositing-enabled window manager.

The best example of a compositing window manager is Compiz. Compiz allows for a great number of 3D effects and animations that add a level of both functionality and yes, fun, to the Linux desktop. Of course, not every computer is able to handle the system load Compiz requires, while other people simply don’t want the GUI effects. But many people still want the nice features and ease-of-use programs like GNOME Do or Docky provide. So what is there to do?

Not everyone is aware of this, but Metacity, the built-in GNOME Linux window manager, offers compositing, although in a very basic fashion. So following this tutorial won’t give you all the neat effects that Compiz offers, but it should use less memory while still allowing those “compositing required” programs to operate.

Use Metacity Instead of Compiz

The first step is to start using Metacity as the window manager instead of Compiz. This is a pretty simple step. First, open up the Run Dialog, by typing Alt-F2 (assuming you haven’t used this guide and changed it to something else).

Run Dialog

When the window appears, type the following:

metacity –replace

This starts Metacity with the command to replace any currently running window manager. If we attempted to start metacity without the “–replace” argument, we would get a warning that metacity could not be started as the current display already has a window manager.

Once this is done, you’ll likely notice one or two things. First is that you no longer have fancy drop shadows behind your windows. This is to be expected, as Metacity – by default – has compositing turned off. Second is that if you were running a program like Docky, it might have thrown a warning message that it requires compositing, and might have actually stopped working. This is fine; when we’re done, we can always restart it.

Turning on Metacity Compositing

This is also pretty simple, and can be done using the Configuration Editor. This isn’t shown by default in many Linux distributions, but can always be invoked by typing the following (again into the Run Dialog):

gconf-editor

This should open up the following window:

Configuration Editor

To get to the Metacity settings, double click the apps entry in the left sidebar to show the list of applications with available settings.

Apps Option in Sidebar

Now scroll down to metacity, double-click it and choose the general option.

Metacity General Options

Finally, scroll down the list of options to the right until you see this:

Compositing Manager Option

To turn on basic compositing, all we need to do is tick the checkbox.

Tick the Compositing Manager Checkbox

Metacity will immediately restart (there may be some flashing or flickering), and when your windows return, compositing will be turned on, and you’ll notice that your drop shadows have returned as well. You can now quit the Configuration Editor. Below is an example of the corner of a window without compositing, and then with compositing, you’ll notice the drop shadow, one of the many benefits of using a compositing window manager.

Without and With Compositing

Remove Compiz

If you think you’ll never use Compiz again, you can remove it from your computer using the package manager. However, a simpler way to do this is by typing the following (into a Terminal):

sudo apt-get remove compiz*

The asterisk ensures that any library or plugin associated with Compiz will be removed, and not simply those that contain “compiz” in their name. When the process is over, go ahead and restart, and your computer will start up as normal, only now it will be using Metacity instead of Compiz.

If, however, you want to keep Compiz installed, you may find that the next time you restart your computer, you’re back to using it instead of Metacity’s built-in compositing. If this is the case, we have one more step, and that is to set Metacity to always run at startup, which will keep Compiz from running as our default window manager.

Set Metacity to Run at Computer Startup

First is to open the Startup Applications window, which can be found under your System menu.

System Menu

Navigate to the Preferences submenu, and finally to Startup Applications.

Startup Applications

Click the Add button, then copy the information shown in the following image:

Add Startup Program

The “metacity –replace” command, just as before, launches Metacity with the option to replace any currently running window manager. With this command, if Compiz is running, it will be replaced by Metacity.

And that’s it! You should now have a computer that uses Metacity’s built-in compositing abilities instead of Compiz. This should free up some system resources, a very valuable thing – especially for those older computers with issues running the more resource-hungry Compiz – while still providing that little bit of compositing required for some programs.