Tips & Tricks, Tutorials, Hacking, Troubleshooting,

While your monitor is probably doing its job, does it ever seem not quite right? Sometimes, our monitors seem to degrade with use. The crystal-clear images we enjoyed when our computers first came out of the box just do not seem as enchanting as they did at first.

There are a number of settings that can be configured to improve the quality of images on your monitor. A Web site called ScreenPerfect can help tweak your monitor’s settings, no downloads required.

screenperfect

Once you arrive at ScreenPerfect’s Web site, click Next on the bottom right of the page. You are then led through a serious of monitor tests with explanations. The first test asks if the colors displayed on the screen are darker at the top than the bottom. If they are, you are instructed to change the physical angle your monitor.
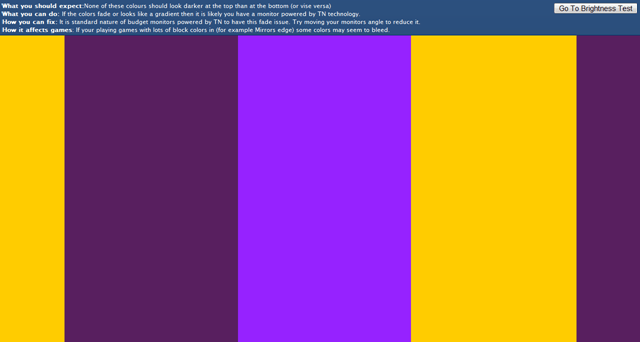
test 1

Once you have angled your monitor so the colors on the screen are the same lightness from top to bottom, click the link at the top of the screen that says Go to Brightness Test.

The brightness test displays horizontal black, white and gray blocks of color. If the colors appear to run together, or are not completely even, you should adjust your monitor’s brightness settings until they are separate and even.

brightness test

When you have adjusted your monitor’s brightness, click the link at the top of the screen that says Go to Gamma Check.

The Gamma Check shows a series of psychedelic circles. You are checking to see if you see a dot in the middle of the circle. If you do not see it, or barely see it, great! But if you do see it, you need to adjust the Gamma settings. ScreenPerfect gives directions at the top of the screen for adjusting this setting on your video card in your control panel.

psychadelic circles

When you are satisfied with your Gamma settings, click the link that says Go to Phasing Check.

The Phasing Check displays the words Phasing Test horizontally on your screen. If you see the letters crystal clear, with no blurring between the white letters and black background, you are in good shape. If there is blur, then you can either edit the phasing and clock of your monitor (if these settings are available to you), or replace the monitor cable.

phasing test

Click the link at the top of the screen that says Go to XOR Test. We are now testing for screen flicker. If you see the screen flicker, you can use the auto-config button on your monitor to calibrate the screen so the image is nice and stationary.

XOR

Finally, click the button at the top right of the screen that says Go to Dead Pixel Fixer. You will receive a warning that this test should not be used by people with epilepsy. If you suffer from epilepsy, it would be a good idea for someone else to perform this test for you. Otherwise, click Continue to Fixer.

Your screen will then flicker several different colors, presumably waking dead pixels. This will work for some computers, but not all. After this runs for a few minutes, you can safely close window. Your screen settings should now be set as best they can be. If you are still unhappy with your screen quality, it is probably time for a new monitor.
Index cards are useful for many things, from making flashcards to study for tests to printing recipes to keep in a nice, neat recipe box. You can print index cards from MS Word easier than you think. All you need is a stack of blank index cards and a printer that will print on them (most will these days).

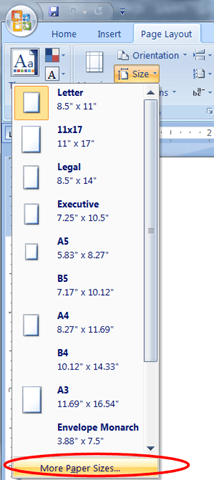
Open Word and select the Page Layout tab. Click Size and then the bottom link in the menu that appears that says More Paper Sizes.

More paper sizes

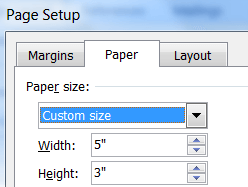
A menu will pop up asking for parameters. In the first drop down menu (labeled Paper Size), choose Custom Size, which is the last selection in the list.

custom size

Now, change the Width to 5” and the Height to 3” (if you are using 4”x6” or larger index cards, the larger number is always the width and the smaller number is the height).

dimensions

The preview in the box at the bottom of the menu should show a 3×5 card. Click OK.

preview

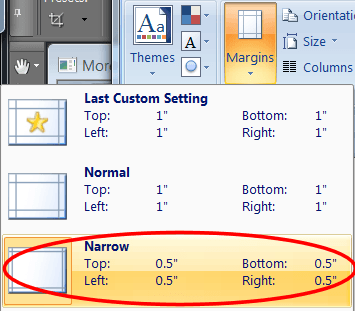
You now have a perfectly typable, printable index card. Now, set the print margins on the card from the default 1” to the Narrow .5” setting by clicking Margins at the top of your screen and then choosing the third one on the list that says Narrow.

narrow margins

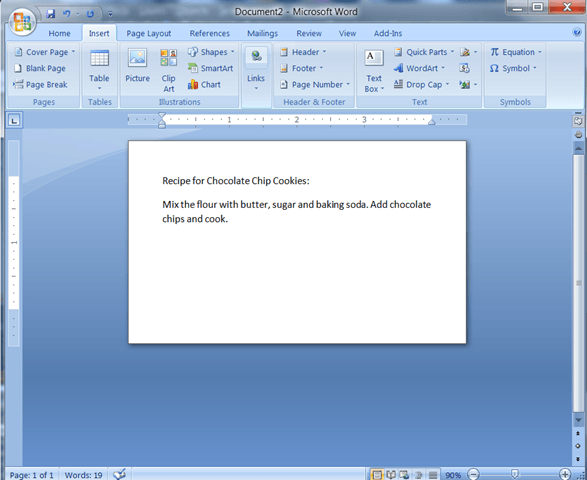
You can now type anything you want on your index card template.

template

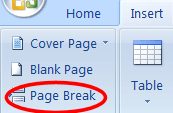
You can make new index cards in this same file by clicking the Insert tab, then Page Break.

page break

Load a stack of index cards in your printer’s print tray (some printers require you to feed one at a time) and print your way to index card happiness.

If you have an iOS device in a Windows environment, sometimes you might want to be able to access your PCs from the device. Here we take a look at Splashtop Remote that makes the process very easy.

For this tutorial we’ll be using an iPad and connect to a Windows 7 Home Premium 32-bit system and XP. The free version only allows you to connect to your computer for only 5 minutes at a time. The upgrade lets you to connect with your iPad, iPhone or iPod Touch over Wi-Fi with no time limits. It also supports connecting with an Android device as well.

1. Head over to Splashtop.com and download the Splashtop Remote for PC – they also have a OS X version in beta. Installation is a breeze following the wizard and accepting the defaults. You can install it on every computer you want to remotely access from your iPad.

sshot-2011-01-25-[22-23-06]

2. After you finish installation, Splashtop Remote launches and you’re prompted to enter in a password twice and click Save.

sshot-2011-01-25-[22-28-43]

3. After you enter in the password you’ll be able to connect to your PC with your iPad

sshot-2011-01-25-[22-29-15]

4. There are also a couple settings like starting it when you start up your PC and redirect sounds to the client and mute the computer.

sshot-2011-01-25-[22-29-27]

5. Under Network you can change the Port number for connecting to the computer.

sshot-2011-01-25-[22-29-38]

6. The Splashtop Remote server app lives in the Taskbar when it’s running.

sshot-2011-01-26-[00-12-57]

7. Now download the Splashtop client software for your iPad either through the iTunes App Store or directly from your device.

sshot-2011-01-26-[16-56-50]

8. After it’s installed go ahead and tap on the icon to launch Splashtop.

sshot-2011-01-26-[17-03-48]

9. You’ll get a list of the computers on your network that have Splashtop software installed. Just tap on the one you want to access.

sshot-2011-01-26-[17-14-38]

10. When it comes up you’ll need enter the access password, then you’re presented with a hints screen showing how to control the remote computer. After you learn the how to control the remote machine, you might not want to see the hints screen all the time and can turn it off.

sshot-2011-01-26-[17-07-17]

11. Tap on the Continue button on the Hints screen and you can start controlling your Windows PC easily from your iPad.

sshot-2011-01-26-[00-52-57]

12. It provides a full QWERTY keyboard you can bring up for typing data into documents, web forms, changing file names…etc..

sshot-2011-01-26-[17-18-13]

13. Here is an example accessing my Windows Home Server through the console from the Windows 7 computer which is a neat ability. Running Splashtop Remote from an iPad is like you’re sitting right in front of your computer.

sshot-2011-01-26-[17-59-04]

14. If you click the setting to have the sound redirect to your iOS device, you’ll have the ability to watch movies, listen to music, play games, and more on the iOS device.

sshot-2011-01-26-[17-48-50]

15. You can also use it with your older XP machines as well…cool!

sshot-2011-01-26-[17-23-10]

Splashtop Remote is one of the coolest and most functional remote solution I’ve used for an iOS device yet. You can try out the limited free version and is only $1.99 after that, which is a great price for such a solid remote access app. There’s a bit of lag when controlling the PCs, but not as much as some other remote access apps.

We’ll be covering more remote access solutions in the future for connecting your iOS devices to Windows so stay tuned.

If you’re a fan of the bookmarks Toolbar in Firefox to keep your bookmarks easily accessible, sometimes you might find there isn’t enough room. Here take a look at a couple ways to create more space for them.

1. Here we take a look at Firefox with several bookmarks on the Toolbar. When you have too many and run out of room, you have to use the dropdown on the right side to access the rest of them which can be quite annoying.

sshot-2011-01-25-[02-50-16]

2. You can try different tricks like shortening the titles of the bookmarks by renaming them to something shorter. Right-click on the bookmark and click Properties.

sshot-2011-01-25-[02-57-31]

3. Then in the Name field change it to something shorter like the initials of the site and then click Save.

sshot-2011-01-25-[02-59-47]

4. If you do that for the bookmarks that for each of the bookmarks that have longer names, you can clear up more space for more bookmarks on the bar.

sshot-2011-01-25-[03-02-10]

5. If you have a large amount of bookmarks on the Toolbar, an even better option is to use a handy Add-on called Smart Bookmarks Bar. Head over to the page and click on Add to Firefox and install it.

sshot-2011-01-25-[03-09-42]

sshot-2011-01-25-[03-11-09]

6. As with all Firefox Add-ons you’ll need to restart it to complete the installation.

sshot-2011-01-25-[03-14-08]

7. After it’s installed take a look at the Bookmarks Toolbar and you’ll notice a remarkable difference with everything much more condensed.

sshot-2011-01-25-[03-17-05]

8. Now by default when you hover over a bookmark icon, it will show the full description. By using this Add-on you can actually go back and rename your bookmarks if it helps you remember what they’re for.

sshot-2011-01-25-[03-20-55]

9. You can change the options by clicking on Tools then Add-ons.

sshot-2011-01-25-[03-22-53]

10. Make sure Extensions is selected, scroll down to Smart Bookmarks Bar, and click on Options.

sshot-2011-01-25-[03-24-44]

11. Now in the Smart Bookmarks Bar Options window you can change the way the bookmarks behave. After you’ve made your selections click OK.

sshot-2011-01-25-[03-27-08]

If you like to use the Bookmarks Toolbar in Firefox and find you’re running out of space, using these tips will help you reclaim more room to add even more bookmarks.

Apple’s Safari browser has not been one of the more popular browsers on Windows. Maybe more people would use it if it had more features available for it. As long as you have at least Safari 5.0.1 or later installed, it is very easy to install and manage extensions.

To find out which version of Safari you have, click the gear button and select About Safari from the drop-down menu.

Selecting About Safari

A dialog box displays showing the version of Safari installed. If the version of Safari listed on the dialog box is NOT 5.0.1 or later, you need to update Safari before continuing with the steps in this post. If you don’t know how to update Safari in Windows, see our post, Update Apple’s Safari Browser in Windows.

To close the dialog box, click the X button in the upper, right corner of the dialog box.

Safari About dialog box

Once you have updated Safari, if necessary, you can use the Safari Extensions Gallery to add functionality to Safari. Open Safari, click the gear button, and select Safari Extensions Gallery from the drop-down menu.

Opening Safari Extensions Gallery

The Safari Extensions Gallery web page opens in either a new tab or a new window, depending on the Preferences set in Safari.

NOTE: By selecting Preferences from the Edit menu and clicking the Tabs button, you can tell Safari to Automatically or Always Open pages in tabs instead of windows, if desired.

Safari Extensions Gallery web page

The extensions are listed in categories. Click on a category to jump to the extensions in that category. We picked the Productivity category.

Selecting the Productivity category

All the extensions are listed on one page, so the page scrolls to the selected category.

Jumped to Productivity category

We chose to install the SafariRestore extension which automatically restores previous Safari browsing sessions. To install the chosen extension, simply click the Install Now button below the extension name and description.

Installing SafariRestore extension

The extension is automatically installed. For some extensions, the associated web page may display in a new tab. Click the X button on the right side of the tab to close the tab.

NOTE: When you close a tab in Safari, the next tab to the left of the closed tab becomes active.

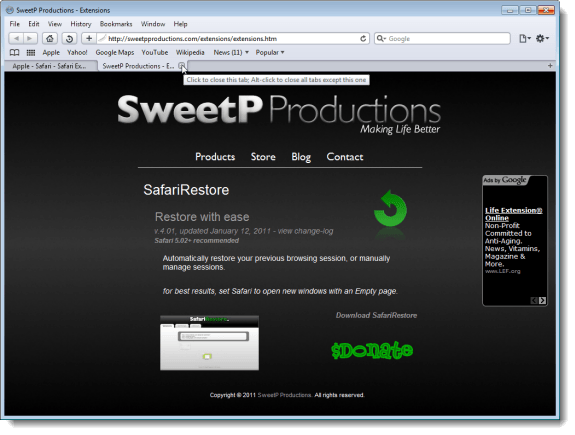
SafariRestore web page

The SafariRestore extension listed on the Safari Extensions Gallery web page now shows the extension to be installed.

SafariRestore installed

The SafariRestore extension installed a button onto the toolbar to access the options for the extension.

SafariRestore Options button

When we clicked the SafariRestore Options button, a new tab opened with three subtabs containing options for and information about SafariRestore. The Sessions tab allows you save and manage your Safari sessions. The Settings tab allows you change settings for SafariRestore.

SafariRestore options open in a tab

You can easily manage your extensions by clicking the gear button and selecting Preferences from the drop-down menu.

Opening Preferences

A dialog box displays, labeled for the currently active screen. To manage your extensions, click the Extensions button. To enable, disable, or uninstall an extension, click on the extension’s name in the list on the left pane on the dialog box. To disable an extension, select the Enable check box so there is NO check mark in the box. If you decide you don’t want an extension anymore, select the extension in the left pane and click the Uninstall button in the right pane. You can also change options for the selected extension in the right pane. Any changes you make to the Extensions screen take effect immediately.

NOTE: To turn disable all extensions, click the OFF side of the OFF/ON slider. To turn re-enable the extensions, click the ON side of the slider.

Extensions screen

Safari does not install updates automatically, by default. If you want Safari to do this, click Updates at the bottom of the left pane on the dialog box and select the Install Updates Automatically check box in the right pane so there is a check mark in the box.

Install Updates Automatically option

To close the Extensions screen on the Preferences dialog box, click the X button in the upper, right corner of the dialog box.

Closing the Preferences dialog box

You can also install third-party extensions you find at other sites with a few more clicks. We found a good list of Safari extensions at the following page on Macworld.

http://www.macworld.com/article/153134/2010/08/25safariextensions.html.

As an example, we downloaded the SuperDrag Safari Extension listed on the above web page. This extension allows you to drag a link anywhere on a web page to open it in a new tab.

Downloading an extension

A dialog box displays asking whether you want to open or save the file. Click Open.

Dialog box to open or save the file

The File Download dialog box may display. If you have unselected the Always ask before opening this type of file check box, you will not see this dialog box. If you want to turn on this option again, see our post, Re-enable Always Ask Before Opening this Type of File Check Box in Windows, for instructions.

File Download dialog box

The zip file opens in an Explorer window. Double-click on the .safariextz file.

Running the extension file

Another dialog box displays asking whether you are sure you want to install the extension. Click Install to continue with the installation.

Clicking Install

No dialog box displays to tell you the installation is finished. You are just returned to the Safari window. You can click the gear button, select Preferences from the drop-down menu, and then click Extensions to see the newly installed extension on the Extensions screen.

Extension installed

There aren’t as many extensions available for Safari as there are for Firefox. However, installing an official extension in Safari is as easy as clicking one button (a few clicks for third-party extensions), faster than in Firefox. Explore some of the useful official extensions for Safari, such as Awesome Screenshot for taking screenshots of web pages, and the Ultimate Status Bar extension, that prevents the status bar from always taking up room at the bottom of the browser. Between the official extensions on the Safari Extensions Gallery web page and third-party extensions you can find on other sites, you can extend the functionality of Safari in useful ways.

If you do a search for Safari extensions, you can find some sites offering free, third-party extensions. Here are a couple of web sites where we found lists of extensions available for Safari: