Tips & Tricks, Tutorials, Hacking, Troubleshooting,

One of the most highly regarded features of Windows 7 is the Snap feature. If you’re working with two windows of information, all you need to do is drag each window to the side of your desktop, and Aero Snap will automatically resize the window to occupy half of the screen.

If you work with multiple documents or applications often, like web developers and technical writers often do, Snap saves you a lot of hassle and time by resizing the windows for you.

If you like Snap, you will love AquaSnap, which expands on the basic Windows 7 features. Not only can you drag windows to each side of your desktop, but you can drag windows to the corners and top or bottom of the window.

AquaSnap Settings

When you drag four windows to the corners of the screen, it automatically resizes each to take up one quarter of the screen. You will notice that when you are dragging a window to the screen corners, a small image appears showing you how your resized window will be oriented on the screen.

AquaSnap Corners

AquaSnap also lets you control window behavior by shaking a window. If you enable the AeroShake window, any window you shake will result in all other windows being minimized. If you enable the AquaShake feature, shaking a window will make that window stay on top of the other windows.

AquaShake

If you enable the AquaGlass feature, the window you are moving will become opaque so you can see what is underneath it.

AquaGlass

AquaSnap takes a great Windows 7 feature and makes it even more useful. It is a small free application that’s compatible with the 64 bit version of Windows 7 and also works on Windows XP.

If you have a large music library, you know how time consuming it can be to keep your tags updated. iTunes has limited tag information and cover art, because it is limited to what Apple has in its catalog.

If you have ripped a lot of CDs or purchased music elsewhere, chances are your tags may not be correct. Manually editing mp3 tags is not an option if you have more than a few hundred files, and chances are you will make mistakes.

Pollux is a low-cost solution to your music tagging problems. It is a very small application that costs $10 per year to use, and does a great job of updating your music’s tags. It works with iTunes, so all you do is fire up your iTunes library, select the songs you want to tag, and choose Tag Selected iTunes Tracks from the Pollux menu in OS X’s menu bar. Pollux uses the track’s fingerprint to identify it and tag it appropriately.

This is what the iTunes library looked like before we started Pollux.

Before Pollux

Pollux went through the tracks we selected one at a time, and applied the correct album art, title, artist, year, track number, and even lyrics. The status screen shows you what track Pollux is editing. If you hide the status screen, you can choose to use Growl notifications on OS X.

Pollux Status Window

This is what the iTunes library looks like after Pollux applied the correct album art and tags.

After Pollux

One of the best things about Pollux is that if the tracks are not tagged correctly once Pollux applies its changes, you can always use Pollux to revert to the original tag information. Select the files you want to revert and choose Undo Tagging of Selected Tracks from the Pollux menu. Pollux will undo all of the changes it made.

Pollux will save you a lot of time and energy by doing what iTunes (and other music management applications) still cannot do. It will clean up your entire collection, and provide you with more accurate tags than you started with.

If you have thousands of mp3s you need to update, Pollux will do it in the background for you, and you can always undo incorrect changes. It will also automatically update new tracks you add to iTunes. Pollux is available for Windows and OS X, and you can try it out on 20 tracks for free.

For people wanting to archive their purchased DVDs, or simply wanting to take a few movies on vacation without bringing along a bunch of fragile disks, ripping a DVD is a good choice.

There are a lot of DVD ripping solutions out there, but if you’re looking for something that works well, is simple to use without giving up functionality, and that works on Mac, Windows and Linux, then Handbrake is the obvious choice.

Installing Handbrake is simple, so won’t be gone over in great detail here. First navigate to the Handbrake home page and click on the download link.

Download Link

Once the download page loads, click to download the Mac disk image or the Windows installer. If you use Fedora, there are 32-bit and 64-bit binaries available, while Ubuntu users can use the provided PPA. If you want the source code, it’s also available. Once installed, you’ll find Handbrake in the usual places.

As mentioned, it’s available for Mac, Windows and Linux, but in this article, all screenshots will use the Linux version, for consistency. The procedures mentioned, however, will work on all versions.

Once you’ve started Handbrake, you’ll see the following window.

HandBrake Main Window

To access a mounted DVD, click the Source button in the toolbar.

Source Button

Then, in the file picker that appears, find the DVD and click OK.

Select DVD

Once you’ve chosen the input DVD, Handbrake will scan it, looking for different titles.

Scanning For Titles

This will bring up more than just the movie, unless the movie is the only thing on the disk. Trailers, special features, anything on the disk will be a title. Typically, however, Handbrake will choose the longest title and select it for you automatically. But if you want to choose a different title, pick it from the drop-down menu.

Choose Title

Once you’ve selected the title to rip, you’ll want to give your ripped file a name, and a location it will be saved.

Name And Save Location

It’s now time to start choosing our audio and video settings. If you want, choose a preset from the side panel. There are many to choose from.

Presets In Side Panel

If you find a preset that meets your needs, you’re finished. Just hit the Start button. Or, if you’ll be performing a number of rips from the same DVD, hit the Add to Queue button. When you’ve added all your items to the queue, then hit the Start button.

Start and Add to Queue buttons

If you’ll be wanting to choose the options for yourself, first choose a container format. Handbrake currently supports either M4V or MKV.

Choose Container

You can also select, by ticking checkboxes, whether the file should be web optimized, will be larger than 4 GB, or if it will be used on a fifth generation iPod.

Once you’ve made that selection, click the Video tab. First, you’ll choose the video codec and framerate, as well as whether or not to use 2-pass encoding (which will take longer but provides better results).

Codec and Framerate

You’ll also select the bitrate for your video. If you want, you can use a quality setting. Lower numbers provide better quality video, while higher numbers offer smaller file sizes. Or if you have a size in mind (this is a good option for when you want to fit your rip to a particular size, like a CD), choose a target file size.

Bitrate File Size and Quality

It’s now onto the Audio tab. Here you can select from any available audio track on the DVD. You can encode it to a new format (such as AAC or MP3), give it a new bitrate (to squeeze more audio into less space), change the sample rate (for DVD Audio playback), remix it to stereo, surround sound, and more.

Audio Options

Now it’s onto Subtitles. This probably won’t be an option you’ll use with every DVD rip, but if you want, you can add a subtitle track to the rip. You can choose to burn in the subtitles (so they’re a part of the picture, and can’t be turned on or off), set them as the default option, or select them only when forced.

Subtitle Options

The next tab is called H.264 and offers a multitude of options related to the H.264 codec. This is a rather in-depth and detailed page.

H264 Options

In fact, it’s in-depth and complicated enough to be one of those areas where you “look and don’t touch,” for the most part. If you know a particular setting needs to be a certain way for your device (such as a B-Frames setting for an iPod), then this is where to make the change.

After this is the Chapters tab.

Chapters Options

If you’ll want to keep the DVD chapters intact, make sure the checkbox is ticked. If it is off, your resulting file will have no chapter markings.

There’s really only one thing left, and that is the Pictures Settings button (in the top toolbar).

Picture Settings Button

Click it, and you’ll come to an interface like this.

Picture Settings

Here you can resize the final image, crop it, and more. On the Filters tab (not shown), you can change the picture to grayscale, as well as deblock, denoise, detelecine, decomb or deinterlace.

Now… we’re ready to encode. Simply click the Start button (or Add to Queue, just as before), and the process will start. You can click the Show Queue button from the toolbar, and the Handbrake Queue will appear.

HandBrake Queue

When the process is finished, you’ll hear a ding, and your newly ripped DVD file will be in its save location.

Saved File

And that’s it! Handbrake is a great program, that can be simple (choose a preset and click Start), or a bit more detailed. It’s cross-platform, works well on all of them, and is completely free. In all regards, it’s a big winner and a fantastic choice for your DVD ripping needs.

If you have a lot of fields in your Word document that you are not going to be updating, you may want to convert them to plain text. To do this, you will want to easily find your fields by turning on the field shading.

This post shows you how to turn on and off the field shading in Word 2003, Word 2007, and Word 2010. We will also show you the steps to convert fields to plain text, which are the same in all three versions.

Turn On and Off Field Shading in Word 2003

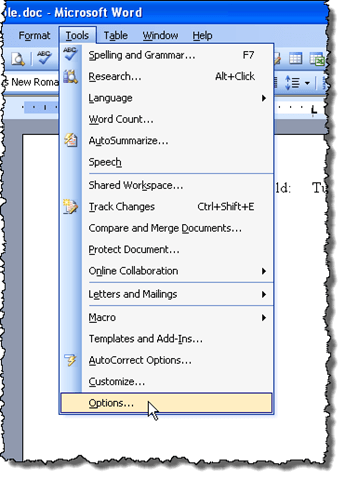
To turn on or off field shading in Word 2003, select Options from the Tools menu.

Selecting Options from the Tools menu in Word 2003

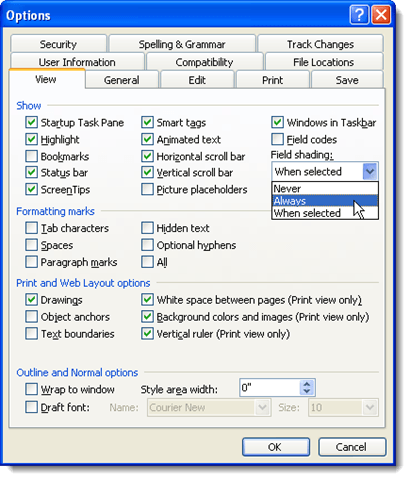
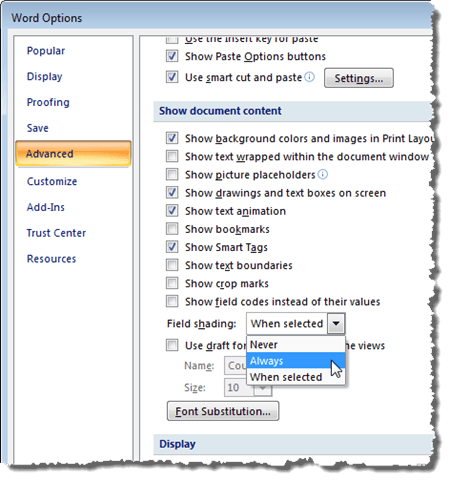
The Options dialog box displays. To turn off field shading, select Never from the Field shading drop-down list. To display field shading all the time, even when the field is not selected or the cursor is not in the field, select Always from the Field shading drop-down list.

This allows you to see your fields in your document at a glance. If you only want to see the field shading when the field is selected, or the cursor is in the field, select When selected from the Field shading drop-down list. This is the default choice when you install Word.

Selecting to Always show the Field shading in Word 2003

Click OK on the Options dialog box to accept your changes and close the dialog box.

Closing the Options dialog box in Word 2003

If you selected Always, you will notice that fields are highlighted even when the cursor is not in the field.

Example of field shading in Word 2003

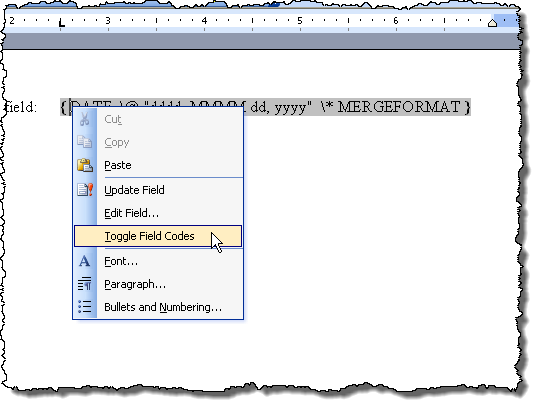
If you see what looks like code in your date field, for example, rather than the date, that means the field codes are being displayed rather than the value of the field. To view the value of the field, right-click in the field and select Toggle Field Codes from the popup menu. You will then see the date, as in the example image above.

Selecting Toggle Field Codes in Word 2003

If some or all of your fields show the field codes, you can display the values of all the fields by pressing Ctrl + A to select all the text in your document, right-clicking anywhere on the text, and selecting Toggle Field Codes from the popup menu.

You may have to select the option twice until the values of your fields display. The fields are all converted to the same state, even if some display field codes and some display values.

Turn On and Off Field Shading in Word 2007 and Word 2010

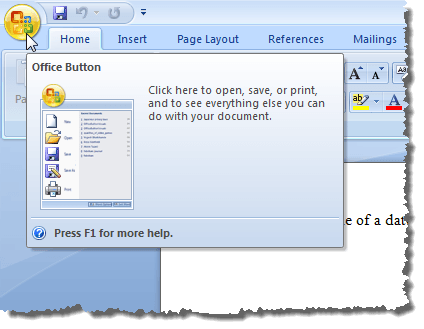
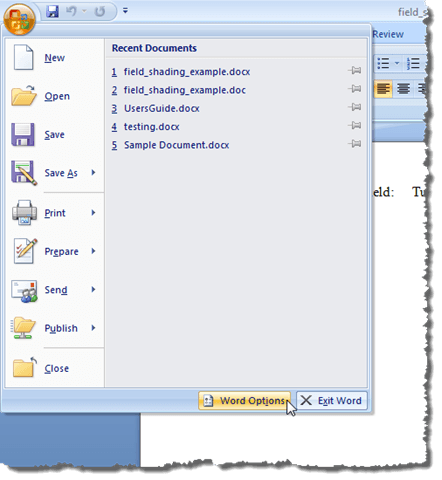
The procedure for turning on or off field shading in Word 2007 is essentially the same as in Word 2010. We will show you the steps for Word 2007 and point out the few differences for Word 2010. To start, click the Office button.

Clicking the Office button in Word 2007

Click the Word Options button at the bottom of the Office menu.

Clicking Word Options in Word 2007

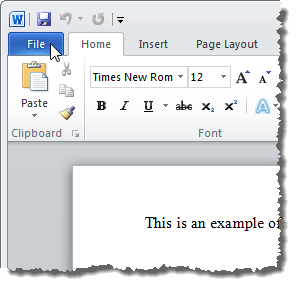
To access Word Options in Word 2010, click the File tab.

Clicking the File tab in Word 2010

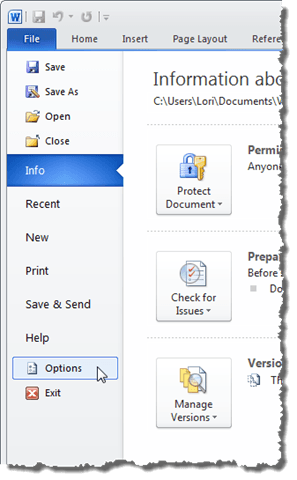
On the File tab, click Options.

Clicking Options on the File tab in Word 2010

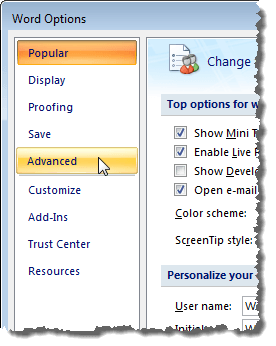
The rest of the steps are the same for Word 2007 and Word 2010. On the Word Options dialog box, click Advanced in the list on the left.

Clicking Advanced on the Word Options dialog box in Word 2007

Scroll down to the Show document content section. Select the desired option from the Field shading drop-down list. The options perform the same functions as described for Word 2003 above.

Selecting to Always show the Field shading in Word 2007

Click OK on the Word Options dialog box to accept your changes and close the dialog box.

Closing the Word Options dialog box in Word 2007

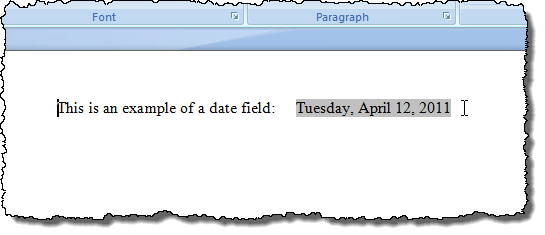
Again, if you selected Always, the field shading displays even if the cursor is not in the field.

Example of field shading in Word 2007

You can toggle the field codes the same way as described for Word 2003 above.

Update Fields

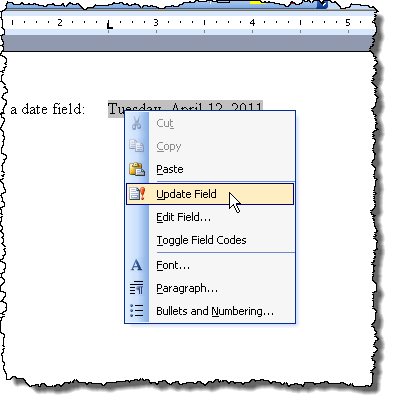
If you decide that you will not need to update a field anymore and you want to convert it to text, you can easily do so. However, first, you should update the field to make sure the value of the field is up-to-date. To do this in Word 2003, right-click on the field and select Update Field from the popup menu.

NOTE: You can also press F9 to update a selected field. If you want to update all the fields in a document, press Ctrl + A to select all the text in the document, including the fields, and press F9. All the fields in the document will be updated.

Updating a field in Word 2003

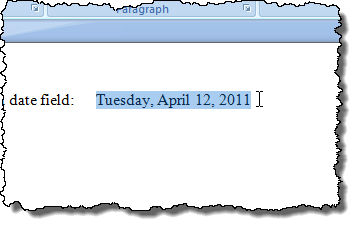
To update a field in Word 2007 and Word 2010, put the cursor in the field and either click the Update button that displays above the field or press F9.

NOTE: You can update all of the fields in your document the same way as described above for Word 2003.

Updating a field in Word 2007

Convert Fields to Plain Text

Converting a field to plain text is done the same way in all three versions of Word discussed in this post. Simply, put the cursor in the field you want to convert to text and press Ctrl + Shift + F9. The field is converted to text as the last value it contained when it was a field.

A field unlinked and converted to plain text

If you change your mind, and want to convert the text back to a field, you can undo the Unlink Fields action by clicking the Undo button on the Quick Access toolbar or press Ctrl + Z.

Undoing the Unlink Fields action

If you want to convert all of your fields to text, you can select all of the text in your document as described earlier in this post (Ctrl + A) and then press Ctrl + Shift + F9. You will then have no more fields in your document.

OpenOffice (and LibreOffice, which is actually the program shown in the screenshots), is a powerful office suite, available for Mac, Windows and Linux. It comes with different applications, which help with a variety of tasks.

It comes with a word processor, spreadsheet, presentation creator, database, drawing program and equation editor. Each is its own separate program, although they each share a fairly similar interface.

And that interface can be a bit messy. Take, for example, Writer, the word processing program. Here is what the toolbars look like, by default:

Default Toolbars

And those are only the two toolbars that are visible! There is an old joke about Microsoft Word, and how each new version seemed to add new toolbars and functions, until there was hardly any room to write. It was funny, because it was true. And it’s true of OpenOffice as well. In fact, if you turned on every available toolbar, it would look like this:

All Toolbars Turned On

Obviously, that’s a bit silly, but even with just the two default toolbars, there are likely some functions you won’t need, while others you do need are buried in the menus. Here’s how to edit them so that the functionality you want is always visible.

The first step is to figure out what particular tools are available, which ones you want to use, and which you don’t need. To figure out the available tools on any particular toolbar, simply move your mouse to the end of any toolbar, and click the navigation button that appears at the end of every toolbar, as shown:

Toolbar Options

What we want from this menu is the list that will appear when navigating to Visible Buttons. Here is the list of options for the Insert menu (not shown by default in OpenOffice).

Insert Menu Visible Buttons

As you can see, certain options, such as Comment, Bookmark and AutoText, are highlighted, so the button is visible on the toolbar. Other items, such as Cross-reference, File and Controls, are not highlighted, so will not be visible on the toolbar.

Making an item visible is as simple as making sure it’s selected in this menu, while hiding an item is as simple as making sure it isn’t selected.

Going through this process, you’ll likely come up with a variety of features that you use, but that you don’t need the buttons for. A good example of this might be bold, italics and underline. In practically any word processor, or almost any operating system, the act of making text bold, italicized or underlined can be accomplished without the toolbar buttons.

Simply type Ctrl-B, Ctrl-I or Ctrl-U (substitute Ctrl with the Apple key if using Mac OS X), to get the required effect. Similarly, Ctrl-O will open a document, Ctrl-N creates a new one, and Ctrl-P brings up the print dialog. Chances are you don’t need these buttons, so why keep them in the toolbar, taking up room and cluttering the interface?

This article isn’t going to provide a recommended toolbar, but with a little bit of thought, you can easily pare down the default toolbar to something a bit sleeker, and more efficient, like this:

Pared Down Toolbar

What was done here was to take the two default toolbars, remove a lot of commonly-used items that can easily be accessed via keyboard shortcuts, and then moving the lower toolbar to the same line as the top toolbar, so that only one line is used. It won’t be perfect for everyone, but something like this can easily be accomplished and will be helpful for most users.

If you’ll only be doing a little bit of adjusting to your toolbars, the way shown is just fine. However, if you’ll want to adjust a lot of toolbar buttons, then choose the Customize Toolbar option as shown.

Customize Toolbar Option

This will bring up a new window where you can accomplish the same thing as outlined above, but by simply ticking and unticking checkboxes.

Customize Window

Finally, when you’ve adjusted all the menus, you can combine multiple toolbars, so they take up less space. Simply grab a toolbar at the far left edge, as shown.

Grab A Toolbar

The mouse cursor will change to a little grabbing fist (not shown), and you can then drag to reposition any toolbar. Toolbars can be above the page, below, or even to the side (vertically). It’s a very customizable interface, and can pretty much be set however you like it.

When you’re done, you can make things even more efficient by locking your toolbars. To do this, right click on any toolbar item and choose the Lock Toolbar Position.

Lock Toolbar Position

You should now have a sleek, slimmed-down toolbar that has only the tools you need on it, and none of the ones you don’t.