Tips & Tricks, Tutorials, Hacking, Troubleshooting,

Although you can search the web from the Firefox address bar, there is a much better way to use the address bar and harness the power of Google at the same time.

CyberSearch is an add-on for Firefox that lets add advanced Google search capabilities to Firefox. With it, you can get results from Google more quickly and find what you are looking for faster.

Firefox and Google Searches

Many people use Google as the default search engine in Firefox. When searching from the address bar, you simply type in your search term and press the Enter key. Firefox then directs you to Google’s website where your search results are displayed on the search engine results page (SERP). About the only thing this process saves you is the trouble of having to go to Google’s website first.

CyberSearch, an add-on for Firefox, brings some features of the SERP to your address bar by allowing you to see the top results for your searches without having to go to Google’s site at all.

When you type a search term in Firefox’s address bar, the results of your search automatically appear allowing you to choose from among the most popular search results. CyberSearch is particularly useful when your searches include popular and high-volume search terms.

Installing and Using CyberSearch

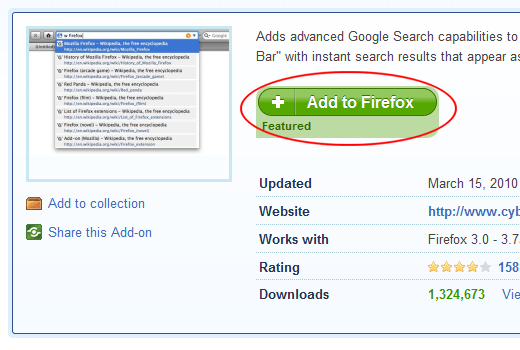
Open Firefox and visit the official CyberSearch page at Mozilla.org. Click on the Add to Firefox button and follow the instructions for installation. Note that after installation, you are prompted to restart Firefox. The add-on won’t work until you do.

Install CyberSearch Firefox Add-on

Once the add-on is installed and you’ve restarted Firefox, CyberSearch is ready to use. Let’s say that you want to search for the term Windows 7 from the Firefox address bar. Type in the search term and notice that CyberSearch automatically shows you the most popular results.

Search Results with CyberSearch

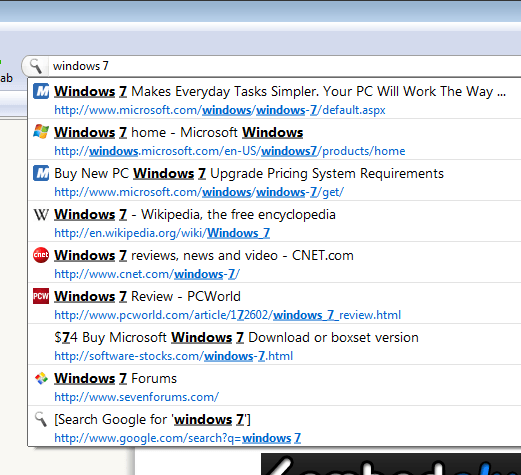
These are the same results you would get on the SERP had you searched for Windows 7 on Google. Note that the results include pages from Microsoft, Wikipedia, CNET, PCWorld, and others.

These are not watered down or filtered results; they are the same you would get at Google.com because they are from Google.com. CyberSearch just conveniently displays them from your Firefox address bar.

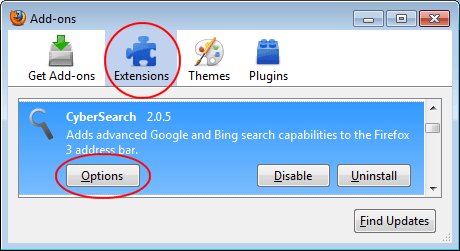
CyberSearch also comes with a variety of options so you can customize how the add-on works and behaves. Click on Tools>Add-ons, click on the Extensions tab, and locate the CyberSearch add-on from the list. Click on the Options button to open the options window.

CyberSearch Options for Firefox

Using the options window, you can set how many results appear during a search, which search service to use, whether the Enter key pulls up the search page, and a number of other options to make using the add-on more convenient. On the Reset tab, you can even restore CyberSearch’s default settings in case you forget which options you’ve changed and which you’ve left alone.

CybserSearch is a convenient add-on that lets you add advanced search capabilities to Firefox. Once installed, you can view Google search results right from the address bar without having to go to the Google website first. CyberSearch is especially useful if you often find yourself searching Google and want to save some time by not having to go to the search engine’s website first.

System Restore is a useful tool that you can use to reset your computer’s settings to an earlier time. It can be very helpful in times of crisis, when your computer fails to work as it should. However, you can only restore your computer’s settings if you have a valid restore point to set it back to.

Although your computer usually automatically creates a restore point every time you install new software, drivers or updates, there’s no guarantee that it will. It’s wise to create a manual restore point before you major changes to your computer’s settings, install software or manually edit the registry.

If turn System Protection off on a disk, all your restore points for that disk will be deleted. If System Restore fails to automatically create a restore point when you turn it back on, you should create a manual restore point. To use System Restore in Windows Vista, you must have about 300 MB of free space on your hard drive.

Your drive must be larger than 1 GB and must be formatted using the NTFS file system, as System Restore cannot protect FAT32 or FAT file systems. System restore restores important files and settings such as system files, installed programs and registry settings. It doesn’t change your personal user files, such as documents, email messages or pictures, stored on your computer.

Creating a System Restore Point on a Disk

Click the Start button, then right click Computer and select Properties. In the left pane, click System Protection.

System Properties

Under Automatic restore points select the drive for which you’d like to create a restore point. Beside You can create a restore point right now for the disks selected above, click Create.

Type a description of the restore point in the field provided. You can use today’s date, or you can type a description of the changes you’re about to make to your computer. For example, describe the software you’re about to install or the edits you’re going to make to the registry. If it works, you will receive a message that the Restore point has been created successfully.

System Protection

Restoring Your Manual Restore Point

Save your work and close all open programs. Click the Start Search box, type System Restore and press Enter. Click Next, then look in the window for your restore point. Your most recent restore point will appear.

Select it and click Next. Review the information under Confirm your restore point and click Finish. System Restore will now restart your computer to return it to the earlier state you chose.

Choose a Restore Point

For more information, read How to enable or disable System Restore in Vista.

One of the many gripes people have had about Microsoft products, at least in the past, has been the lack of customization regarding menus, which led to claims that Microsoft was out to tell us all what to do and how to do it all the time, rather than let us do what we want with the products we buy.

Well, Microsoft has been listening, and now, for the first time, they have made the menu system in Office 2010 completely customizable. Here we describe how to customize the main menu (ribbon) in Word.

First, click on the File tab in the main ribbon to get to the Backstage area:

File Tab - Main Ribbon

Then, click on the Options menu choice:

Backstage Menu

Next, move down and click on the Customize Ribbon option:

The screen should look like this:

Customize Ribbon Screen

This screen is divided into two sides; on the left are possible things you can add to your ribbon, while on the right are the things that are already there. To add something to the current ribbon, highlight it with your mouse, then click the Add button that sits in the middle between the two sides (or if you prefer, simply drag it from the screen on the left and drop it where you want it in the screen on the right).

In similar fashion, you can remove things from the ribbon by highlighting it in the window on the right and then clicking the Remove button under the Add button.

Before you can add any buttons however, you first have to add a new Group to your ribbon, because Word won’t allow you to add or remove commands from the existing groups.

To add a group, first choose which ribbon you want to add the group to, by highlighting it on the right side of the menu. Then click the New Group button at the bottom of the screen:

Here we’ve added a new group under the Insert tab.

Add New Group

Because New Group isn’t exactly a great name, it’s best to rename the group once it’s been created by highlighting the group name and then clicking the Rename button:

Rename button

Once you have the new group created and renamed, the next step is to add commands to it. To do that, click once on any of the commands on the left side of the screen, drag it over to the right side of the screen and drop it on the new group you created.

Add Commands to Group

While adding or removing commands from your ribbon might be just what you need, the best approach is generally to add a new tab to your main ribbon and populate it with the stuff you most commonly use.

To add a new tab to the main ribbon, click on the New Tab button at the bottom of the right side of the screen:

New Tab Button

You should get the following screen:

New Tab Added

Note how the new tab was created and displayed in the center of the right hand screen. And then, because the name New Tab isn’t all that helpful, highlight the new tab by clicking on it, then move down and click the Rename button.

Rename Button for New Tab

Type in the new name for your tab, then press the Ok button. The new tab should now reflect the new name.

Next, notice that when you added a new tab, Word also created a group name underneath it…

Test Tab New Group

…and because the words New Group aren’t very helpful either, highlight it and then move down and click the Rename button again, and give your group name something meaningful.

Test Tab and Test Group

Now you’re ready to start adding stuff to your new tab. To do so, click one of the commands on the right hand side window, and then drag it over and drop it onto the tab you just created.

Note: If an option on the command side of the screen has a “+” next to it, click on it to see the commands under it.

New Tab Commands Added

Once you’ve added the commands you want, click the Ok button at the bottom right hand side of the screen, and just like that, you now have a new tab on your ribbon with all of your most used and favorite commands on it.

New Tab in Ribbon

…and when you click on it, you’ll see your new commands added to it:

Contents of new Tab

The ability to customize the ribbon in Word allows you to make your ribbon look the way you want it, which should help make you more efficient when using Word.

Note: If you regret your customizations, click the Reset button at the bottom of the screen.

If your children will be using your Windows Vista computer, you can protect them by using Parental Controls. Windows Vista Parental Controls can control which websites your children can access, what games they can play, when they can use the computer and which programs they can run.

To effectively set up Parental Controls for a child’s account in Windows Vista, you must first protect your administrator accounts with a password. Click the Start button and Control Panel. Under User Accounts and Family Safety, click Add or remove user accounts.

Click the icon for each administrator account on your Windows Vista computer. Select Create a password. Type a strong password of with at least 8 characters which consists of both letters and numbers. Then type a hint that will help you remember your password if you forget it. Click Create password.

Create a Strong Password

Click User Accounts and Family Safety in the address bar. If your child doesn’t already have an account on your Windows Vista computer, select Add or remove user accounts, then click Create a new account. Type a name for the child’s account. Select Standard account as the account type and click Create account.

Create a Child's Account

Click Manage Accounts in the address bar and select Set up Parental Controls. Select your child’s account from the list.

Set Parental Controls

Under Parental Controls, click On, enforce current settings. Under Activity Reporting, ensure that On, collect information about computer usage is checked.

Set Parental Controls Options

Click Windows Vista Web Restrictions. In this screen, you can choose to block certain websites and content or to allow all websites and content. You may also click the Edit the allow and block list link to allow or block specific websites.

If you’re setting up the computer for a younger child or if your child has a tendency to visit inappropriate websites, check the box beside Only allow websites that are on the allow list. Otherwise, choose a web restriction level for the Parental Controls under Block web content automatically.

The High web restriction level will block all websites except those which are specifically approved for children. The Medium web restriction level blocks unrateable web content and other content that is inappropriate for children, such as mature content. You may also choose to block web downloads by checking the next box. Click OK.

Web Restrictions

Click Time Limits, then click and drag your mouse over the hours when your child should not use the Windows Vista computer. The blocks in the graph should turn blue. Make sure to block all hours before 8 or 9 am and all hours after 8 or 9 pm.

If you prefer, you can choose to block your child’s access to the Windows Vista computer at other times, such as during breakfast, lunch or dinner or during times when you or another adult will need the computer.

If the child is on the computer when a blocked hour begins, he or she will be automatically logged off of the computer. When you’re satisfied with the Time Restrictions, click OK.

parentalcontrols6

Click Games to set game restrictions. Game ratings only controls games which are installed on the computer, and cannot block or allow online games. Select Yes if you would like to allow the child to play games on your computer. If not, choose No.

If you’ve chosen Yes, click Set game ratings to choose which games the child can play. Choose whether you’d like to block or allow unrated games. Select Early Childhood for younger children. Select Everyone for children under 10 years of age. Choose Everyone 10+ for children between the ages of 10 and 13.

If you don’t mind your child being exposed to some strong language or violence, you may choose Teen for teenagers between the ages of 13 and 17. However, if these things concern you, you may select Everyone 10+ for your teenaged children instead. Click OK to enable your game ratings choice. Click Block or Allow for specific games.

If you’ve chosen to block unrated games, you may allow certain unrated games in this section. Also, if you’ve chosen Everyone 10+ or Teen as your game rating selection, you may block specific games which have violence, language and suggestive themes which you don’t want your child to observe.

The specific games which are currently installed on your computer will appear in this window. Go over each game individually, view its rating and select whether you want to block it, allow it or use the user rating setting you set in the Game Ratings parental controls.

If you’re uncertain whether a specific game is appropriate for children, consider playing it for a few minutes to determine whether you should block it or allow it. When you’re satisfied with your selections, click OK.

Allow or Block Games

Click Allow and Block Specific Programs. If you want to allow your child to use all programs, select User can use all programs. If you want to block programs from running, select User can only use the programs I allow.

Wait for the computer to scan the Program Files folder, then select the allowed programs from the list. If a program is missing, click the Browse button to add it. When you’re finished, click OK.

Allow or Block Programs

You can get more information on this topic at How to block Internet web sites with free parental control software.

The Desktop Cleanup Wizard is a utility that ships with all versions of Windows 7 and is designed to help you keep your Desktop neat and tidy. The utility does this by recommending the removal of old, out-of-date, and unused files and shortcuts currently on your desktop. If you find the Desktop Cleanup Wizard annoying, you can remove it by editing a group policy.

The Desktop Cleanup Wizard

The Desktop Cleanup Wizard is one of those good-intentioned but annoying features Microsoft built in to Windows 7. It’s one of those features that isn’t really useful because if a user wants to clean up the desktop, he/she just does it manually by moving shortcuts and files to the Recycle Bin. Do people really need help cleaning up their desktops?

The most frustrating aspect of the Desktop Cleanup Wizard is the false positives it creates. Icons are apparently deemed old and out-of-date by the wizard in relation to how often other icons and files on the desktop are used.

The result is an automated process that requires too much intervention to be considered automatic. Luckily, you can remove the Desktop Cleanup Wizard from ever appearing by using the Local Group Policy Editor to change just one variable’s value.

Removing the Desktop Cleanup Wizard

Truthfully, you are not going to remove the wizard from the computer; you are simply preventing the wizard from ever popping up again.

Begin by logging into Windows 7 using an account that has administrative privileges. Click on Start>Run, type in gpedit.msc in the Run dialogue box, and click the OK button. If you don’t have the Run command on your Start menu, hold down the Windows key on your keyboard and press the R key.

You should now be looking at the Local Group Policy Editor. In the left hand pane, open User Configuration>Administrative Templates>Desktop. Be sure to click on the Desktop folder rather than expanding it.

Open up Desktop in Local Group Policy Editor

In the right hand pane, locate and double click on an entry labeled Remove the Desktop Cleanup Wizard.

Click on Remove the Desktop Cleanup Wizard

You should now be looking at the Remove the Desktop Cleaning Wizard window. If no one has changed this setting before, the current state should be Not Configured. Click on the Enabled option, click the OK button, and you are done. Note that by selecting Enabled, you are actually disabling the wizard, not enabling it. This is due to how the setting is worded in the negative.

Remove the Desktop Cleaning Wizard from Windows 7

Although the Desktop Cleaning Wizard seems like a good idea, most users of Windows 7 find it annoying when it pops up and not very useful while using it. The most frustrating part is how the wizard decides which files and shortcuts are old and which are still in use enough to keep on the desktop.

The wizard requires so much input from the user that it isn’t much of a wizard at all. Removing the Desktop Cleaning Wizard is an easy way to stop users of Windows 7 from being frustrated by a good-intentioned but ultimately useless utility.

Many Windows 7 applications keep a history of recently opened documents in the File menu or another location. This practice represents a security risk for companies and even home users because the list of recently opened documents is kept in a single location. Learn how to prevent Windows 7 from keeping a history of recently opened documents for all users of the operating system.

Recently Opened Documents and Security

Keeping a list of recently opened documents is one of those good intentioned features added to many Windows 7 applications that actually poses a security risk to users of the operating system. The reason is because Windows keeps a list of all recently opened documents in a single location. That location is:

c:\users\USERNAME\recent

Each person who has an account in Windows 7 has this folder where shortcuts to recently opened documents are stored. Since they are all stored in one location for each user, anyone gaining access to that folder can see all of that user’s recent documents, those that are most likely to contain important and updated information.

Recently Opened Documents in Word

Starting with Windows 2000, all third-party applications written for the operating system and certified by Microsoft are required to adhere to the standard of using this folder as the default location for recently opened documents.

By changing one group policy setting, you can prevent applications from displaying recently opened documents in the File menu or anywhere else. In fact, changing this one setting affects all users of the operating system so administrators don’t have to deal with this issue on a user-by-user or application-by-application basis. The setting even affects the history of documents kept on the Start menu.

Preventing Applications from Keeping a History of Recently Opened Documents

To make the changes to the operating system discussed here, you need to log in to Windows 7 using an account that has administrative privileges. Then, click on Start>Run to open the Run dialogue box.

Hold down the Windows key on your keyboard and press the R key if the Run command does not appear on your Start menu. In the Run box, type in gpedit.msc and click the OK button.

You should now be looking at the Local Group Policy Editor. It is with this editor that you can make system-wide policy changes that affect all users. In the left hand pane, locate the policy settings at User Configuration>Administrative Templates>Start Menu and Taskbar.

Start Menu and Taskbar Local Group Policy Editor

In the right hand pane, locate and double click on the policy titled Do Not Keep History of Recently Opened Documents.

Do Not Keep History of Recently Opened Documents

You should now be looking at the Do Not Keep History of Recently Opened Documents policy window. If no one else has ever changed this policy’s settings, the current option should be set to Not Configured. Simply click on the Enabled option, click the OK button, and you are done.

Enable Do Not Keep Document History

To prevent a security risk, many administrators and home users enable the local group policy that keeps Windows 7 and applications from displaying a history of recently opened documents.

Enabling this policy affects all users of the operating system so it is wise to inform everyone of the change before you change the policy. Some users rely on that application feature and may have trouble finding their documents after the policy is enabled.

The Gadgets Platform introduced in Windows Vista and carried over into Windows 7 is an attempt by Microsoft to add small, convenient apps to the desktop. In work environments, many administrators are charged with the task of removing Windows applications that detract workers from their work. One such element is the gadgets that users have installed themselves. Learn how to turn off user-installed desktop gadgets in Windows 7.

Why Turn off User-Installed Gadgets?

Most users of Windows 7 are familiar with the stock gadgets that ship with the operating system such as the calendar, clock, currency conversion, weather, and others. These gadgets are useful to users in a work environment so most managers are not concerned about these gadgets wasting employees’ time. User-installed gadgets, however, range from entertainment apps such as music players and movie viewers to apps that clog up networks with non-essential bandwidth use.

Consequently, many companies have a policy that forbids users from installing and using gadgets that didn’t ship with Windows 7. This policy is enforced by the system administrators. Rather than police each PC or individual using the PC, it is much easier to enable a group policy at the administrative level that turns off all user-installed gadgets but leaves the stock ones available for use. Luckily, Microsoft built in just such a group policy that is accessed using the Local Group Policy Editor.

Turning off User-Installed Gadgets

Begin by logging in to Windows 7 using an account that has administrative privileges. Click on Start>Run to open the Run dialogue box. If you don’t see the Run command on your Start menu, hold down the Windows key on your keyboard and press the R key. In the Run dialogue box, type in gpedit.msc and click the OK button.

Windows 7 Run Dialogue Box

You just opened the Local Group Policy Editor. This editor organizes various policies into categories so you need to find the policy you are looking for. Locate the folder at User Configuration>Administrative Templates>Windows Components>Desktop Gadgets. Be sure to click on the folder titled Desktop Gadgets.

Desktop Gadgets in Local Group Policy Editor

In the right hand pane, locate and double click on the policy labeled Turn Off User-Installed Desktop Gadgets. Be sure not to confuse this one with the one labeled Turn Off Desktop Gadgets.

Turn Off User Installed Desktop Gadgets

You should now be looking at the Turn Off User-Installed Desktop Gadgets policy window. Unless you or someone else changed this policy’s setting in the past, the policy should be set to the default Not Configured. Click on the Enabled option and click the OK button. Now all users will no longer have access to user-installed Desktop Gadgets.

Enable Turn Off User-Installed Desktop Gadgets Policy

In work environments, many administrators are charged with the task of removing elements and applications from Windows 7 that distract employees from work. Although the stock Gadgets that ship with Windows are generally considered useful, gadgets installed by individual users can include music players, movie viewers, and a number of other time wasters.

Turning off user-installed Desktop Gadgets using a group policy retains use of the stock Gadgets but turns off all others.

Microsoft introduced the world to desktop Gadgets in Windows Vista and also made them a feature of Windows 7. Gadgets are little desktop elements that can display just about any information that can be displayed using XML, HTML, and image files.

Anyone with administrative privileges can uninstall a gadget from a Windows 7 computer. Uninstalling a gadget from Windows 7 affects anyone else using that gadget. Luckily, Microsoft makes it easy to both uninstall and reinstall the gadgets that ship with Windows.

It is good administrative practice to warn other users of the computer that you are about to do something that will affect them. Many people try to streamline Windows by eliminating any elements not used or needed.

However, gadgets are made up of nothing but XML, HTML, and image files that hardly take up any space on the hard drive at all. Rather than do something that may adversely affect others, look for other ways to streamline Windows if you want to make it more efficient or if you need the hard drive space for other uses.

Uninstall a Windows 7 Gadget

To uninstall a gadget from Windows 7, you must be logged in with an account that has administrative privileges. Before you uninstall the gadget, make sure it isn’t currently running on your desktop or any other desktop in an account that is logged in. Now, right click on your desktop and choose Gadgets from the menu.

Right Click and Choose Gadgets fromt the Menu

The gadgets window should now be open. Right click on the gadget’s icon that you want to uninstall and choose Uninstall.

Right Click the Gadget and Choose Uninstall

Windows will ask you to confirm if you want to uninstall the gadget. Click the Uninstall button.

Click the Uninstall Button

The gadget will disappear from the Gadgets Window and will no longer be one of the gadgets that users can display on their desktops.

Reinstall a Windows 7 Gadget

If you or someone else with administrative privileges uninstalled a Windows 7 gadgets and you want to reinstall it, follow these directions. Remember that you can only reinstall default gadgets or gadgets that shipped with Windows 7. To reinstall custom gadgets, you will have to download and install them from scratch.

Begin by clicking on Start and then clicking on Control Panel. In the top right of the Control Panel window, type Restore in the Search Control Panel box and press Enter. The Control Panel window will change its content to those options associated with restoring different features in Windows 7.

Type Restore in Control Panel

Locate the option titled Desktop Gadgets and click the option underneath it titled Restore Desktop Gadgets Installed in Windows.

Reinstall Windows 7 Desktop Gadgets

Immediately, Windows 7 will open up the Gadget window and you will see that all of the default gadgets that shipped with Windows 7 are reinstalled and ready to be placed on the desktop.

Windows 7 was able to reinstall these gadgets so quickly because the operating system doesn’t actually delete them from your computer when you or someone else uninstalls them. Windows 7 simply makes them not appear in the gadgets window. In a sense, they are deactivated rather than actually uninstalled from your hard drive.

One of the best proofreading techniques is to have someone read your work to you so you can hear errors you would not normally see. But, it takes time to find someone you trust enough to read what you write, not to mention most of us who write do so alone.

WordTalk is an add-in for MSWord that reads your documents to you, and even saves them into an MP3 file if you choose.

The program is available from WordTalk.co.uk and is absolutely free. It is designed for people with reading and writing disabilities, but as noted above, it has practical uses for all of us. The complete package is a 50mb download, so those with slower connections will be waiting awhile.

After running the install file in the usual manner, you must click on the newly installed program from the start menu.

wordtalk start A window will appear asking if you want to add the toolbar to Word. Click the first option that says Add WordTalk Toolbar to Word.

add word talk

Now you can open word, click add-ins and see the new toolbar.

wordtalk toolbar

The program is straight-forward and simple to use. The first icon on the toolbar that looks like a chat bubble will start reading your document from where your cursor is placed. The P will just read a paragraph, while the S will read a sentence and the W will read a single word. The crossed-out chat bubble will make the program stop reading, and the speaker icon will record your text as an MP3 or WAV.

In recording an MP3, you will not hear the text read as it records—it just automatically creates an MP3. So, you could save your documents to an MP3 player or cell phone and listen to them in car.

While WordTalk is quite easy to use, some people report receiving Visual Basic and .Net errors. If you encounter these errors, there are solutions on WordTalk’s FAQ.

WordTalk will work with MSWord 2003/XP and 2007. Older versions are not compatible. Foreign language voices will also work with WordTalk if the are installed on your machine.

Although AutoCorrect is a useful feature most of the time, it can produce some strange errors that are more annoying than the errors it is supposed to fix in the first place.

Like most modern word processors, OpenOffice Writer has a built-in AutoCorrect feature that usually works in the user’s favor to reduce or eliminate typos. For the other times, you can learn how to change the AutoCorrect options in OpenOffice Writer to create a more customized experience with the feature.

Why Change AutoCorrect Options?

Publishers of word processors are constantly adding features to their software to make editing text faster and more convenient. Checking your spelling and grammar as you type are passive features that let you choose whether to make the changes suggested by the program. Other features such as AutoCorrect are applied automatically, forcing you to correct whatever errors the feature adds to your document.

One example of an AutoCorrect error occurs when using parentheses. For example, when typing (c) into OpenOffice Writer, AutoCorrect changes it to the copyright symbol or ©. This is OK if that’s what you intended but if you often need a C in parentheses, the feature is more work than it’s worth. Luckily, OpenOffice offers a simple way to change AutoCorrect’s options to make the feature work more like the way you need it to.

Changing OpenOffice Writer’s AutoCorrect Options

To use the example above, we will remove the AutoCorrect feature that automatically changes a C in parentheses into a copyright symbol. Open Writer and click on Format>AutoCorrect>AutoCorrect Options.

OpenOffice Writer AutoCorrect Options

You should now be looking at the AutoCorrect window. Click on the Replace tab and notice that the window displays many different entries. Locate and click on the one labeled (C) and note at the top of the window that (C) is in the Replace box and © is in the With box.

Delete Copyright Symbol AutoCorrect Option

Since we no longer want AutoCorrect to automatically make this change, click the Delete button and the feature will no longer appear in the list of entries. Note that you can do this for any of the entries in the list.

Change AutoCorrect Options in OpenOffice Writer

You can also add entries by placing text in the Replace box and the text you want AutoCorrect to automatically change it to in the With box. Clicking the Replace button adds the entry to the list. If you want to restore the entries to their default settings, click the Reset button and all entries will be restored just as they were when Writer was first installed.

Although the AutoCorrect feature in any word processing program can be a help with typos, there are times when the feature actually adds errors to your document. OpenOffice Writer adds an easy way to change AutoCorrect’s options to stop these errors.

You can even add custom options to AutoCorrect to speed up your creation of a document. One click of the Reset button restores all AutoCorrect options to the way they were before you added or deleted any entries to the list.