Tips & Tricks, Tutorials, Hacking, Troubleshooting,

Most large companies these days have a dedicated support desk for solving technical issues. Employees generally respond favorably to the helpdesk process, where they file a support ticket electronically, and then are free to do other tasks while the problem is resolved.

JazzDesk allows companies and Web sites of any size to create a helpdesk that works in this same way. So long as only one admin account is needed, the service is free.

jazz desk

To start building a helpdesk, click the sign up for free button on the homepage.

signup2

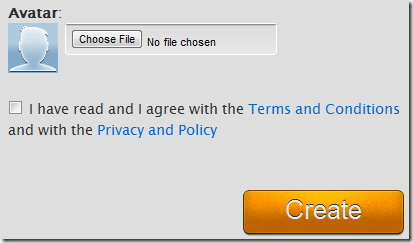
Enter the standard registration information, then upload a picture from your desktop to serve as an avatar and click create.

create2

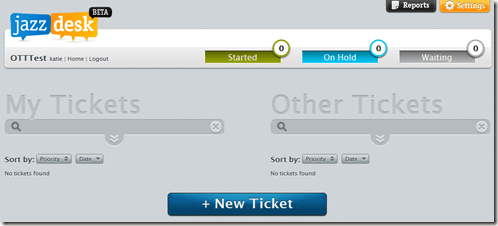
Your helpdesk then loads in the next window. This is where tickets will appear once filed.

helpdesk pic

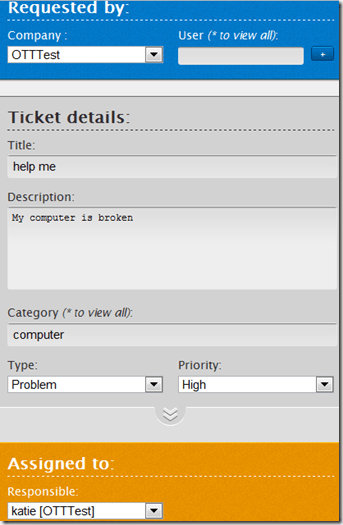
Click New Ticket to file a helpdesk ticket. From the admin point-of-view, the ticket allows you to choose the user in need of help, and also assign the ticket to a staff member (free accounts do not allow staff members).

ticket

Back on the main screen, you can add users by clicking settings at the top right of the screen. Then click the Users tab.

users

Click create user and enter a username and email address for your potential user.

create new user

Users appear in the requester users list. To upgrade a user to staff status, you must purchase a monthly account. Requesters can file helpdesk tickets, but that is all.

requesters

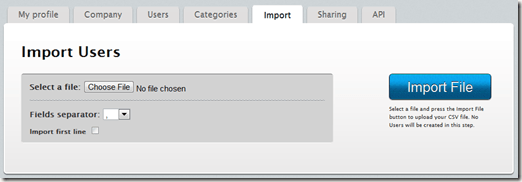
If you have a long list of users, you can import a CSV, XLS or XML file under the import tab. This could save a great deal of time for bigger companies.

import

Overall, JazzDesk is a good starter helpdesk. Since it cannot be installed on a company’s own server, many companies will have security and privacy concerns. But for a Web site or blog with a small staff, JazzDesk is an option worth exploring.

Navigation Toolbar (see our post, Expand Your Viewable Web Page Space in Firefox Using Tiny Menu). Another way to save space is to hide the Menu Bar, using an extension called Hide Menubar, and only show it when you need it using the keyboard or the mouse.

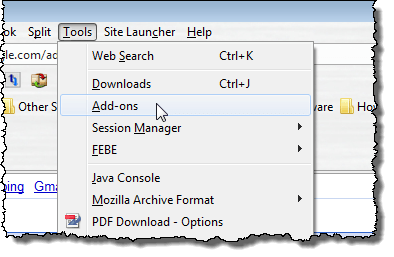
To install Hide Menubar, select Add-ons from the Tools menu.

Selecting Add-ons from the Tools menu

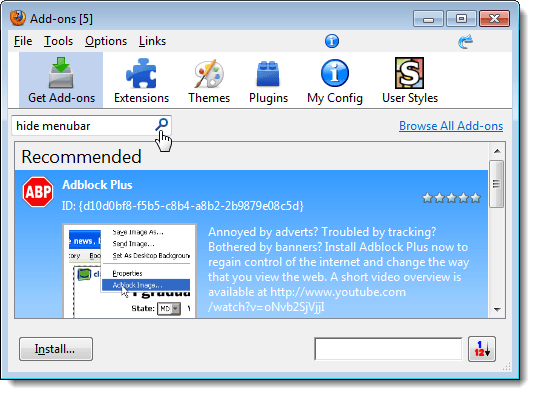
The Add-ons dialog box displays. Click the Get Add-ons button on the toolbar at the top of the dialog box. Enter “hide menubar” (without the quotes) in the search box and either click the magnifying glass or press Enter.

Searching for Hide Menubar

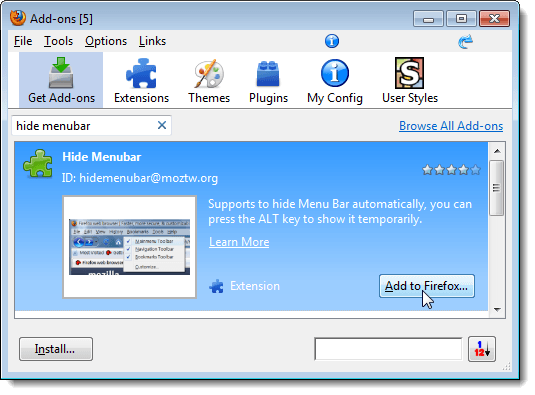
The Hide Menubar extension should be the first item in the list of results. Click on it and then click the Add to Firefox button.

Clicking the Add to Firefox button

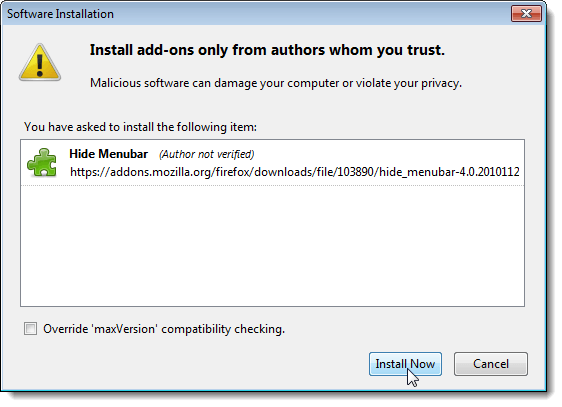
The Software Installation dialog box displays. There may be a countdown on the Install button, depending on your settings. If so, when it is done, click the Install Now button.

NOTE: See our post, Easily Tweak Firefox Configuration Settings Using a Graphical Interface, for information about turning off the add-ons installation delay, if desired.

Clicking the Install Now button

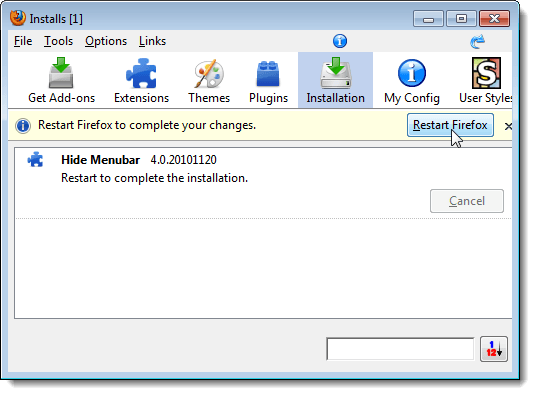
Once the installation is finished, you are returned to the Add-ons dialog box. You must restart Firefox to complete the changes. Click Restart Firefox.

Clicking the Restart Firefox button

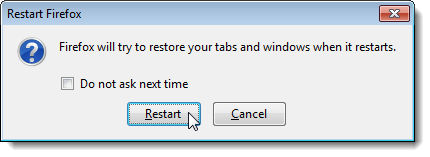
If you have more than one tab open or more than one Firefox window open when you close Firefox, the Restart Firefox dialog box may display, telling you that Firefox will try to restore your tabs and windows when it restarts. If you don’t want to see this dialog box every time you restart Firefox, select the Do not ask next time check box so there is a check mark in the box. Click Restart.

Restart Firefox confirmation dialog box

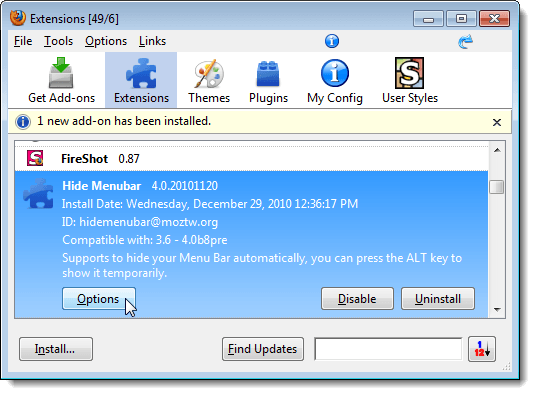
When Firefox reopens, the Add-ons dialog box may automatically display again. If it doesn’t, select Add-ons from the Tools menu to open it. First, we will set the options for Hide Menubar. Find Hide Menubar in the list on the Extensions screen and select it. Click the Options button.

Opening Options

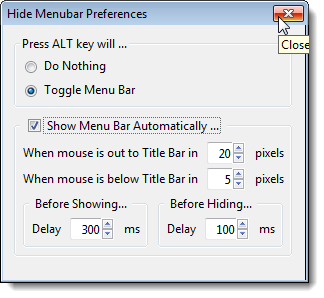
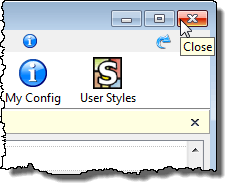
The Hide Menubar Preferences dialog box displays. If you want to use the Alt key to turn on and off the Menu Bar, select Toggle Menu Bar in the Press ALT key will box. You can also choose to Show Menu Bar Automatically by hovering near or on the title bar. Once you have made your selections, click the X button in the upper, right corner of the dialog box to close it.

Hide Menubar Preferences dialog box

You are returned to the Add-ons dialog box. To close it, click the X button in the upper, right corner.

Closing the Add-ons dialog box

To display the menu bar, press either Alt or F10. The Menu Bar displays right below the title bar. If you turned on the Show Menu Bar Automatically check box, you can also hover your mouse over or right below the title bar to display the Menu Bar.

Showing the Menu Bar

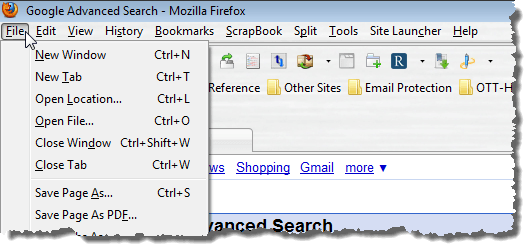
Another very simple option for hiding the Menu Bar is to turn off the Menu Bar using the popup menu on the toolbars and using the Alt key to show it when you need it.

If you have installed a lot of extensions in Firefox, changed or moved around your toolbars and tab bar, and now you’re having problems, you may want to return to the “factory default” settings. There is an easy way to do this.

NOTE: Before resetting Firefox to the default configuration, we recommend that you backup your settings, bookmarks, extensions, etc., in case you want to return to your customized setup. You can use a free program, called MozBackup, to do this. See our post, Backup Firefox and Thunderbird Profiles, for more information.

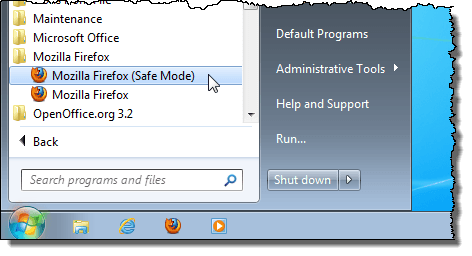
To reset Firefox to the default configuration, open Firefox in Safe Mode. To do this, select the Mozilla Firefox (Safe Mode) shortcut from the Start menu.

Opening Firefox in Safe Mode from the Start menu

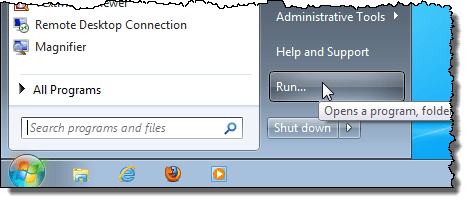
You can also start Firefox in Safe Mode from the Run dialog box. To do this, select Run from the Start menu. If you are using Windows 7 or Windows Vista and the Run command is not available on the Start menu, see our post, Add the Run Command to the Start Menu in Windows Vista and Windows 7, to add it to the Start menu. You can also press Win + R to access the Run dialog box.

Opening the Run dialog box

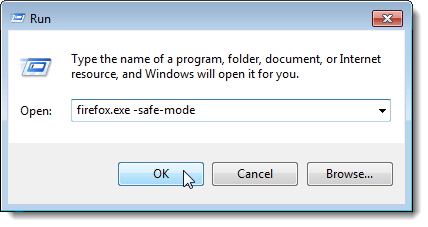
On the Run dialog box, enter the following command in the Open edit box and click OK.

firefox.exe -safe-mode

If this doesn’t work, you may have to enter the full path to Firefox, so enter the following command in the Open edit box and click OK. Be sure to include the quotes if there are spaces in the path.

“C:\Program Files\Mozilla Firefox\firefox.exe” -safe-mode

Opening Firefox in Safe Mode from the Run dialog box

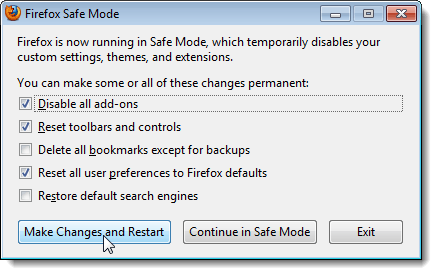
The Firefox Safe Mode dialog box displays. You can select from the following options to reset your Firefox configuration.

NOTE: The following options cannot be undone except by restoring a profile backed up using a backup tool, such as MozBackup. However, if you have disabled all your extensions and themes by selecting Disable all add-ons, these must be re-enabled manually. Restoring a profile does not re-enable the extensions.

  • Disable all add-ons: This option disables all your extensions and themes, but not your plugins. The extensions and themes are only disabled, not uninstalled.
  • Reset toolbars and controls: This option removes any toolbar customizations you made, such as the position of the buttons and toolbars.
  • Delete all bookmarks except for backups: This option deletes all your bookmarks and replaces them with the default set of bookmarks available when you first install Firefox. Any backups you made of your bookmarks are NOT deleted.
  • Reset all user preferences to Firefox defaults: This option sets any changes you made to the Firefox options back to the default settings.
  • Restore default search engines: This option restores any default search engines you deleted.

Once you have made your selections, click one of the following buttons at the bottom of the dialog box:

  • Make Changes and Restart: This button is only enabled if you select one of the check boxes above it and it applies the selected changes.
  • Continue in Safe Mode: This button starts Firefox in its Safe Mode. While you are in Safe Mode, your extensions and themes are disabled, and any toolbar customizations are reverted back to their defaults. However, these changes are not permanent. When you leave Safe Mode by exiting Firefox and then you start Firefox up normally, your extensions, themes, and settings will return to the state they were in before you entered Safe Mode.
  • Exit: This button cancels your attempt to start Firefox in Safe Mode. If you selected any check boxes on the dialog box, these are ignored.

Firefox Safe Mode dialog box

If you made some selections on the Firefox Safe Mode dialog box and clicked the Make Changes and Restart button, Firefox resets the selected options and opens.

Firefox reset

To exit Safe Mode, close Firefox by selecting Exit from the File menu and start Firefox again as you normally would. If Firefox keeps starting in Safe Mode see the following Mozilla Firefox Help article for suggestions on what might be wrong:

Firefox is stuck in Safe Mode | Troubleshooting | Firefox Support

iPhone Dev Team has already released the first beta version of Redsn0w 0.9.7.This beta version comes with a new feature called “Jailbreak Monte” using the “Backup Method“, that allows to jailbreak (untethered) certain devices on iOS 4.2.1.This beta version of Redsn0w will enable you to jailbreak (untethered) iPhone 4, iPad and iPod touch 4G on iOS 4.2.1.

Here is the complete step by step guide to use Redsn0w 0.9.7 b1. Before you proceed, read the following “updated warnings/notes” from iPhone Dev Team:

* This is a beta tester program. It’s not a general release! Things can go very wrong, so please don’t even consider testing if you have pictures or other media on your device that you haven’t backed up!
* For the same reason, please don’t participate if you rely on the ultrasn0w carrier unlock. Wait for the final version!
* Until we fix some sandbox issues with bluetooth, the bluetooth functionality is disabled.

The steps are given below.

Step 1: Create a folder called Pwnage on your desktop and in it place:
- Xcode (also found on your Mac OS X Install DVD)
- MacPorts
- Usbmuxd
- RedSn0w 0.9.7b2
- iOS 4.2.1 (iPhone, iPad, iPod touch)
- iOS 4.2b3 *Only iPhone developers have legit access to this firmware

Step 2: Double click the Xcode dmg to mount it then double click the pkg to install the application.

Step 3: Double click the MacPorts dmg to mount it then double click the pkg to install the application.

Step 4: Open Terminal from Applications:Utilities then input the following. If asked for a password then enter your administrator password.
sudo port install libusb

Once libusb has installed then input the following command: sudo port install cmake

Once cmake has finished installing input the following command: sudo port install pkgconfig

Step 5: Double click the downloaded usbmuxd archive to extract it.

Return to the Terminal window and input the following commands to install usbmuxd: cd ~/Desktop/Pwnage/usbmuxd-1.0.6

mkdir build

cd build

cmake ..

make

sudo make install

Step 6: Disconnect and then reconnect your jailbroken iPhone to the computer via USB. Make sure OpenSSH is installed through Cydia then input the following into the Terminal window:

cd ~/Desktop/Pwnage/usbmuxd-1.0.6/python-client/

chmod +x tcprelay.py

./tcprelay.py -t 22:2222

Step 7: Double click the RedSn0w archive to extract it. Then launch RedSn0w from the extracted folder.

Click the Browse button

Select the iOS 4.2.1 ipsw from the Pwnage folder on your Desktop and click Open.

Click the Next button to continue.

RedSn0w will now prepare the jailbreak data.

You will now be presented with a list of checkboxes.

Select Jailbreak Monte (untether) from the list of checkboxes. You will be asked to select the iOS 4.2b3 ipsw from the Pwnage folder on your desktop then click Open. Click Next to continue.

Please plug your iPhone into the computer and make sure its OFF then click the Next button

RedSn0w will now guide you through the steps to get into DFU mode. You can find more help with DFU mode here

Hold down both the Home button and the Power button for 10 seconds.

Release the Power button and continue holding the Home button until RedSn0w detects the device.

RedSn0w will prepare Jailbreak Monte files, exploit with Limera1n, Upload RAM Disk and Kernel, and Send Jailbreak Monte files.

Notice that during this time usbmuxd will facilitate the connection to your device.

RedSn0w will inform you when it has completed successfully.

That’s all.
Click On Ads To Buy

Download iOS 4.2.1 for iPhone 4, 3GS, 3G, iPad, iPod touch
Download Redsn0w 0.9.7b1 for Mac
Download iTunes 10.1.1 for Mac

Thanks