Introduced in Windows Vista and carried through to Windows 7, the Aero Desktop creates the most visually appealing GUI to date offered by Microsoft. Unfortunately, Aero requires lofty computer requirements and can hog much of your PC’s resources.
In addition, some users find certain aspects of the Aero Desktop annoying but don’t want to turn it off completely and miss out the features they do like. Fortunately, Microsoft lets you take control of many of the individual features that make up the Aero Desktop. Read on to learn how to turn off and on distinct features of the Aero Desktop.
Windows 7 Performance Options
Although labeled as performance options by Microsoft, specific features of the Aero Desktop can be turned off to create a more pleasant computing experience. To make these changes, you must be logged in with an account that has administrative privileges.
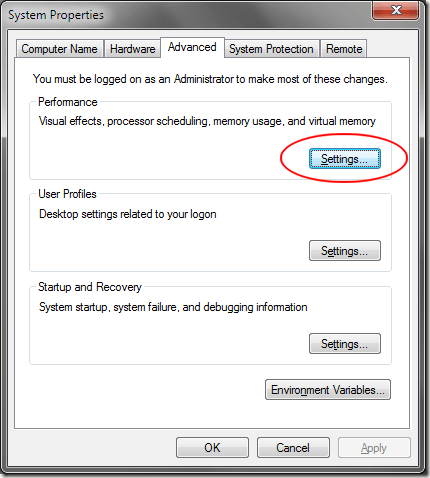
To begin making changes to these features, click on Start and right click on My Computer. Choose Properties from the menu and then choose Advanced System Settings on the left hand side of the Control Panel Home window. In the System Properties window that opens, click on the Advanced tab and then click the Settings button in the Performance section.
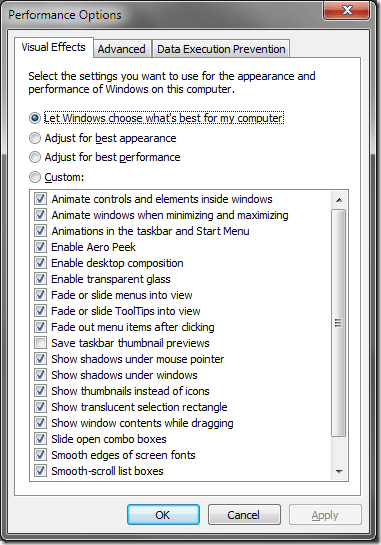
Click on the Visual Effects tab and notice that you have four options available to you. The first option is also the default setting. Titled Let Windows Choose What’s Best For My Computer, this option is the fastest and simplest way to setup Windows 7’s visual effects.
Using this setting, Windows 7 will take into account several of your computer’s capabilities such as your video card, video memory, RAM, and others to determine which visual settings will produce the best visual experience.
The next two options are quick and easy ways to make changes to Windows 7’s visual effects without having to get too technical about which features are turned on or off. Adjust For Best Appearance will turn on most if not all of Windows 7’s visual effects to create the prettiest experience possible.
Adjust For the Best Performance turns off most if not all of the visual effects to speed up your computer and remove a great deal of effects from memory. If you often find yourself running low on memory while using Windows 7, this is the best option for you.
The third option titled Custom allows you to turn off and on each individual visual effect to create a completely customized Windows experience.
Clicking this option gives you access to twenty visual effects from enabling Aero Peek to removing drop shadows around open windows. Luckily, you can apply these settings without having to restart Windows.
Visual Effects Example
You may think that letting Windows make your visual effects decisions for you is the best option but there may be circumstances where you want to just turn off one feature and not sacrifice the rest by turning all effects off.
Suppose that you often take screenshots of open windows and the shadowing around the window that gets captured with the rest of the window is making your screenshots look unprofessional. You can easily turn off just the window shadowing option while leaving the rest of the visual effects untouched.
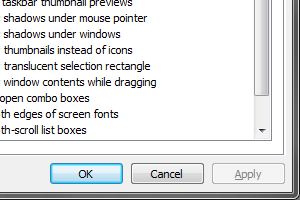
Notice that in the second image above, the lack of shadowing under the window creates a cleaner and crisper screenshot. In addition, keep in mind that changes to Windows 7’s visual effects are not permanent. You can turn a feature off, do what you need to do, and turn it back on with just a few clicks.

No comments:
Post a Comment