Tips & Tricks, Tutorials, Hacking, Troubleshooting,

Among the advances offered to it users, Windows 7’s handling of virtual memory is the most efficient to date. However, as the RAM in a computer increases, so must the size of the pagefile to accommodate the larger capacity of computer memory.

There are several advantages to starting each Windows 7 session with a cleared pagefile. Learn about virtual memory and how to force Windows 7 to clear your virtual memory pagefile whenever the operating system shuts down.

What is Virtual Memory?

The amount of memory you can put into your computer is finite. To make more efficient use of information that your computer must keep track of, Windows 7 uses a small portion of your hard drive to simulate more memory and make memory allocation more accessible by applications.

The amount of hard drive space set aside for virtual memory ranges from zero to about 1 to 2 times the memory you have installed in your computer. There is a lot of debate as to how much memory Windows should set aside for virtual memory but 1.5 times the physical memory in a PC is the general heuristic.

Why Clear Virtual Memory?

When you shutdown Windows 7, the data in your computer’s RAM is lost because PC memory is volatile. This means that once power is cut from the computer all data in the memory is lost. Since virtual memory is stored on the hard drive, what remains in the virtual memory at shutdown will still be there when you start up your computer at your next session.

Virtual memory is quite secure within Windows 7 because only the operating system has the authority to read and write to the virtual memory pagefile. However, there are some security risks involved.

If you dual boot your computer, it is possible for someone to gain access and read data from the pagefile when using the other operating system because Windows 7 isn’t running and can’t protect the file. A lesser threat is the possibility that a virus or other maleware could corrupt or steal the information in virtual memory.

One way to combat this is to simply have Windows 7 delete the virtual memory pagefile whenever the operating system shuts down. The one disadvantage to this is that it can add up to three minutes to your shutdown time as Windows 7 clears the 2 to 16 gigabyte file. The choice to clear the pagefile at shutdown is a question of security vs. convenience.

How to Clear Virtual Memory Pagefile at Shutdown

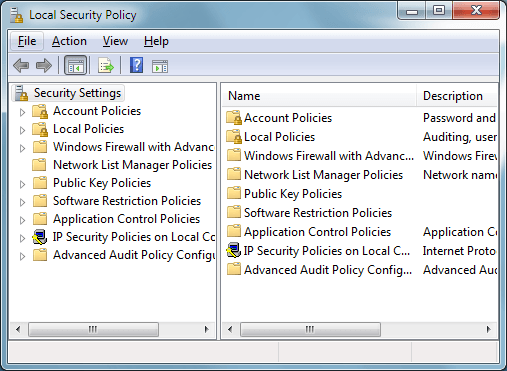
To force Windows 7 to clear the virtual memory pagefile at shutdown, begin by logging in to the operating system using an account with administrative privileges. Then, click on Start>All Programs>Administrative Tools>Local Security Policy. This will open up the Local Security Policy options window.

Windows 7 Local Security Policy

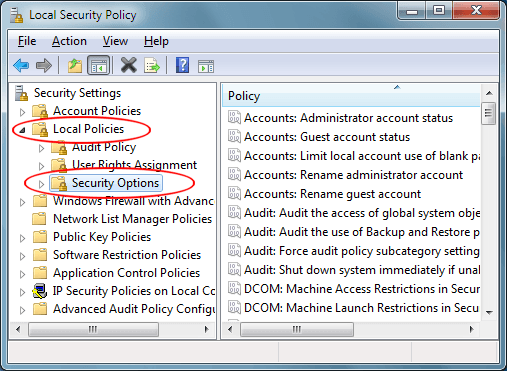
In the left hand pane, click on the Local Polices Folder and then click on the Security Options folder. This will display a variety of local computer security policies from which to choose for your PC.

Windows 7 Local Policies Security Options

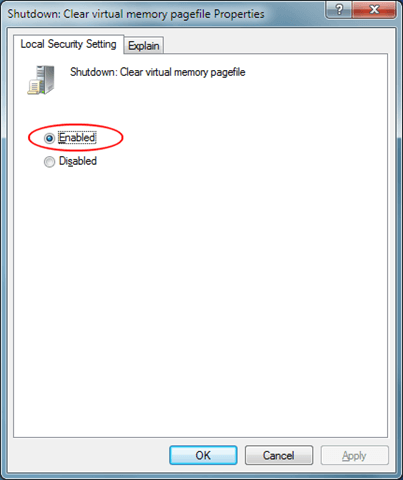
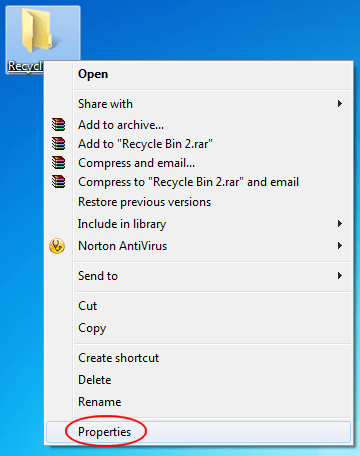
In the right hand pane, locate an option titled Shutdown: Clear Virtual Memory Pagefile. Right click on this option and choose Properties.

Windows 7 Shutdown Clear Virtual Memory Pagefile

On the Local Security Setting tab, choose the Enabled option. Click the OK button and now every time you shut Windows 7 down, your PC’s virtual memory pagefile will be cleared of all data.

Windows 7 Shutdown Clear Virtual Memory Pagefile Properties

The data left in your virtual memory pagefile is a security risk, especially if you dual boot your PC with another operating system besides Windows 7. By forcing Windows 7 to clear your pagefile, you have a more secure computer and there will be no leftover information in your pagefile to slow you down. In fact, many people report a generally better Windows 7 experience when they start each session with nothing in virtual memory.

Internet Explorer has been a major target for spyware and other forms of attack on your computer. If you have stopped using Internet Explorer and have moved to other browsers, you may want to remove it from your system.

However, that is easier said than done, especially in the later versions of Windows. There is no good way to get rid of Internet Explorer without risking doing damage to your Windows system, as well.

It is safer to simply disable it so it cannot visit websites and websites cannot find your computer through Internet Explorer.

There are several ways to disable Internet Explorer, but the method below is simple and easy to reverse and it doesn’t interfere with the operation of Windows Update. It should also work with any modern version of Internet Explorer.

To disable Internet Explorer, select Internet Options from the Tools menu.

Selecting Internet Options from Tools menu

NOTE: If you are using Internet Explorer 7 or 8, you can click also click the Tools button to access the Internet Options. In Internet Explorer 9 Beta, use the the gear button in the upper, right corner of the window.

Selecting Internet Options from Tools button

On the Internet Options dialog box, click the Connections tab. In the Local Area Network (LAN) settings section at the bottom of the dialog box, click the LAN settings button.

Clicking LAN settings button on Connections tab

On the Local Area Network (LAN) Settings dialog box, select the Use a proxy server for your LAN check box. Enter “0.0.0.0” in the Address edit box and make sure the Port edit box contains “80” (all without the quotes). Click OK.

NOTE: Entering the above address, sets up a dummy proxy server that goes nowhere. With this setting, Internet Explorer cannot make an HTML connection to the internet and web sites on the internet cannot connect to your computer through Internet Explorer. The above address is not a magic number; you can use any other dead proxy address. The address above is just a simple one to use.

Setting the Proxy server to go nowhere

You are returned to the Internet Options dialog box. Click OK to close it.

Closing the Internet Options dialog box

Now, when you open Internet Explorer, you will not be able to access any web sites.

Internet Explorer cannot display the webpage

To reverse this setting and be able to access the internet again using Internet Explorer, simply perform the steps above to access the Local Area Network (LAN) Settings dialog box, and select the Use a proxy server for your LAN check box so there is NO check mark in the box. Then, to access a URL you already entered in the address bar, simply press F5 to refresh the web page. Internet Explorer will access the internet again.

The Windows 7 Recycle Bin is great place to temporarily store old files or files you think you won’t need any more. However, if you are afraid that you or someone else might accidentally delete files you may need again, you need a place to store these files until you can make a final decision about whether to delete them or not. Using a trick used by programmers, graphics artists, and video editors, you can create a custom recycle bin in Windows 7 to store old files until you are ready to delete them.

Why Use a Custom Recycle Bin?

Programmers, graphics artists, video editors, and other professionals are used to creating and storing files for later use. The files serve as both a backup and a means to go back and redo some work on a file that didn’t turn out quite right. These professionals know not to delete a file until they are sure they won’t need it again.

Although the Windows 7 Recycle Bin can be used for this purpose, it can be dangerous to temporarily place old files in the Recycle Bin because they can be wiped out so easily with just a click or two. To reduce the danger of unintentionally deleting old files, you can create a folder, change its icon, and treat it like a custom recycle bin where you can store your files until you decide when they can be deleted.

Create a Custom Recycle Bin in Windows 7

Right click on your desktop and select New>Folder from the menu.

Create a New Folder on the Windows 7 Desktop

Name your new folder anything you want. For our purposes, we have named ours Recycle Bin 2. However, any name such as Old Files, Temporary Recycle Bin, or anything else is OK too. Now that you have named the folder, you should give it a custom icon to distinguish it from other folders on your desktop. Right click on the folder and select Properties from the menu.

Select Folder Properties in Windows 7

Click on the Customize tab and then click on the Change Icon button. You can select any icon you want but we chose one that is sure to stand out; one that is unlikely to be treated like any other folder on the desktop. We chose the one that looks like a yield sign.

Choose Icon for Custom Recycle Bin

Choose whichever icon you want and click the OK button. Click the OK button on the Folder Properties window and note that the new folder now uses the icon you just chose.

New Custom Recycle Bin

Note that this custom recycle bin does not operate like the default Windows 7 Recycle Bin. It’s missing the ability to right click on it and choose Empty Recycle Bin from the menu. This is what makes this custom recycle bin more secure. Not just anyone can delete files you may need again.

It is dangerous to use the default Windows 7 Recycle Bin as a repository for old and temporary files. Although many people use it that way, one or two clicks can delete files you may need again. Using a trick used by programmers, graphics artists, and video editors, you can protect temporary files in a custom recycle bin that is nothing more than a standard folder with a custom icon.

There are several ways to run any program with administrator rights, as discussed in our post, Run Programs as Administrator with Full Elevated Rights in Windows 7. However, running a program as an administrator still requires you to go through the User Account Control (UAC) dialog box before the program will start.

You can manually create program shortcuts that allow you to start programs without having to go through the UAC dialog box (see our post, Create an Elevated Program Shortcut that Does Not Display the UAC Prompt).

We have found a free tool, called Elevated Shortcut, that provides a quick and easy method for creating new shortcuts that bypass the UAC dialog box. You can even convert an ordinary shortcut to an elevated shortcut that skips the UAC dialog box.

Download Elevated Shortcut from

http://translate.google.com/translate?js=n&prev=_t&hl=en&ie=UTF-8&layout=2&eotf=1&sl=ru&tl=en&u=http%3A%2F%2Fwinreview.ru%2Fdownload.php%3Fview.67.

NOTE: It is a Russian website and the above link uses Google to translate it. The software is in English.

To install Elevated Shortcut, double-click on the .exe file you downloaded.

Elevated Shortcut installation file

If the User Account Control dialog box displays, click Yes to continue.

NOTE: You may not see this dialog box, depending on your User Account Control settings. See our post, Windows 7 – How to configure UAC (User Account Control), for more information.

User Account Control dialog box for installation file

The Welcome screen on the Setup Wizard displays. Click Next.

Setup Wizard Welcome screen

The Choose Install Location screen displays. If you want to install Elevated Shortcut to a different location other than the default location listed in the Destination Folder edit box, use the Browse button to select another location. We accepted the default location. Click Next to continue.

Choose Install Location

The Choose Install Location screen displays. Select the check boxes for the parts of Elevated Shortcut you want to install. We chose to add a shortcut on the desktop and turned off the option to access the Elevated Shortcut option on the context menu only with Shift. Click Install to continue.

Choose Components

Once the installation is finished, the Completing the Elevated Shortcut Setup Wizard screen displays. Click Finish to close the Setup Wizard.

Completing the Setup Wizard

A dialog box displays asking if you want to visit the home page for Elevated Shortcut. We chose not to and clicked No.

Visit web page dialog box

The User Account Control dialog box may display when you start Elevated Shortcut, depending on your settings, as mentioned earlier in this post. If it does, click Yes to continue.

User Account Control dialog box for running Elevated Shortcut

The Elevated Shortcut main dialog box displays. Click New shortcut to create a new elevated shortcut for a program.

Clicking New shortcut

A dialog box displays allowing you to select a program for which you want to create an elevated shortcut and to specify a folder in which to save the shortcut. Click the Browse () button to the right of the Target path edit box.

Clicking the Browse button for the Target path

The Choose a file dialog box displays. Navigate to the location of the file for which you want to create the elevated shortcut and select the file. Click Open.

NOTE: In addition to creating elevated shortcuts for .exe program files, you can also create elevated shortcuts for .com, .cmd, and .bat files.

Choosing a program file

You are returned to the dialog box for defining the elevated shortcut. To select where to save the shortcut, click the Browse () button to the right of the Folder to store shortcut edit box.

Clicking the Browse button for the Folder to store shortcut

The Browse For Folder dialog box displays. Navigate to the folder in which you want to save the shortcut. We chose to save our elevated shortcut to the desktop. To save your shortcut to the desktop and make it available for all users, select the following path.

C:\Users\Public\Public Desktop

Select this following path if you want the shortcut only available to the currently logged in user, replacing “[username]” with the current username.

C:\Users\[username]\Desktop

If you want to add your shortcut to the Start menu, select the following path:

C:\ProgramData\Microsoft\Windows\Start Menu\Programs

Browse For Folder dialog box

If you want to run the selected program with any special arguments or switches, enter those in the Command line arguments edit box. Click OK to create your new elevated shortcut.

Closing dialog box for creating a new shortcut

A dialog box displays telling you that the operation completed successfully. Click OK to close it.

Operation completed successfully dialog box

The elevated shortcut is added to the desktop. It is named using the same name as the program with “(elevated)” added to the end. Starting the program using this shortcut now bypasses the UAC dialog box.

Elevated shortcut on desktop

You can also modify existing shortcuts to convert them to elevated shortcuts. To do this, click the Modify shortcut button on the main Elevated Shortcut dialog box.

Clicking Modify Shortcut

The Open dialog box displays. Navigate to the folder containing the shortcut you want to elevate and select the shortcut file. To select a shortcut on the desktop or the Start menu, use the paths mentioned earlier in this post. Click Open.

Selecting shortcut to elevate

Again, a dialog box displays telling you the operation completed successfully. Click OK to close it.

Operation completed successfully dialog box

You can also delete any elevated shortcuts you create whether they are created new or from existing shortcuts. To do this, click the Remove shortcut button on the Elevated Shortcut main dialog box.

Clicking Remove shortcut

A dialog box displays, listing all the elevated shortcuts you have created. On our system, we have two of the same shortcuts because we created one new and also from an existing shortcut for the same program. Select the check boxes next to the shortcuts you want to delete so there are check marks in the boxes. Click Delete.

Deleting elevated shortcuts

Click OK to close the dialog box telling you the operation completed successfully.

Operation completed successfully dialog box

Since there is no confirmation dialog box for deleting shortcuts, be sure you want to delete the shortcut before selecting it and clicking Delete.

NOTE: We discovered that when you create an elevated shortcut using Elevated Shortcut, you cannot run that shortcut as administrator (see our post, Run Programs as Administrator with Full Elevated Rights in Windows 7). It seems that converting the shortcut makes it a Windows 7-only shortcut and prevents you from changing the compatibility settings for the shortcut.

Unable to run as administrator for an elevated shortcut

Elevated Shortcut makes it easy to add and remove elevated shortcuts for programs you use often requiring UAC approval.

There are several apps that will allow you to turn your iPhone, iPad or iPod Touch into a remote for media apps, but how about your whole computer? Today we take a look at a free app that let’s you do just that.

1. First head over to the Mobile Mouse website and download the server client software for Windows or Mac. For this tutorial we’ll demonstrate using it on a Windows 7 PC and an iPod Touch 4th generation running iOS 4.2.

sshot-2010-12-27-[03-13-04]

2. Right-click on the installer file and click Run as Administrator.

sshot-2010-12-27-[03-22-36]

3. The Mobile Mouse Server install wizard starts up. Go through the wizard accepting the defaults.

sshot-2010-12-27-[03-23-52]

4. You’ll also need to Bonjour for Windows if it’s not already installed. Again, go through the install wizard accepting the defaults.

sshot-2010-12-27-[03-26-57]

5. You’ll have the option to enter your email address to be notified of updates and special promotions. This step is up to you and it’s not necessary to sign up to use the server software.

sshot-2010-12-27-[03-29-06]

6. Now you can configure the Mobile Mouse Server settings and password.

sshot-2011-01-07-[23-26-34]

7. Next install Mobile Mouse Free either through the iTunes App Store or directly from your device.

sshot-2011-01-07-[20-06-50]

8. After it’s installed just tap on the icon to launch it.

sshot-2011-01-07-[20-12-14]

9. When it launches you have the option to upgrade to the Pro version or not.

sshot-2011-01-07-[20-16-31]

10. Now enter in the password you created on the server to use for the PC you’re controlling with Mobile Mouse.

sshot-2011-01-07-[20-17-52]

11. Your computer should be listed and you can change some of the remote settings to get it working optimally.

sshot-2011-01-07-[20-20-05]

12. The remote starts and you have a Trackpad and Air Mouse and you can control your computer from across the room. You also have a full keyboard with CTRL, ALT, and Windows key to remotely control your computer.

sshot-2010-12-27-[03-56-35]

13. Tap on the yellow arrows to launch the Windows 7 Magnifier which comes in handy if your sitting far away from your screen and want to zoom in on something.

sshot-2011-01-07-[22-44-05]

sshot-2011-01-07-[22-45-17]

14. One of the neat tricks you can do with it is shake your iOS device to hide the keyboard for more real estate for controlling the mouse.

sshot-2011-01-07-[23-40-34]

15. With the free version you get basic control of your computer, but for a lot more features you might want to get the Pro version for only $1.99. Taking a look at the few of the options…you can get a list of a bunch of apps on your system to click on to launch then be able to control it with your iPod Touch, iPhone, or iPad.

sshot-2011-01-20-[22-58-23]

16. Here we launched Windows Media Center and all of the remote controls were populated for easy control.

sshot-2011-01-20-[22-59-22]

The decision to pay for the Pro app is up to you based on how much you use it and amount of functionality you want. You might want to go with the free version for a while and then decide if you need to go Pro. Overall though this is a cool way to control your computer from across the room. Have fun!