File management has come a long way since the introduction of the first fully functional computer operating system in 1956. Since then, computers became more complicated and so has the OS. This obscured file management, and in turn, caused searching for files to be more difficult.
To remedy this, Windows introduced Instant Search (also known as Windows Search) in Vista. This feature allows PCs to search faster. It also gives users more control over what files should be searched and indexed. Your searches are also more personalized. Because of Instant Search’s success, it was continued and applied to Windows 7.
If you want a more customized and powerful search experience in Vista and Windows 7, you can tweak some of Windows Search’s advanced settings.
To begin with, click the Start Button.
![]()
Type the word “performance” on the Start Search box.
![]()
Next, open Performance Information and Tools.

Under Tasks, press Adjust indexing options.

This is Indexing Options’ main interface. Click the Advanced button to proceed.

Advanced Options has two tabs: Index Settings and File Types. First, we will set what’s in Index Settings.
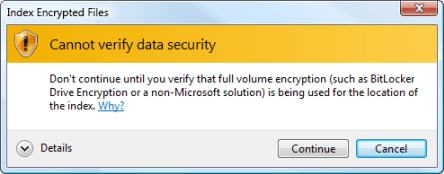
In here, you can include in the indexing process all your computer’s encrypted files. Encrypted files are files with passwords and locks.
You can also tell the system to Treat similar words with diacritics as different words. Diacritics are words with an additional grave or acute mark. They are mostly found in Russian, Arabic, Thai, Hindi, Japanese, and Hebrew languages.

When you check Index encrypted files, you’ll be asked to confirm your action. To proceed, hit the Continue button.
When you enable the diacritics file index setting, you’ll be presented with this window.

If you have trouble with how Windows indexes files on your computer, you can click either the Rebuild or Restore Defaults button.

You can also change the default directory of the index file by clicking Select new.

To finalize all the changes you’ve made, press the OK button.
![]()
The other tab is File Types.
![]()
In here, you can manually select what file types you want to be included in the indexing process. Just check and uncheck the file type you want.
If you would like to be thorough, you can index not only the file’s properties, but also its contents. However, this method will cause the indexing process to slow down. This option should not be enabled especially if you have lots of documents on your computer.

You can also manually add a new file extension to be included to the indexing process.
![]()
For your changes to take effect, click OK.
![]()
Some people have complained that the Windows 7 search simply does not work well. A lot of people I know have said that the Windows 7 search won’t list files on their computer when they perform a normal search.
In this case, your index may not be configured properly. If the search is missing obvious files and documents, make sure the file type is included in the index and make sure to rebuild the index.

No comments:
Post a Comment