If you use Windows 7 now, you have probably used several versions of this operating system, perhaps stretching all the way back to Windows 95. Along the way, you’ve likely amassed quite a collection of old software, some of which you wish you could still use.
Short of dual booting your PC with an older version of Windows or running a virtual computer from within Windows 7, you may think that your old software can’t run on Microsoft’s latest operating system. However, many people have had great luck running old software by using Windows 7’s built in program compatibility troubleshooting application.
Troubleshooting Program Compatibility
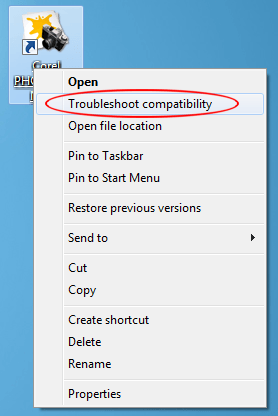
You can access Windows 7’s program compatibility troubleshooting application using either the icon for the program itself or any shortcut to the program. Therefore, there is no need to hunt around your PC for the location of where your old program is installed. Simply use any icon on the Start Menu, on your Desktop, or pinned to your Taskbar. Right click on that icon and select Troubleshoot Compatibility from the menu.
This opens the troubleshooting application and offers you two choices to begin. The two choices are more powerful than they seem when it comes to troubleshooting old programs.

The first option titled Try Recommended Settings is the first option you should try when troubleshooting incompatibility issues with software. Microsoft maintains a large database of program compatibility information covering topics such as known incompatibilities, release dates of software, release dates of Windows versions, and software requirements. Using this information, the first option will choose for you the most likely settings you need to make your old software work with Windows 7.
When you select this option, Windows 7 checks the database and recommends the most likely settings to make your old software compatible with the new operating system. Notice that in our example here, the compatibility troubleshooting application has recommended that this program be run in Windows XP Service Pack 2 Compatibility Mode.
Clicking the Next button automatically sets this option up and then you can click the Start the Program button to test whether this option works for you.

The second option titled Troubleshoot Program walks you through a series of questions designed to custom choose a compatibility scheme that is likely to work best for your old program. When you click on this option, you are faced with one question with four possible answer choices.

It is beyond the scope of this article to walk through all of the possible options here but let’s assume that the problem you are experiencing has to do with permissions to run the old program. Select the option titled The Program Requires Additional Permissions and click the Next button.
Notice that Windows 7 has applied the Run As Administrator compatibility option which will elevate the launching of the program to the administrative level. We can verify this by right clicking on the icon, selecting Properties from the menu, clicking on the Compatibility tab, and noting that the Run As Administrator compatibility option is indeed checked.

Windows 7 wants you to immediately run the program back on the Troubleshoot Compatibility window to verify that this change works. If not, you can walk through the troubleshooting application again to try other options.
Unfortunately, that’s where the Troubleshoot Compatibility application ends. Either the old program works or it doesn’t. If it doesn’t, the application does not walk you through other options. You are on your own to try difference settings until the old program works as expected or you give up trying.

No comments:
Post a Comment